Welcome to part 8 of our tutorial on building a website with Drupal 6. Previously we covered:
Part 1: Introduction
Part 2: Installing Drupal 6
Part 3: Configuring your Site
Part 4: Playing with Blocks
Part 5: Playing with Modules
Part 6: Playing with Themes
Part 7: Installing Modules and Themes
As we go through this tutorials I am building a Drupal resource site called Learn Drupal. In the last tutorial we played we learned where to find and how to install contributed themes and modules. We downloaded and installed the Pathauto module and I promised we would configure it today.
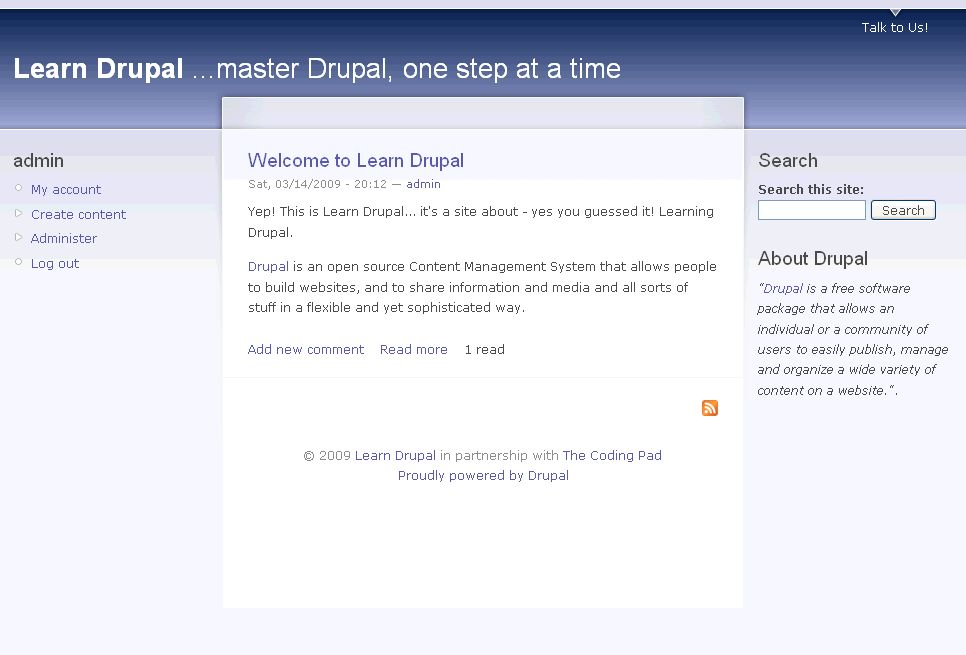
So far our website looks like this: (you can click on the images for a larger view)
In this installment, we’re going to get into the meat and bones of our website, adding content.
In our post about Modules we briefly discussed Content Types, and how you could create more content types directly or by enabling different modules such as the forum module, the blog module, and the poll module. The content types you can create directly by clicking the “Add Content Type” link on your Content Type administration page are pretty simple and limited. However, you can add more flexibility and power to your content by installing the Content Construction Kit module which allows you to create highly customized and complex content types. We’ll be looking at this module in a future tutorial as we create more complex content types for your website.
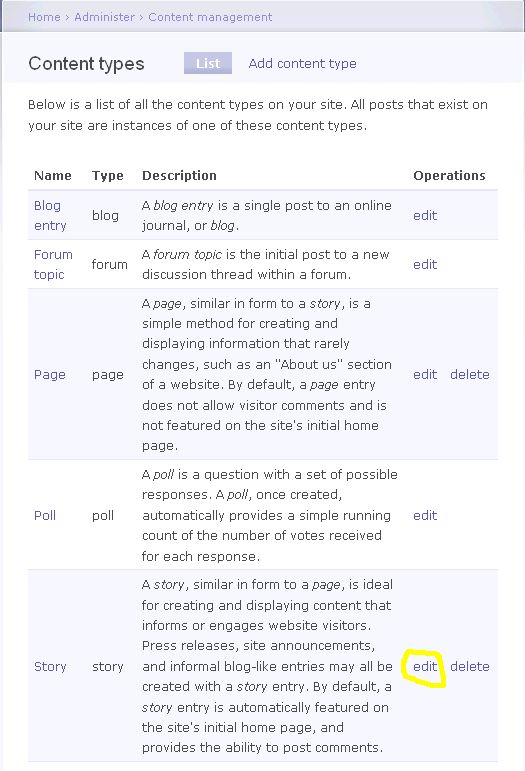
Today, we’re going to customize the content types we have and then create the content we have. Currently, I have five content types, the Blog entry, Forum topic, Page, Poll, and Story. The Page and Story content types come by default in the Drupal install. The Blog Post, Forum Topic, and Poll content types were created when we enabled the Blog, Forum, and Poll modules respectively. So far, we have one Story that we created to add some content to our website.
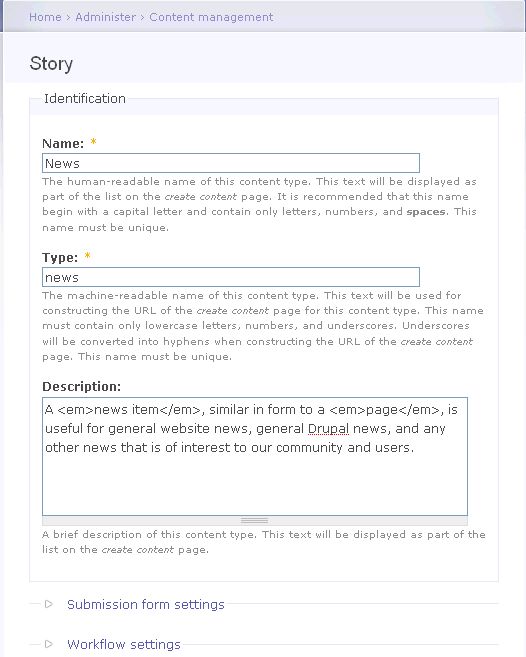
Since this is a Drupal resource site, I don’t need a content type called “Story”. Instead, I am going to convert this content type to one called “News”, and I will use this content type for general website news, general Drupal news, and all that. So under Administer -> Content Management -> Content Types, click on the edit link next to the Story type, and then change the fields as below:
I’ve also changed the description (as well as the name and type) so that any future users of my site who have the permission to add news know what kind of content the news type should hold. I will leave all the other settings as is.
One thing to note is that while I could have deleted the Story type and created a new content type called “News”, I didn’t see any need to. The Story content type was already configured exactly the way I want my News type to be configured, so I just repurposed it.
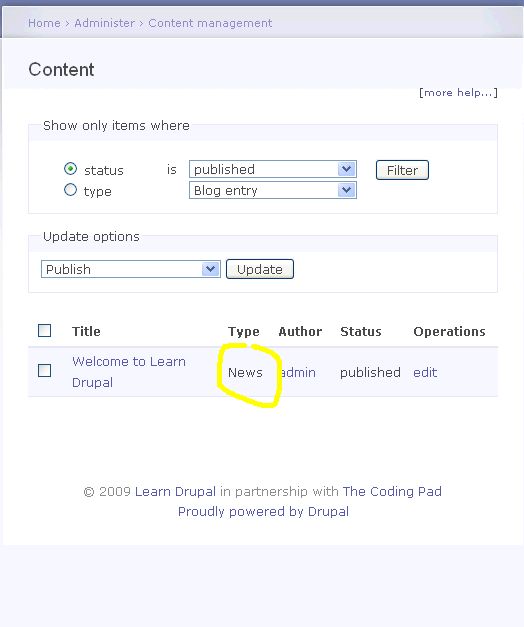
If we now save the content type and go back into Administer -> Content Management -> Content, you’ll see that the “Story” we created before has now been converted to a “News” content type.
I’m now going to add some more content to the website. I already have a Contact Us page that we created when we talked about Drupal 6 Modules. I now want to create some more content. We want to have an “About Us” page that tells visitors to our website is all about, and we want it’s link to appear on the Primary Links. I’m also going to add some more new items. But before we do that, let’s talk a bit about Path and Pathauto.
Configuring Pathauto
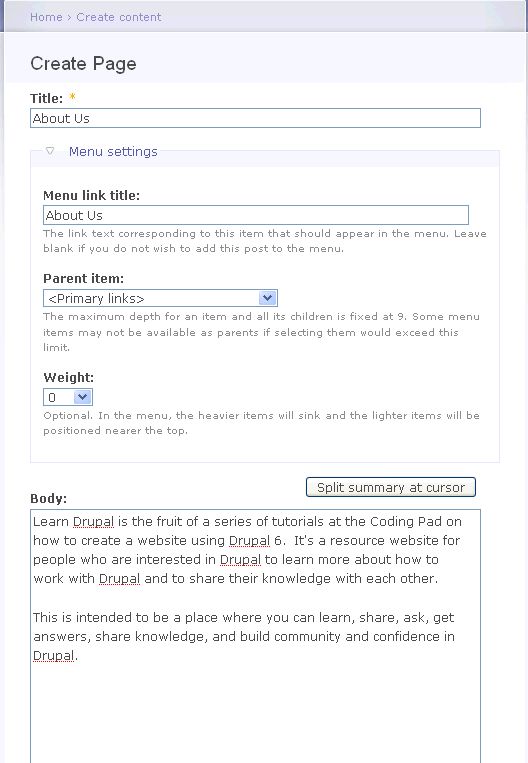
In your navigation panel, click on “Create Content” and then select “Page”. This is what my page will look like.
I’ve put my page title, set the menu settings, and all that. I’m okay with the other settings, I don’t want comments on this page, but this is disabled by default for the Page content type, so that’s cool. I obviously don’t want this content type promoted to the front page, but again that’s disabled by default for the Page type. Pretty cool.
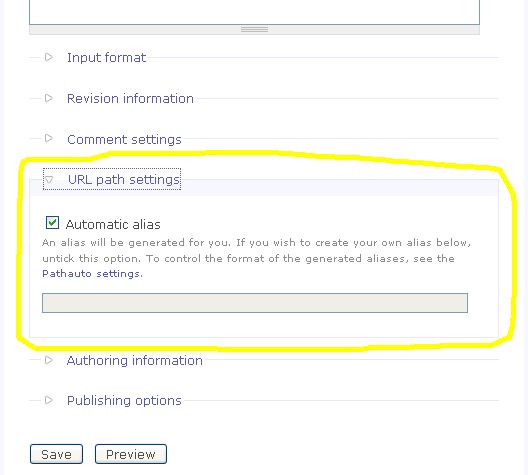
If you scroll down the page and click on URL settings, you’ll see something interesting.
What’s all this about “automatic alias”?? Well, this is the Pathauto module that we installed in the last segment at work!
The Path module allows you to create your own path for your content as you create the content. But the Pathauto module takes this a step further and allows you to configure things so that your urls are created automatically based on rules that you set when you configure the module.
Let’s say for example that you want all page urls to have the format “yourdomainname.com/pagetitle” or “yourdomainname.com/pages/pagetitle”, etc, you can set these automatically so that the urls is correctly created each time you create or someone else creates a page.
If you don’t want the url to be automatically created for a particular page or blog post, or whatever content you’re creating, you can uncheck that little box and manually enter the path you want (making use of just the Path module).
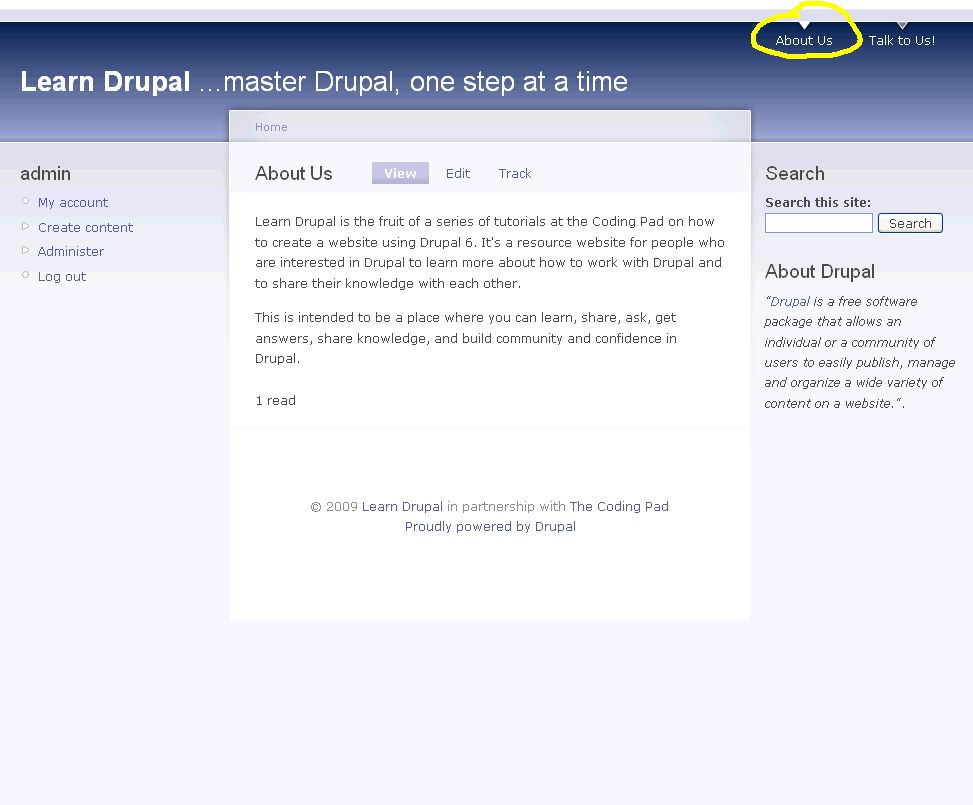
OK, let’s save our page for now. You see a new link at the top of the website, next to the Talk to Us link. Click on it to go to the page.
If you look at the page url, it’s nice and clean, and has been created from our page title. Mine looks like this
Looks good, but I don’t like the /content/ part of it. I want my page urls to simply have the format “mydomainname.com/pagetitle”.
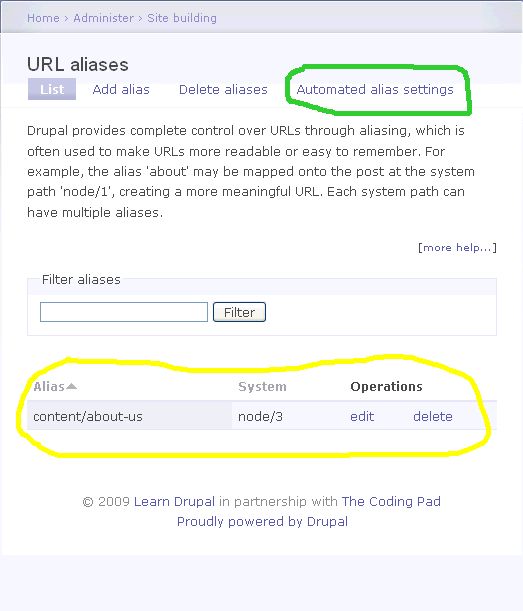
Let’s see how we can make this happen. Go into Administer -> Site Building -> URL Aliases. You can see there the page that we just created is listed with it’s alias as well as it’s node reference.
Click on “edit” and let’s change this to look like we want it to by simply deleting the “content/“. Save and then view the page again, and you’ll see the url now looks like we want it to.
But how do we make sure this kind of url is created automatically each time we create a page?
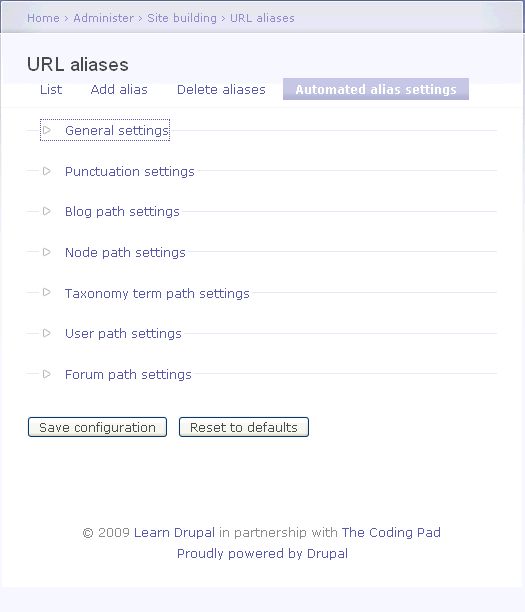
Click on the “Automated alias settings” tab. This is where we do all the configuration.
If you start clicking on and opening all the links (which I suggest you do just to have a look-see), you will probably feel a tad overwhelmed at all the things you can configure, but this ability to configure and fine-tune your urls means you can make your urls as friendly as you want them to be. I won’t go into all the possible things you could do on this page, that would make this post too long to hold your attention. Instead, I will go over what I feel are the most important things to know at this stage in our website development. I will do a different post later dedicated just to the Pathauto module, so make sure you’re subscribed to the blog feed so that you don’t miss it!
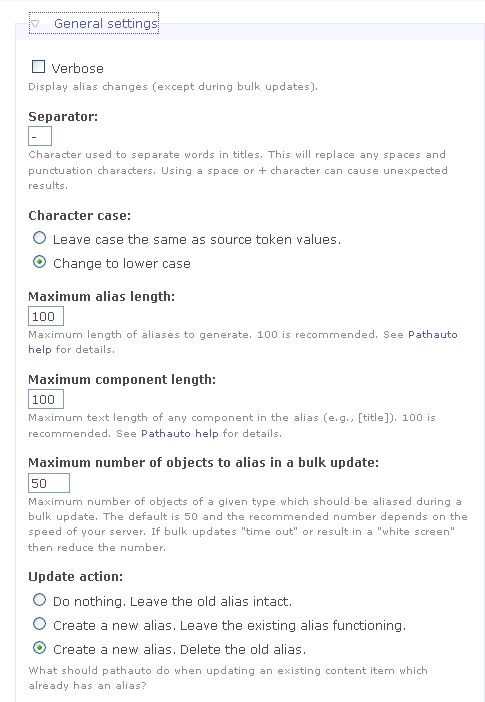
Click on the General Settings tab. This is a good place to start because it looks at some overall settings for our urls.
All the choices are explained, so take some time and read the explanations. I want to highlight two main ones.
Maximum number of objects to alias in a bulk update:
This becomes important if you install and configure Pathauto after you’ve already added content to your site and you need the urls to be changed to the format that you’ve configured in pathauto. In this case Pathauto will alias your urls in bulk, and this setting allows you to set how many urls should be aliased at each update. 50 is the recommended number to avoid bogging down your server. Ofcourse you can tweak this to suit your purposes and server capabilities. I generally recommend that you configure Pathauto before adding too much content to your site so that you don’t have to worry about this.
The update action option asks you what to do with the old alias when the new one is created during an update. I generally choose to delete the old alias, but if your page has been indexed by search engines you may want to leave the old one functioning. Another reason to configure pathauto before your site is too active.
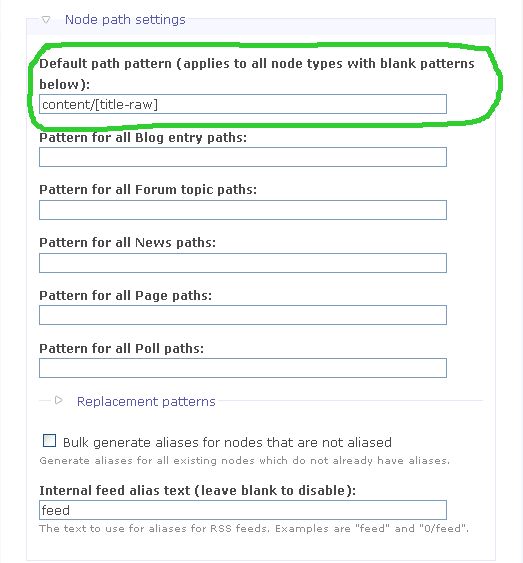
I like my General Settings as they are, and don’t need to change them. You’ll rarely need to change the Punctuation Settings from their default, but I encourage you to look through them to see what they do. We’ll look at the Blog Path Settings, the Taxonomy term path settings, and the User and Forum path settings when we add forum topics, users, taxonomies, and blogs. You’ll generally find that when you add a new content type or add a new module that affects or add content to the website you need to come back to this page to make sure your url alias settings are what you want them to be. The most important settings for us to look at and change at this time are the Node Path Settings, so click on that.
You can see the Default path pattern set to “content/[title-raw]“. What this simply means is that this is the default pattern that will be used for any content types for which you have not specified a particular path. “[title-raw]” is the title that you enter when creating your content, so this would be the page title (e.g. About Us), etc. , with the dash between the us as specified on the General Settings tab, and with punctuation removed according to the Punctuation settings. If you remember, our url for the About Us page had “/content/” in it, and you can now see why.
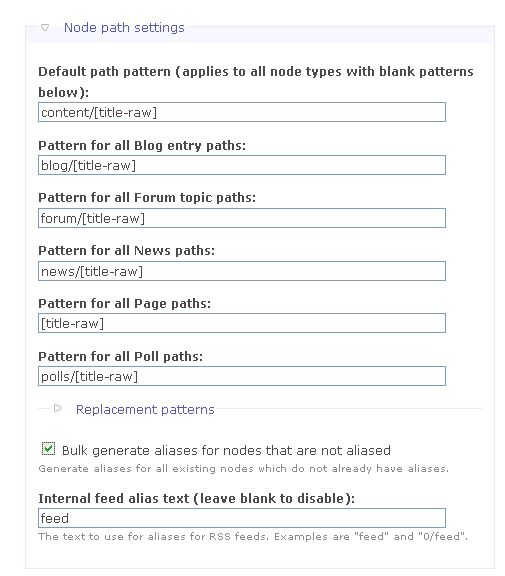
Let’s go ahead and make some changes here. I want my Page path to not have the “/content/” in it, but I want any News items to have “/news/” in it. I’ll go ahead and make the changes I want in the respective fields, leaving the default path pattern as it is.
I have checked the “Bulk Generate aliases for nodes that are not aliased” because the one news item I had created before is not aliased. If we now go to the front page of our website and click on the “Welcome to Learn Drupal” news item you’ll see it’s url looks like this:
You can see the url looks exactly like we specified we wanted, with the “/news” appearing infront of the title. The “to” has been removed as specified in our General Settings in Pathauto for words to be removed from our urls.
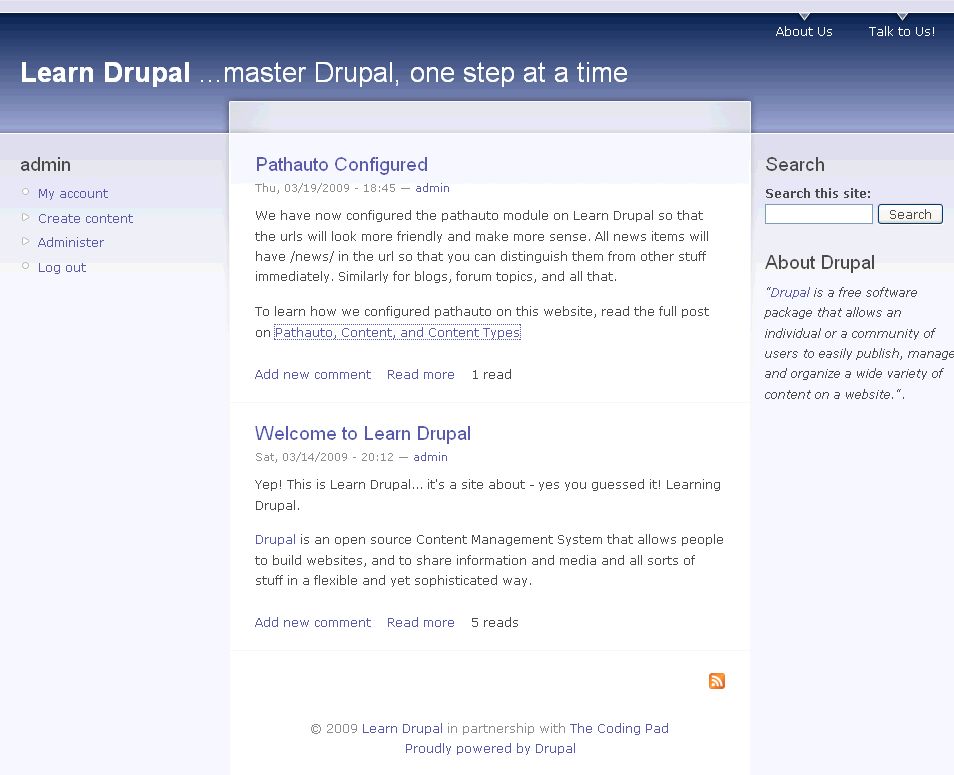
Awesome!! This has been a very brief summary on configuring Pathauto and doesn’t cover all the specifics, but should give you a head start from which you can explore all the configuration options and play with them. We also looked a little more at Content Types, changed the Story type to a News type, and all that. So now our website looks like this:
If you’re observant, you’ll notice that I added a new news item! Pretty sneaky, huh? And look at it’s url! A thing of beauty!
We’ve covered some pretty good stuff today, and I encourage you to continue looking at the Pathauto configuration options. You might find that you want to change some of the general settings, maybe not have so many words left out of urls. You may also have different ideas on how you want your node path patterns to be. Go for it. Pathauto is one of your best friends in creating Drupal websites, and it will serve you well to become familiar with it. That is your homework for today!
In the next installment, we’re going to take some time to look at User Management, setting roles and permissions, and all that good stuff.
Stay tuned!
Great work with this series, I hope you keep updating it. It’s really helpful for me in learning Drupal.
thanks again!
I must say you have the first open source tutorial site that gives one the accurate information to make things work. Example: clean urls. When things get complicated other sites leave students to try to figure it out by themselves. Thanks for your thoroughness.
Kirk
Thanks! 🙂
mary
Many thanks!
Moving forward to the next part.. 🙂
Awesome!
Yesterday I spend the whole day reading different tutorials and not understanding any of them. Today I found yours in the morning and by now (3PM) I have completed “lesson 8” and I have to say that I now feel I can create my own website with Drupal. The way you present everything is perfectly organized, simple, and easy for any beginner to understand!
Keep it up!
Love your tutorials. They are clear, concise and exceptionally organized! Thanks for the great care you put into this. You have a wonderful style. And I’m learning and gaining more confidence with every visit.
Wayne,
thanks for the feedback, much appreciated
mary
Gracias . Me estas ayudando mucho con el sitio de nuestra banda
Saludos
You’re welcome! 🙂
mary
Hello again,
I have quick question here about content type “Page”. How do I disable the author and date/time when you create content. I am trying to create different pages for my other drupal site but I don’t want those two things to show up.
Thank you again for your help.
Go into admin->site building->themes, and click “Configure” at the top so that you see the global configuration settings. You will see “Display post information on”, make sure “Page” is unchecked.
mary
this series has been extremely helpful for me in learning Drupal. I was just about to give up and came across this site. thank you so very much in putting this together it has been a tremendous help.
If any one having trouble creating content I used the link /node/add at the end of the URL…
Michael, you should have a Create Content item in your admin menu so you don’t have to keep typing that into the url. Do you have the admin menu block?
mary
I am not to sure if I have a admin menu block . How would you find that out Mary?
Michael, when you’re in the admin backend, under Site Building, click Menus, then click on the Navigation menu. Make sure that the Administer items are all enabled. Then under Blocks make sure the Navigation block is enabled.
Hope this helps
mary
Thank you for the tutorial, drupal is a nice platform to learn.
Hi Mary – thanks for your response on other query – this is a brilliant series. I have a problem in that my pathauto is not working correctly
http://www.myownhorses.co.uk/?q=nodehttp://www.myownhorses.co.uk/?q=content/about-us
http://www.myownhorses.co.uk/?q=contact
Can you point me in the right direction please. is it to do with file system path – getting very deep for me.
Ta
David
Do you have friendly urls enabled?
What do your pathauto settings look like?
mary
Thank you so much for this series–I spent a week looking for a tutorial that would walk me through the creation of a sample Drupal site with no luck. Finally I found yours and it’s exactly what I needed!
Chris
Thanks for the feedback 🙂
mary
This series is an extremely useful and practical tutorials for us who just walked into the world of Drupal. Thanks so much for your work 🙂
Sir, i m creating the site the way you teach..but i m not getting the links of about us and talk to us at the upper right corner of the page..i have a theme installed PUSHBUTTON on it,is the problem is with this..
Check to see that this region exists in your theme. It might be called something else. Look at the blocks admin page of your theme.
mary
Hello Sir,
i wants to put an editor in my site,for that i have installed required modules and also i enable it,now the editor is not get displayed when i m creatring any content..how can i overcome this..