Welcome to part 4 of our tutorial on building a website with Drupal 6. Previously we covered:
Part 1: Introduction
Part 2: Installing Drupal 6
Part 3: Configuring your Site
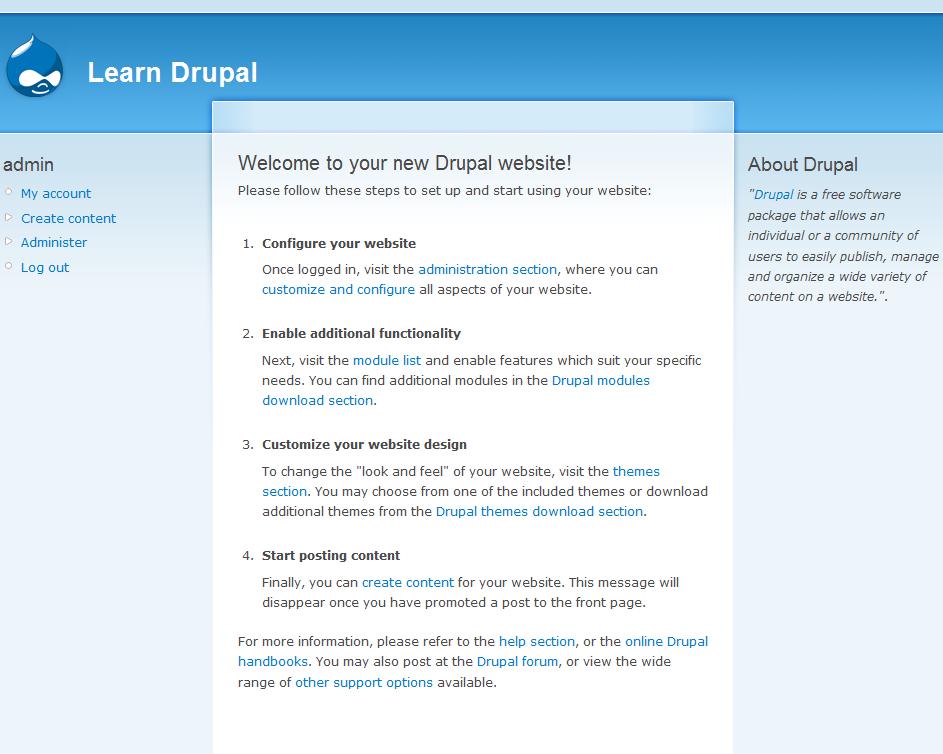
As we go through this tutorials I am building a Drupal resource site called Learn Drupal. So our website so far looks like this:
(You can click on the images for larger views)
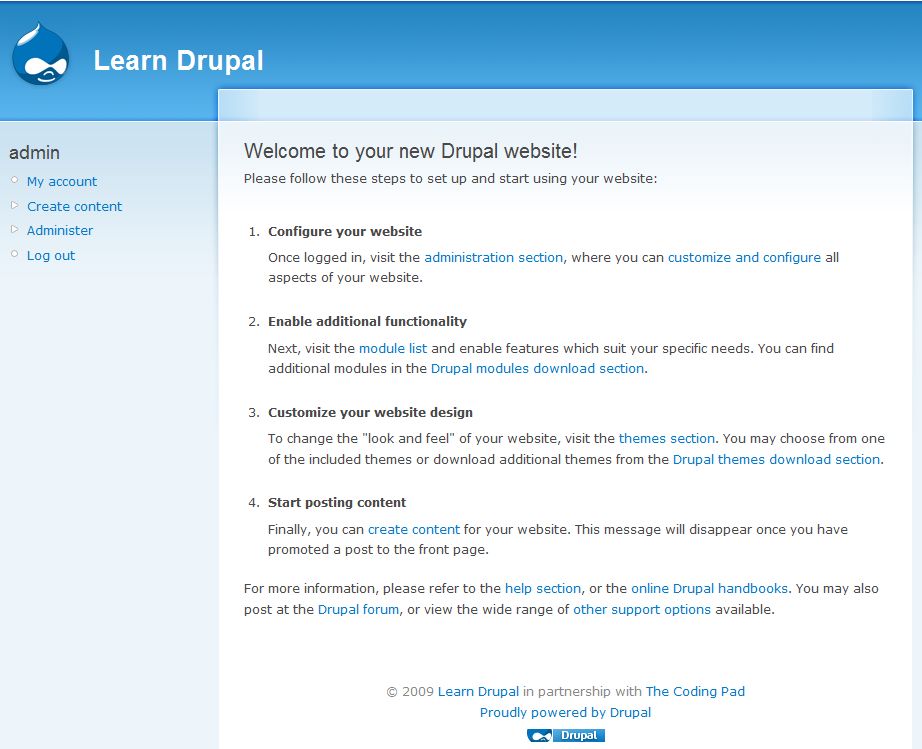
In the last post we did some site configuration, modified our footer, added a slogan and more.
In today’s post and over the next few posts we’re going to start build out site out, by looking through the options in the admin section of Site Building and laying out our site, adding sections, and adding functionality.
Today we get to play with blocks!
Now all we know so far is that we want to build a Drupal resource site, but we haven’t addressed what we want it to look like. What do we want the layout to look like? What functionality do we want it to have?
Since this series is aimed at the Drupal beginner, we’re not going to make it too complicated for now. We will build in some nice functionality, not too complex, but enough to get you started on building a full featured functional website. In future posts we will be adding more and more complex stuff to this website, but for now, we’ll keep it to where it won’t be too overwhelming to someone new to Drupal.
Site Layout
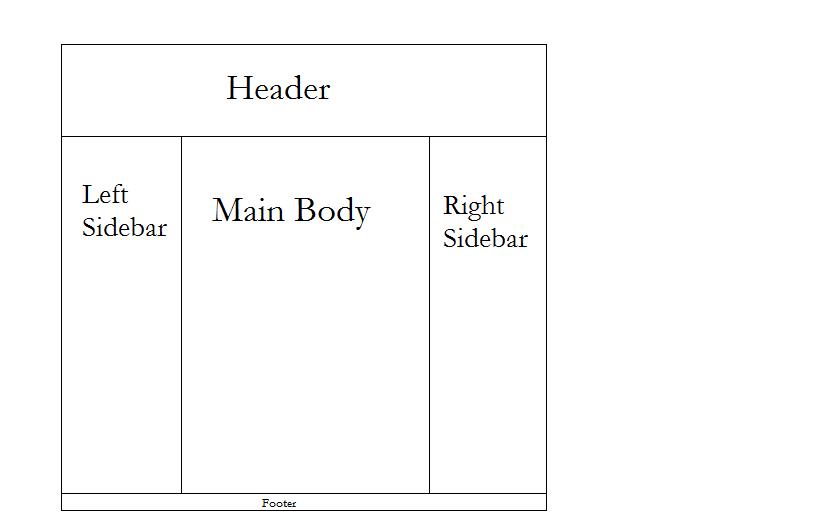
So I’ve sketched out a very basic layout of what I want the Learn Drupal website to look like.
It’s a pretty basic layout with a header region for my site name and logo, a footer region, and two sidebars. The header will have my site name and logo, and maybe a nice banner and some navigational links, the sidebars will hold the login box, some more navigation, rss feeds, and more. Having two sidebars will allow me more space to insert stuff that might be interesting to my readers but that doesn’t belong in the main body area. I could also use the header and sidebar areas for ads, to make some revenue to keep Learn Drupal alive! The footer area of course holds some basic site info, but there are other things we could add there, including site navigation if we wanted.
So we know what we want our website to look like. But right now, if you look at the screenshots at the top, we only have four of the five regions that we want. We’re missing the right sidebar! How do we go about making our layout happen?? Well, this is a combination of using blocks and the theme.
It’s very important that you know what you want your layout to look like before you go theme hunting.
Some Definitions
Blocks are “boxes” visible in the sidebar(s) of your Drupal website. Blocks can be generated on the fly by different Drupal modules, but you can also create your own blocks and add custom content to them.
Blocks are a method for positioning data within a page. They often contain lists of nodes or other navigational content and are frequently placed in the left or right regions of a page. (http://drupal.org/getting-started/before/terminology)
Themes, on the other hand, determine what your site looks like.
A theme is a file or collection of files (PHP, INFO, CSS, JPG, GIF, PNG), which together determine the look and feel of a site. (http://drupal.org/getting-started/before/terminology)
There are many themes available for free on the Drupal website which you can download and use and modify, but you can also create your own, or hire someone to design and code one for you.
I mentioned that it’s important to know what you want your basic layout to look like before selecting your theme because not all themes will make all regions available. Some themes may not make the right sidebar available, etc. You can see what regions are available on your chosen theme by enabling it and then going into your blocks administration page.
The default theme that comes with Drupal is the Garland theme, which is what we’re using for Learn Drupal at the moment. We will probably change it in the future but for now it serves our purposes just fine, but let’s make sure that Garland will allow us to have our layout as we want it.
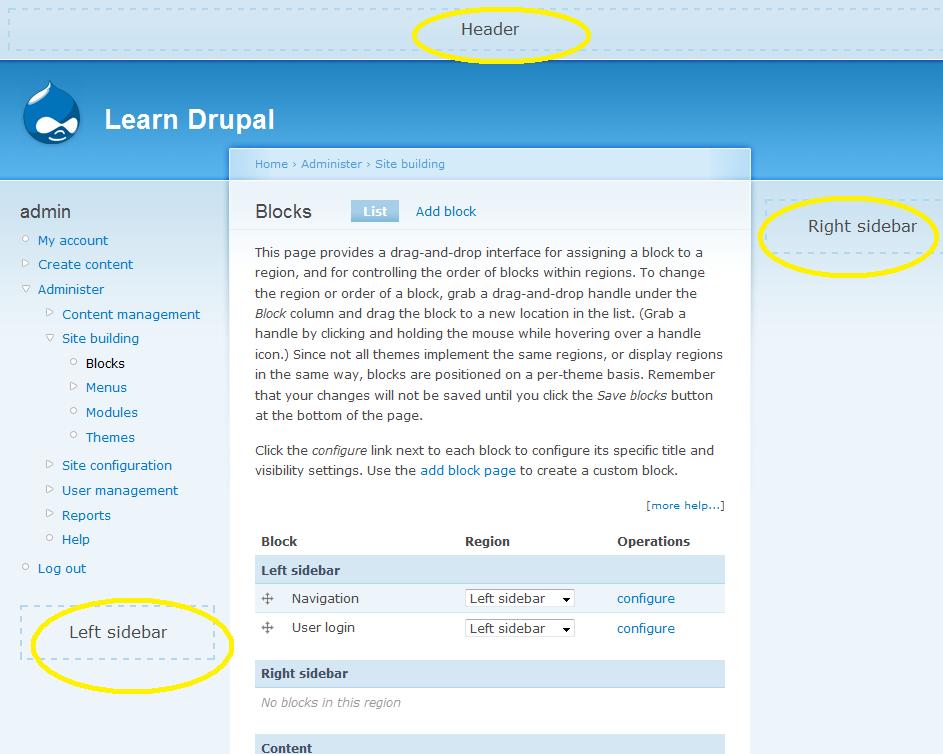
While logged in as admin, go into Administration -> Site Building -> Blocks.
Looking at this page, you can see the available regions with dashed boxes around them. In Garland, you can see we have a header, a footer, left and right sidebar, and ofcourse the content area. Yippee!! We will definitely be able to work with Garland as our theme to create the basic layout that we want.
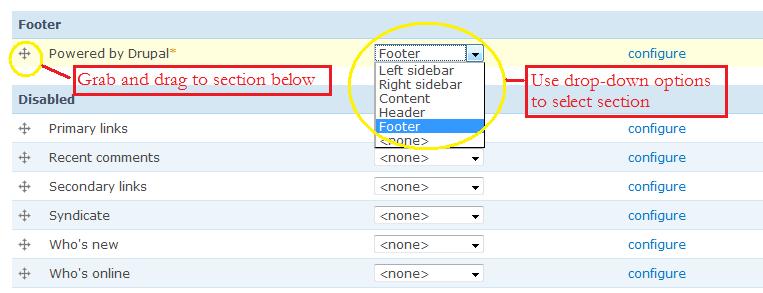
To place stuff in these different regions, we use blocks, and we can order them as we wish from this blocks page. Since we’re here already, let’s start off building our site by working with some blocks. To move blocks and place them in different regions, you can either grab the little cross to the left of the block name and drag it to the region, or else use the drop down list next to the block name and select a region.
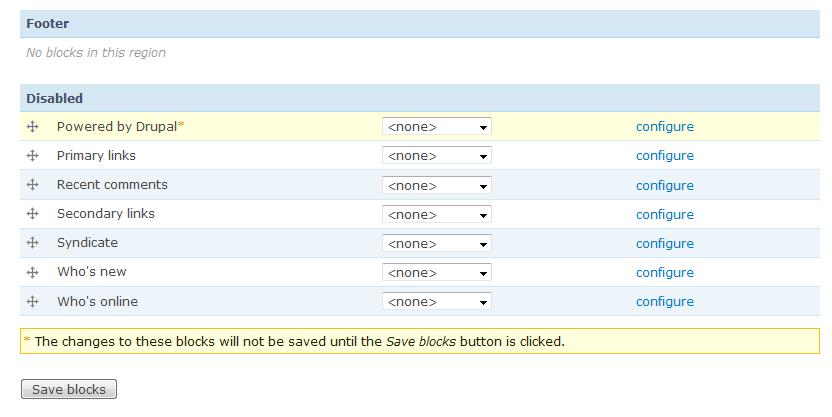
We’ll start off by moving the Powered by Drupal block out of the footer and into the Disabled group, which means it won’t be shown. I’m doing this because I already added the text “Powered by Drupal” to my footer and prefer not to have the image there.
So this is the “before” screenshot, showing you the two options:
And this is the “after” screenshot, with the “Powered by Drupal block now in the Disabled section
Remember to hit Save Blocks at the bottom of the page so that your new configuration is saved. If we now look at the site footer, there is no longer the little blue image that was there before:
Here’s the footer before:
Here’s the footer after:
Now you have the bare fundamentals of blocks and how to manipulate them, we’re getting there. Let’s create a new block and put it on our right sidebar so that we can see what it will look like to have something there.
Creating a New Block in Drupal 6
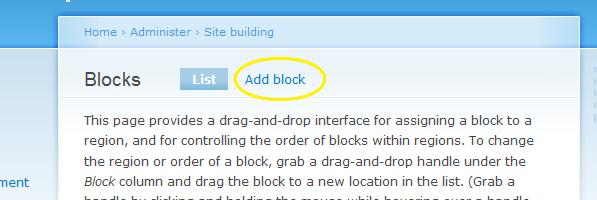
In the Administration -> Site Building -> Blocks page, right at the top, click on Add Block.
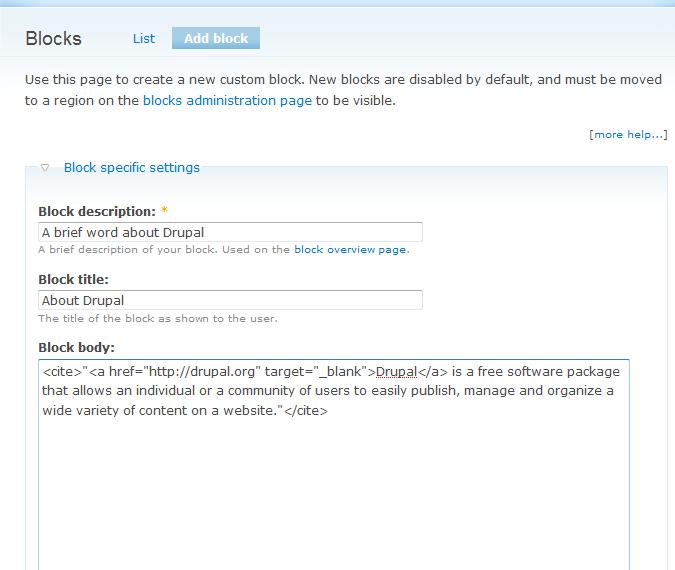
This opens up a page where we can create a new block. We will create a simple block to go in the right sidebar. This block will contain some simple text about Drupal. So let’s go ahead and create the block.
I have borrowed some text from the about Drupal page on Drupal.org for this block. This is what it looks like:
I have used some HTML tags to add a link and to format this as a citation.
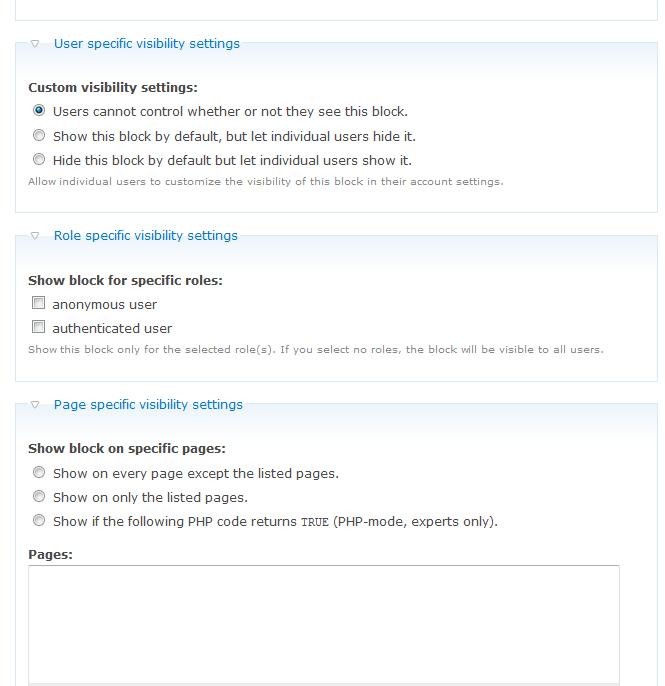
We now want to configure this block, so we need to set the visibility settings for users, roles, and pages. Here is where the power of Drupal and how easy it can be to customize your website begins to emerge.
One way to control what appears on different pages and what different users to see is by giving your users roles and then setting what the different roles can see. We alluded to this in the previous post when talking about input formats, and we will explore it even more fully in a future post when we look at Users and Roles. You can also allow your users to control what they see and don’t see on your site by allowing them to be able to turn on or off certain blocks. We’re going to use this feature pretty soon when we start adding more functionality to our site. Pretty sweet, huh?
OK, since this is a website about Drupal, I want this block to be visible to everyone all the time, so here are my settings:
If you don’t select any roles or any pages, then the block will be shown on all pages and for all roles. Save your block. If you now go back to your blocks page, you should see your new block down in the Disabled section. Add it to the right sidebar either by dragging it using the little cross or by selecting right sidebar in the drop down list as we demonstrated before. Save blocks and voila! You should now see your new block, About Drupal, on the top of the right sidebar.
Sweet! Our website is shaping up, we have the layout we want, and we now know a bit about how to play with blocks.
In the next segment, we’re going to go ahead and build our site out more by learning how to add functionality using modules, as well as how to configure and set up our navigation and menus. So stay tuned!
Remember to please leave comments with any questions, suggestions, corrections, etc.
Homework: (You didn’t think I’d forgotten, did you? :))
Go into the blocks section and try creating and adding a few blocks of your own. Try adding your new blocks to the various regions (left sidebar, right sidebar, header, etc, and see what results you get.


Thanks for this. Good, straight forward and easy to understand information!
So far so good 🙂
Simple way to learn a powerful tool…..Thanks
Thanks for the feedback guys! Glad you’re finding the tutorials useful.
I can’t add a block – Drupal 6.14 – I click add block and absolutely nothing happens. Same if I click configure beside a block.
Also – Site information doens’t exist under Site Configuration Tab
PLEASE HELP
Lincoln
Have you tried clearing your browser cache? Also, check how much memory is allocated to php in your server setting because sometimes that can be the problem. What browser are you using?
mary
You know – I read this tutorial, and at least two dozen others in as many hours, and it was THIS one that made the light go on in my head about my block problem. You don’t directly address my block problem solution, but seeing you got yours to work led me to dig deep enough to find the solution.
Thanks for this, going to go through the whole tutorial soon!
OWO! it’s really nice. I am so happy to have your great support. Wish you best.
Even though I put my menu (log in and other internal links) in the side bar it does not appear on the screen. Is there any logical reason this is happening?
Nate,
Is this when you’re logged in or out? Make sure you have set up the appropriate user permissions to make sure that the block is visible to all users.
mary
This step-by-step tutorial is really helpful. Thanks so much.
muy buena información, me sirivio para hacer mi sitio web
I’m really enjoying this tutorial for Drupal. I’m new to it and really like how you’ve been able to layout a bare-bones explanation of certain elements as you use them. And the homework idea is pretty cool, makes you feel more accountable to an extent (in going beyond what the text covers). Thanks!
Nice post. I like Drupal a lot because:
* Extremely developer friendly. If I loved code more I would almost always pick this system.
* Strong community to help discern the dozens (hundreds) of functions and tags available.
* Can be used to create some really awesome websites that can outperform a majority of other sites out there.
its refreshing to find a drupalite that shares direct knowledge without wanting cash.
if we had more tutorials like this
the world would be rid of money grabbing micrsoft
and the web would be sharing the love
cheers mate!
The tutorial is really awesome
Thanks for the tutorial, so far so good!!! Cheers!
very nice, it’s helpful
thanks for good tutorial
How can i create new region to place a block .
You need to do that in the theme, so if you’re creating your own theme then you can add whatever regions you want. Or in an existing theme if you’re good at themeing and know what you’re doing you can make the modifications to add your own region.
very nice…
thanks for step by step tutorial
Hello would you mind stating which blog platform you’re using? I’m looking to start my own blog soon but I’m having a difficult time selecting between BlogEngine/Wordpress/B2evolution and Drupal. The reason I ask is because your design seems different then most blogs and I’m looking for something completely unique.
P.S Sorry for getting off-topic but I had to ask!
I use WordPress for this blog, and a variety of other platforms for other sites.
mary
During the last years Drupal has really become one of the most important platforms when talking about proper usage of design and functionality. Still I am a beginner regarding the whole subject, and therefore I am looking for more tutorials and videos about the usage of Drupal. I think that the way how one can work with the blocks to increase the performance of his website is a smart idea- still it would be great if it was bit more simple.