Welcome to part 11 of our tutorial on building a website with Drupal 6. Previously we covered:
Part 1: Introduction
Part 2: Installing Drupal 6
Part 3: Configuring your Site
Part 4: Playing with Blocks
Part 5: Playing with Modules
Part 6: Playing with Themes
Part 7: Installing Modules and Themes
Part 8: Pathauto, Content, and Content Types
Part 9: Users, Roles, and Permissions
Part 1o: Reports – Keeping Track
As we go through this tutorials I am building a Drupal resource site called Learn Drupal.
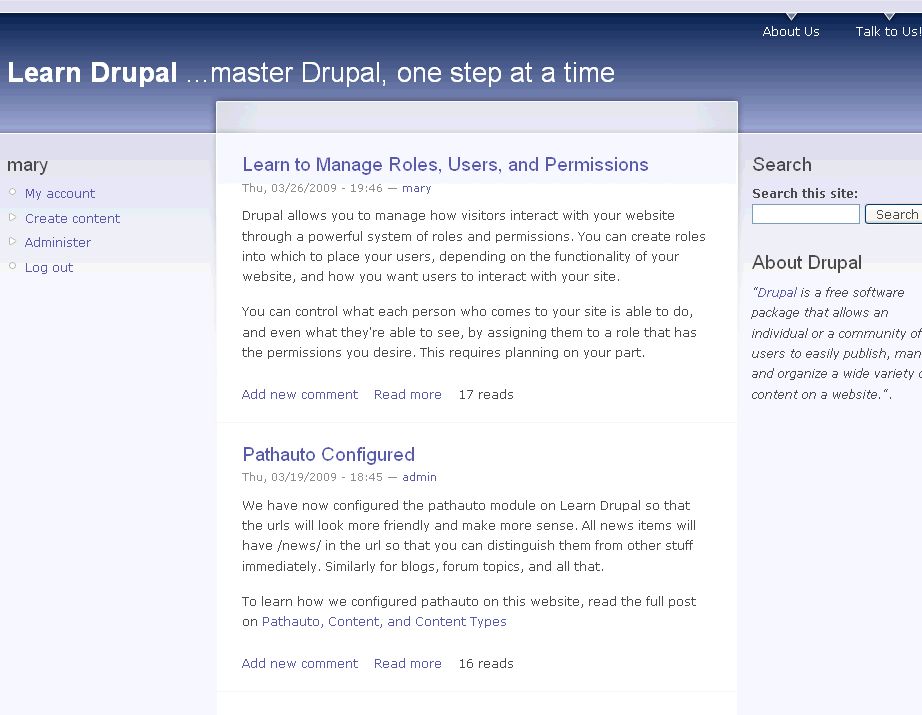
So far our website looks like this: (you can click on the images for a larger view)
As we’ve been building our website we’ve been aiming to have users and visitors interact with our website. One of the ways in which visitors interact with the Learn Drupal website is by leaving comments, and sometimes, spam. Today, we’re going to look at some ways of managing comments and spam on our website.
If you recall, I set my website so that visitors who aren’t signed in can leave comments, but the comments have to be approved by a site administrator or moderator. This is to discourage spam from being let loose on the website. However, what this means is that I need to keep visiting my admin area to check on any comments that need to be moderated.
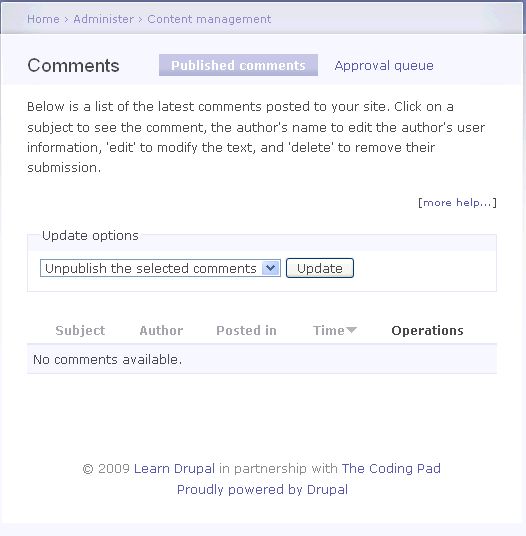
Let’s take a look at the comment management section. You’ll find this at Administer -> Content Management -> Comments
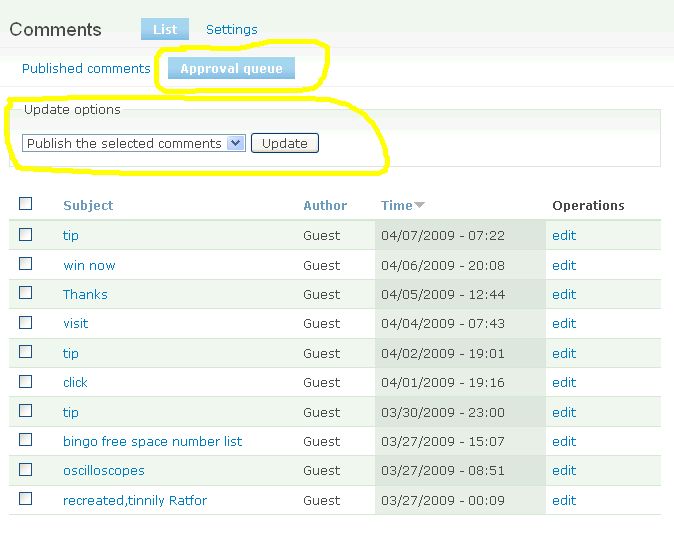
This front page shows you any published comments, and allows you to edit them and such. For now we have no published comments. Let’s check the Approval queu tab to see if there are any comments awaiting moderation:
As you can see, we have a few comments pending moderation. Now I can tell by just looking that most of these are spammy comments, so I will definitely want to delete them, except possibly the one titled Thanks. If you’re not sure, you should open the comments to check the content. You can also edit the content of the comments if you need to by clicking on edit link for the comment.
To delete the comments, check the ones you want to get rid of, and then in the “Update Options” area at the top, click the down arrow to select “Delete the selected comments“, and finally click the “Update” button. You will be asked to confirm that you want to delete the comments, because this is an action you can’t undo. Confirm that you really want to delete the undesirable comments and then delete them.
To approve a comment, select it on the list and then click Update with the Publish option selected.
Drupal Spam Control
That’s not too difficult, is it? However, spammers are persistent, and you don’t want to spend your precious time moderating spam comments. A lot of times these spam comments are left by bots, and not by real people. So ideally, you want to create a deterrent to spambots to discourage them from spamming your website.
Drupal has several modules designed to help you deal with spam, and you can research these on the Drupal.org modules page. Even the popular Akismet spam control plugin that most WordPress blogs use is available as a module for Drupal. Feel free to read on and experiment with the different available modules for spam control to see which one you like best.
CAPTCHA Module
One common way of discouraging bots from leaving spam comments on your website is to use a CAPTCHA. You’ve probably seen and used these when you need to register on different websites and such, and you have to enter some text or phrase to prove that you’re a human before you can proceed. You can read more about captchas here.
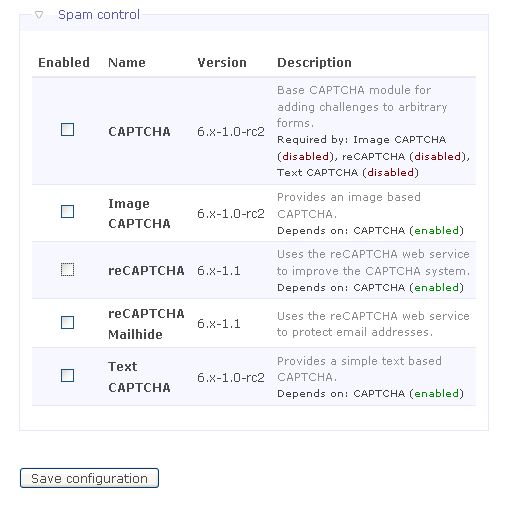
I’m going to implement one of the CAPTCHA modules for Learn Drupal. I have selected the CAPTCHA module and will later use the reCAPTCHA module to enhance it. We’re going to download them, unzip them, and then upload them to the sites/all/modules folder, as discussed in part 7 of this tutorial series. Then we’ll proceed to activate them both in our Site Building -> Modules page. (Make sure you download the stable versions for Drupal 6). You can see that you now have a new batch of modules under Spam Control in the Module management page.
NOTE: Since you want to install and configure new modules, you need to be logged in as the main admin of the site, the account you created when you first installed your site (in my case that username is admin), because this is the user who has master admin privileges, otherwise you may get access denied errors when you try to configure your module.
To use the reCAPTCHA module, you need to go to register at the captcha.net website and get a key to allow you to use the module. I will leave that as part of your homework for this post. For now we’re just going to use the simple CAPTCHA module. Go ahead and select all the modules in the spam section, and then save configuration.
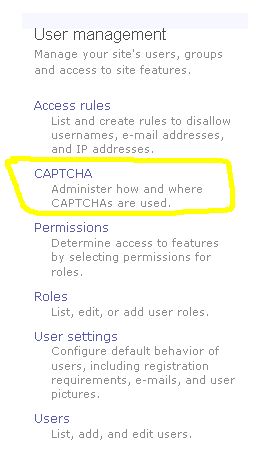
To configure the CAPTCHA module, let’s go into the Administer page, where you’ll see CAPTCHA listed under the User Management section.
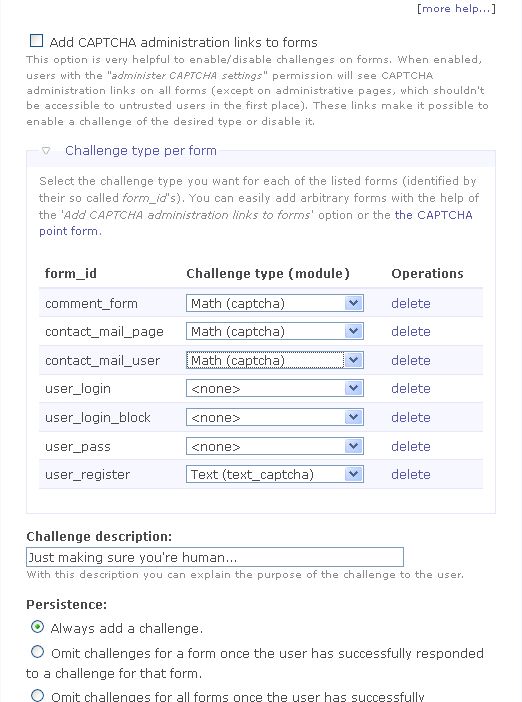
Click on CAPTCHA to open up the configuration page. As you can see there are many many options that you can customize on that page. I’m just going to make some simple configuration changes for testing purposes. I want to set a challenge for the comments, user registration, and for the contact page.
You can see I also slightly modified the Challenge description. Save these settings, and then log out of your website. If you now attempt to leave a comment on a piece of content, you should be presented with a challenge.
Go ahead and leave an anonymous comment to test the CAPTCHA system. You’ll find it works great. You can even make some errors to make sure it will catch them.
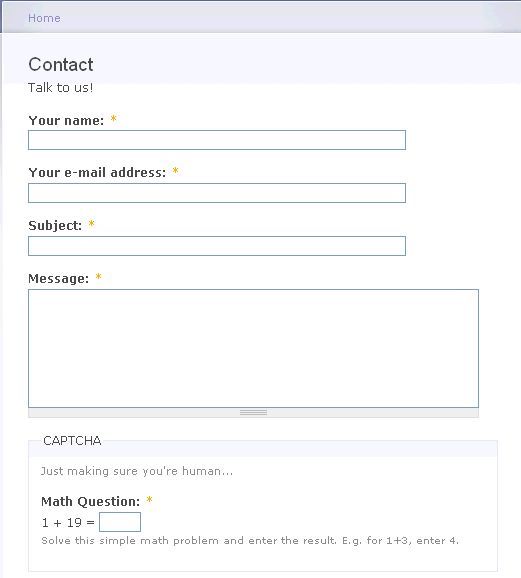
You can also see the CAPTCHA at work on the contact us form.
Excellent. So we know it works. Let’s log in as the admin user we created for ordinary management tasks (in my case that user is mary), not the number 1 super admin user we use for major administrative tasks. If you attempt to leave a comment or use the contact form as this admin user, or as any other authenticated user, you’ll also get the challenge. But we don’t want our regular authenticated users to have to answer the challenge each time they want to leave a comment do we?
Setting permissions for the CAPTCHA module
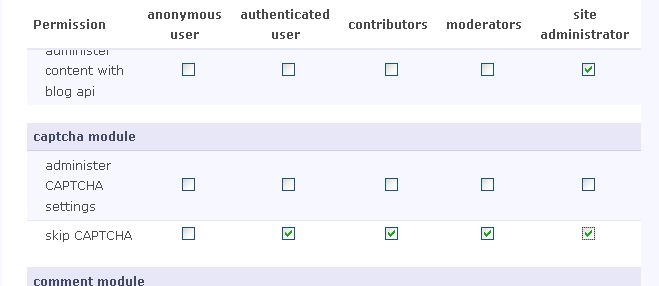
Remember in part 9 when talking about permissions, we mentioned that every time we enable a new module or add a new content type we need to revisit the permissions and set them for the new addition. Let’s do that now for the CAPTCHA module. While logged in as the number 1 super admin, go into Administer -> User Management -> Permissions and locate the permissions for the CAPTCHA module.
As you can see I’ve set it so that only anonymous visitors have to solve the CAPTCHA. If I now log back in as mary, or as any other user, I am no longer presented with the challenge.
So now we have created a system to discourage bots from leaving comments. CAPTCHAs are not fool proof, but if you have a highly trafficked site, you’ll notice the difference in your spam levels. You can strenghthen and enhance the captcha by using an image, by using reCAPTCHA, or even by adding another spam control measure, such as the Akismet module.
General Comment Management
Spam is not the only issue you have to deal with when dealing with comments on your Drupal website. There are other comment management modules out there that are useful and worth investigating for general comment management.
One such module that I like to use is the Comment Notify Module. This module enables your website to send notification e-mails to visitors about new comments on pages where they have commented, and it works for both registered and anonymous users. This is a great module for getting visitors to return to your site.
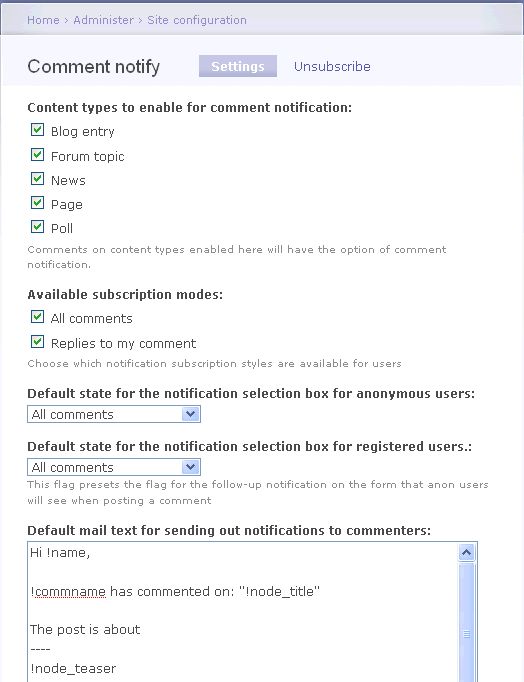
Once you’ve uploaded and enabled it, you can modify its settings under Administer -> Site Configurations -> Comment Notify.
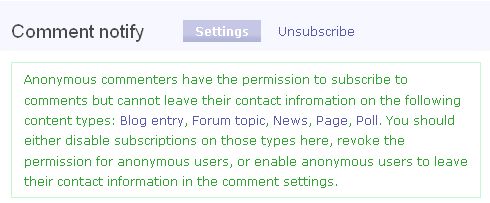
Since I want anonymous users to subscribe to comments, I get this message when I save my settings:
This means I need to go into those content types and change their comment settings to allow anonymous users to leave their contact information, or else disallow them from subscribing to those content types. I’m going to choose to change the comment settings. I will also uncheck the Page type because I don’t allow comments on pages, so there’s no need to subscribe.
Once that’s done there’s one more thing we need to go, and that’s as always, go into Permissions and set the permissions for the Comment Notify module. In my case, I select all groups to be able to subscribe to comments because I want even anonymous visitors to be able to have this choice.
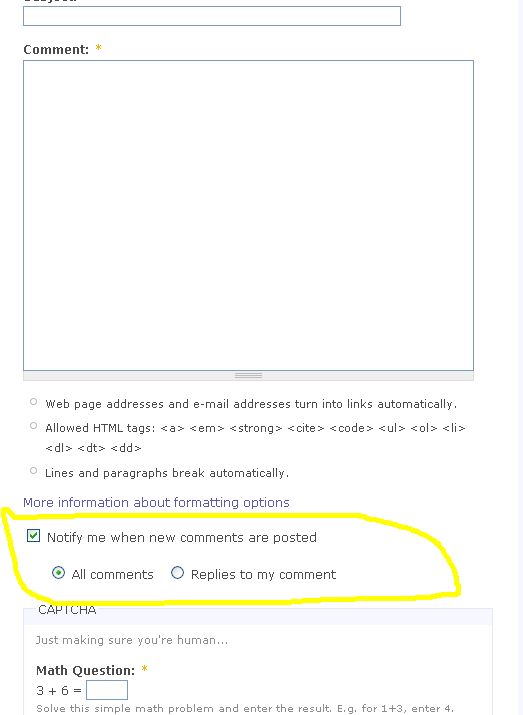
Once all your settings are in place, as always you want to log out and see if they work, and then log in as a different user with different privileges to make sure your permissions work. If I log out and attempt to leave a comment as an anonymous user, this is what I see:
You can see there that the visitor will have the option to subscribe either to all comments on the piece of content, or to replies to their own comment.
There are other comment management modules out there and we may cover them as we go. But you can explore the Drupal modules repository to see what interesting goodies you find by searching on the module page for modules related to comments.
Summary:
In this post we’ve looked at the basics of comment management, how to approve or delete comments from your approval queu, and how to use the CAPTCHA module to discourage spam on your website. We also looked at the Comment Notify module and how you can use it to encourage interaction and return visits.
Homework: (oh yes… homework :))
- Try to setup and configure the reCAPTCHA module that we enabled. Read the documentation and see if you can get it to work on your site.
- Explore other spam and comment management modules and experiment with them.
If you have a particular spam or comment management module that you like to use and find effective for your Drupal websites, please share in the comments section.
We will continue in the next post to explore different modules and add to the functionality of our Learn Drupal website.

hey mary i got problem with the reCaptcha Module. I cant get it work, i have the key from http://recaptcha.net/api/getkey and also the library. The problem is i don’t know how to input the key. i’ve read the documentation n it say: “Input the keys into the reCAPTCHA settings. But i didn’t get it n can’t find the settings page. Could u explain how to configure it?
thanks
ups.. sorry for that stupid questions. i’ve already fix my problem :p
thanks again
Ryan,
Cool, I was just in the process of writing a detailed reply 🙂
Does it now work for you?
mary
how you solved the problem?? i can´t found the re CAPTCHA settings.
Please Help me
Jota
Can you be more specific, what have you done so far? At what step in the tutorial are you getting stuck?
mary
yeah mary it’s work for now, i just forgot to give it permissions. thanks for ur response…
Can’t hardly wait to see another great tutorial from u 😀
cheers..
Great series, the first series I’ve found which approaches this methodically and thoroughly. Especially looking forward to the part where you discuss ‘Views’ … as I for some reason cant figure out the user interface.
Rob,
Thanks for the feedback, glad you’re finding the series useful. I will be covering CCK and Views in some detail, so stay subscribed!
mary
Nice Drupal tutorials. However, I’m finding the structure of your website a bit confusing: your Drupal links lead to different subject areas (eg MODx).
Thanks for your feedback. Sorry about the confusion with the links! Which ones exactly are you referring to that lead to posts about MODX?
The links at the very top of this Drupal page show previous/next links pointing to ModX Part 5 and ModX blog contest. I’m trying to follow the Drupal route, but they take me thru the ModX pages. I would expect 2 separate sets of links, 1 set for Drupal and one for ModX, not a mixture.
p.s. Is part 12 the latest Drupal tutorial? As a result of my above comment, havinf trouble finding part 13. I like the summary links which show previous sections, but it would be nice to have a complete Drupal tutorial index.
Gammerz, I see what you mean about the links, but those links point to the posts in the order in which I write and post them. To filter out and only see the Drupal posts, you can click on the Drupal link on the second nav above the posts. To get the index of the Drupal beginner series, click on the Beginner Tutorials link in the top nav and then on that page scroll down about two thirds and you’ll find a complete index. That page has lists of all the tutorial series for beginners on this blog, which include a series for Drupal 5, Drupal 6, MODx Evolution and MODX Revolution.
Part 12 is the last part of the Drupal beginner series. Once you’re done with these twelve parts I think you’ll be armed with enough knowledge to tackle the more advanced tutorials out there on the web for Drupal 6 since you’ll have the basics of building a simple site mastered. I am soon starting a Drupal 7 beginner series and I plan to do an intermediate series, if time permits. I do these in my free time and blogging doesn’t pay the rent, so it really depends on how much time I can free up 🙂
Glad you’ve found them useful
mary
Thanks.
Thank you so much for these chapters. All of them are so descriptive and very well explained. These will greatly help me with my website.