Welcome to part 5 of our tutorial on building a website with Drupal 6. Previously we covered:
Part 1: Introduction
Part 2: Installing Drupal 6
Part 3: Configuring your Site
Part 4: Playing with Blocks
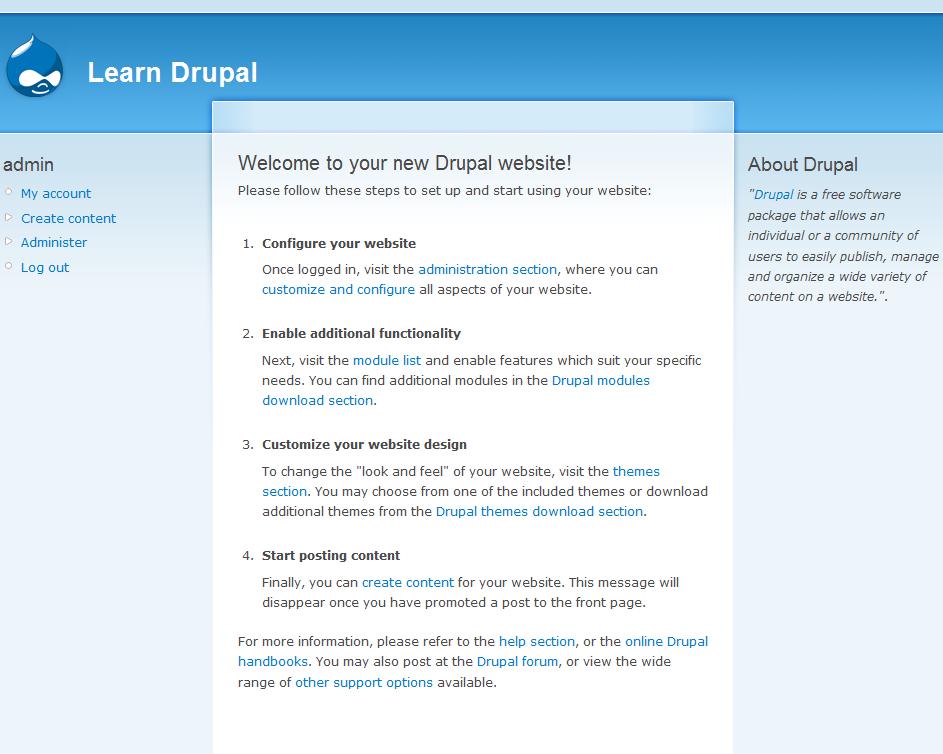
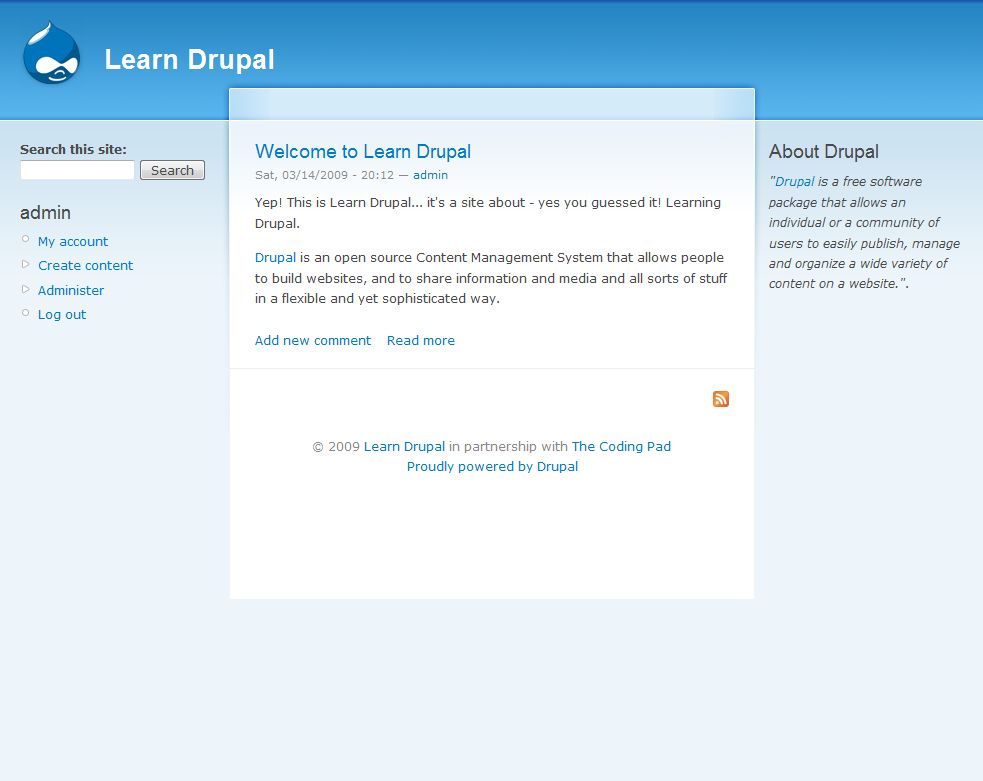
As we go through this tutorials I am building a Drupal resource site called Learn Drupal. In the last tutorial we played with blocks and planned and started implementing the layout of our website. So our website so far looks like this:
(You can click on the images for larger views)
In this post we are going to continue working on our site, building it and adding functionality to it. We know what we want our site to look like, and now we want to decide what functionality we want to have, and how to achieve our goals with modules.
Let me digress for a moment: You may be wondering when we’re going to get rid of that annoying text on our front page. Well, we’re going to do that right now. I will talk more about content and content types in the next post, but let’s change the text and start making our site our own before we continue.
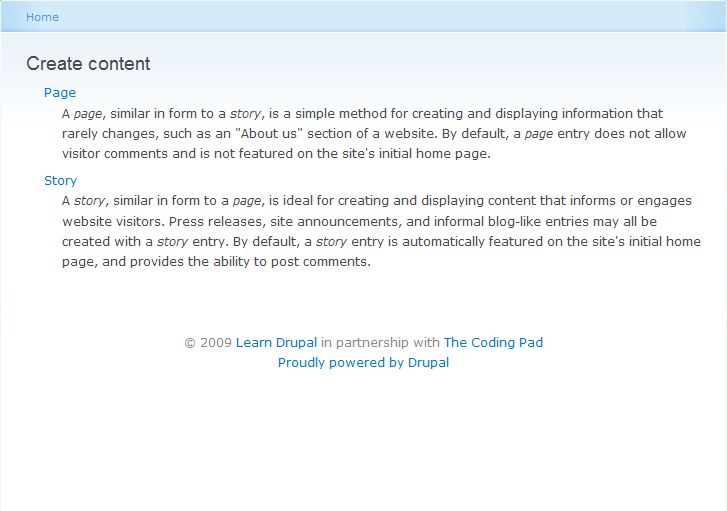
On the left sidebar, click on “Create Content”. You should see this screen:
Drupal comes by default with two content types, pages and stories. Pages are good for static content, stuff that doesn’t change. Examples include an “About Us” page, or a “Disclaimer” page, or even a “Contact Information” page. A story, on the other hand, is ideal for information that informs, and that encourages interaction, such as recent news, latest updates, etc. By default, Drupal sets the Story type to have comments and to automatically appear on the front page as soon as it’s published, and for the page type to not have comments and to not be published to the front page. These are settings that you can change. You can change them as you go, or you can set them so that each content type always behaves the same way each time.
What’s really cool is that Drupal allows you to create your own content types!! But let’s keep it simple for now, we’ll delve more into content types as we go.
For now, let’s change that darned front page shall we?
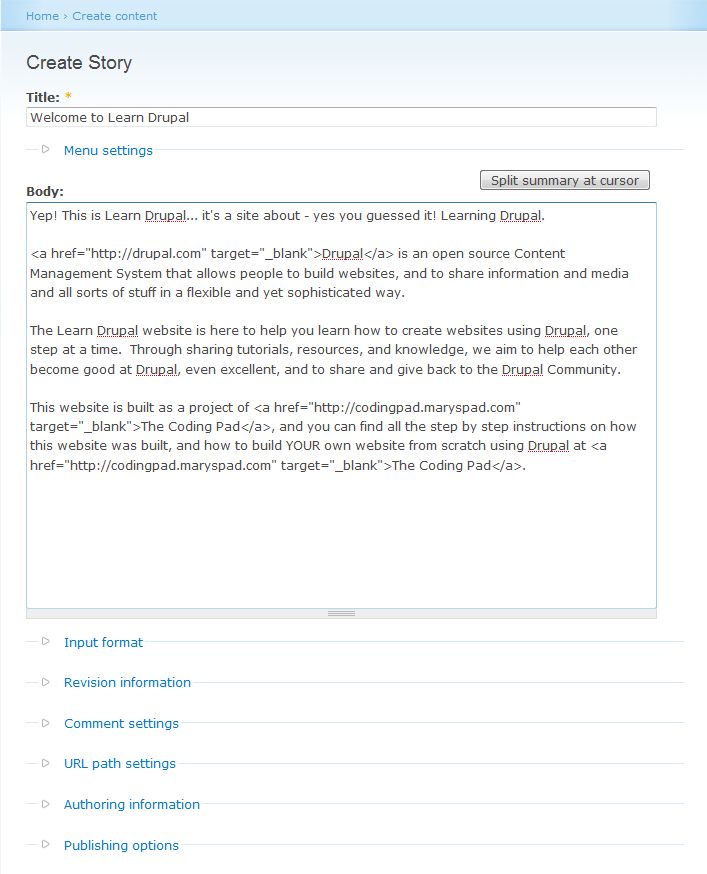
Let’s create a story to appear on our front page. Click on Story:
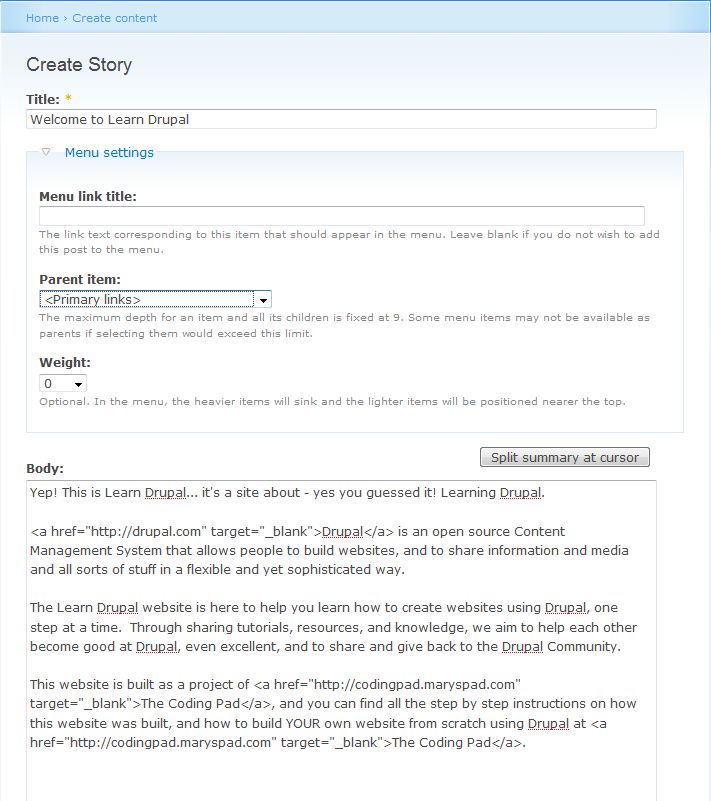
I’ve added some basic text that will be my first content on my site. You can see that there are other things to fiddle with such as Menu Settings, Input Format, Revision Information, etc. I won’t worry about all these for now. I don’t want this story to appear in the menu for now, so I’m going to leave the Menu link title blank.
We will explore all the options when we go into creating content and menus, so bear with me for now. I’m not going to change any of the other options so don’t worry about them for now, just go ahead and click Save. Remember I said that by default Drupal always publishes stories to the front page? Well, if you now navigate to your front page, you should see not the default drupal page but our new story, or part of it anyway…
Drupal truncated the story and added a “Read More” link at the bottom. If you click on that you’ll see the whole story. If you were to add a second story, it would appear on top of the current one and the current one would be pushed to second place, and so on and so forth.
Are you getting the general idea now? Like I said, we will talk more about content, and how to change what appears on your front page and affect the behavior of your content and content types. But for now let’s leave the content part of it and go back to functionality.
Back on track now…
Functionality
In talking about functionality, what we’re basically asking ourselves is what do we want users to our website to be able to find and do? What’s the purpose of our website?
Well, we’re building a Drupal resource site. Therefore, at the very minimum, we want our users to find content that’s relevant to Drupal, perhaps tutorials, articles, Drupal news, etc. This is inherently the purpose of a content management system, and we will accomplish this by adding content to our site.
What else? Well, we want our users to know what’s going on in the world of Drupal, we want them to be able to discuss and share information, ask questions and have a place to exchange ideas. One way to accomplish this is by using a forum.
We also want our users to be able to contribute knowledge in the form of tutorials and articles, perhaps by having a blog on our website. It would be awesome for users to each have a blog to talk about their Drupal project and get feedback from the community. OK, so we want blogs for our users.
We also want visitors to our site to be able to contact us and tell us what they think of our website and ask us any questions, or tell us how much we rock. So we need a contact form.
hmmm… okay, we could go on and on, and I’m sure we will, but before we get ahead of ourselves, we need to ask, do we make these things happen in Drupal? How do we add functionality to Drupal? We do this by adding and enabling Modules.
Modules:
A module is software (code) that extends Drupal features and/or functionality. Core modules are those included with the main download of Drupal. Contributed (or “contrib”) modules are available for separate download from the modules section of downloads. Note: Be sure that the version of the contributed module you wish to use matches your version of Drupal releases section lists modules by Drupal version (http://drupal.org/getting-started/before/terminology#m)
So that’s what a module is… fancy huh?
Well, let’s take a look at this module thing then, shall we?
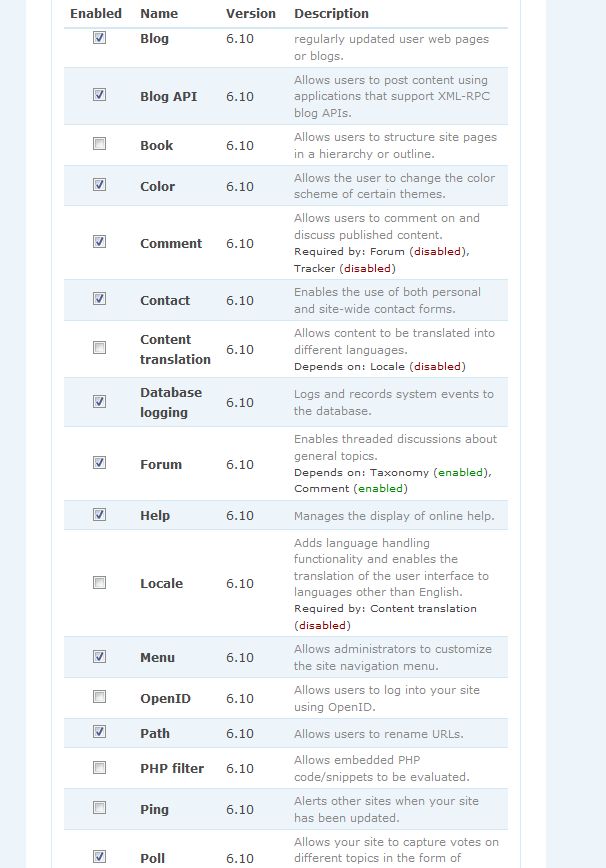
Go into your site administration area, and under Site Building, you’ll see Modules. Click on that and you get a page that lists all the modules that come as part of the Drupal Core. Some, as you can see, are optional, and the rest are required. You don’t want to mess with the required modules, because without them you’re Drupal install will be totally messed up, so we’re going to look at the optional ones. (There are many many contributed modules that can add even more functionality to your website, and we will go over some of them as well as how to install and enable them). For now let’s look at the core optional ones.
The checked modules are the ones that come enabled by default. We’re going to go ahead and enable a few more. We need the Forum module and the Blog and Blog API modules, so go ahead and enable those. We also want to enable the Contact module for our contact form. Hmm.. let’s see, what else? Well, lookie here, we have something called Poll! That looks like fun, having polls on our website… either created by us or our users?? Yay, let’s enable that one too. And I see two others I like… Statistics and Search… enable those two also. Gee, we better leave this page before I get carried away!! But don’t worry, we’ll be back to enable more modules later on. For now, these will do.
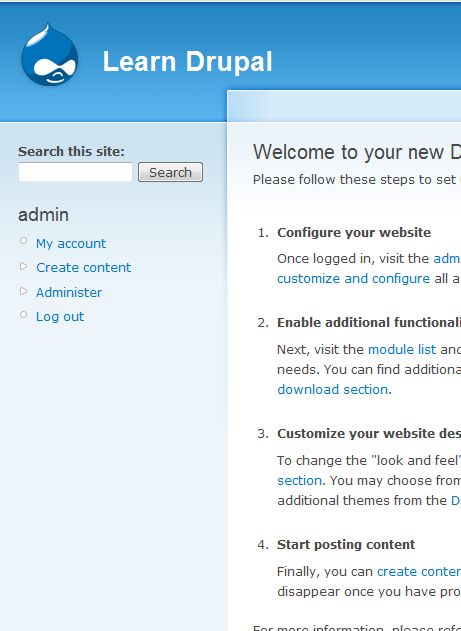
Scroll to the bottom and click on Save Configuration to save your changes. The first change you notice immediately is that your website now has a search box on the left sidebar right at the top. Talk about added functionality!
Well, I don’t think I like that search box over there. I prefer to have it on the right sidebar. This is easy to change by going into the theme configuration, but let’s not get ahead of ourselves, we’ll leave as it is for now. Now this search form won’t yield much if we use it now for 2 reasons:
1. We don’t have any content to speak of and
2. Our site is not yet indexed
Number 1 will be solved when we start adding content, but what does 2 mean? Well, for the search function to work, the content on your site needs to be indexed, structured and organized in such a way that it’s easy to find. We will talk about indexing in a future post, but I wanted to mention it now so that you don’t wonder why your search box yields zilch!
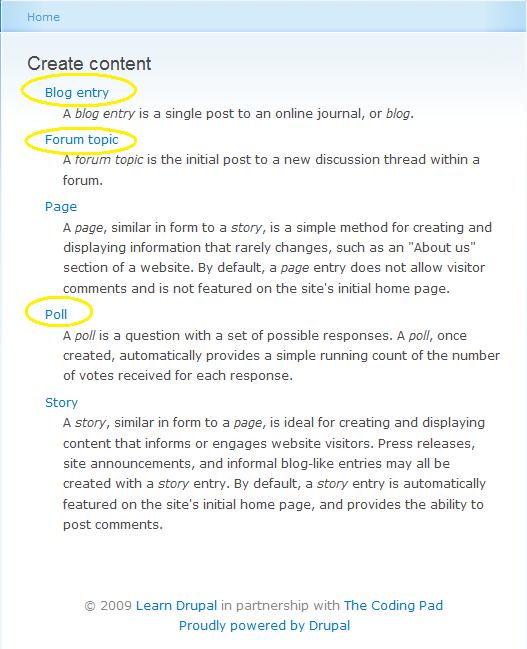
OK, so let’s look at the other modules we added. We added blog, poll and forum. If you now click on Create Content in your navigation, you will see some additional stuff. Remember originally we had Page and Story as our only content types? Well, we have three new content types now!
We can now create a blog entry, a poll, or a forum topic. Looking good!!
We also enabled the Statistics module. What this does is allow us to get an idea of who is accessing our site, what pages are getting the most hits, where our visitors are coming from, and more. You can read more about the statistics module on the Drupal page for the module (http://drupal.org/node/297).
Let’s configure our Statistics module so we can keep an eye on our site and see what’s crackin’! Before the Statistics module can start collecting information you actually have to tell it to do so. Makes you feel like the boss huh? 🙂
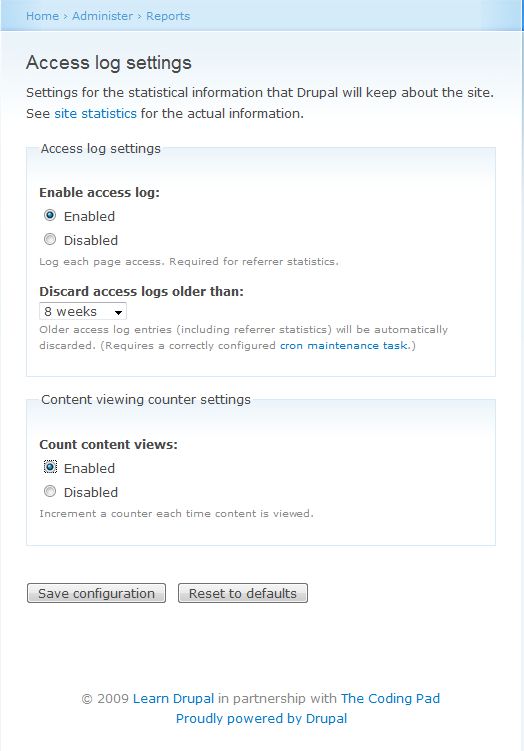
So go into Administer->Reports-> Access Log Settings
Select to Enable Access Log. I’ve increased my log storage time to 8 weeks because that’s my preference. Gives me more time to look at and analyse my logs. I’ve also enabled counting of content views so I know which content is most viewed. Save Configuration. Our statistics module is now ready to gather data. We will check on it at a later date to see what kind of interesting information it collects about our website visitors.
Creating a Contact Form in Drupal 6
We also enabled the Contact module. Let’s go ahead and use it to create a Contact page so our site visitors can reach us.
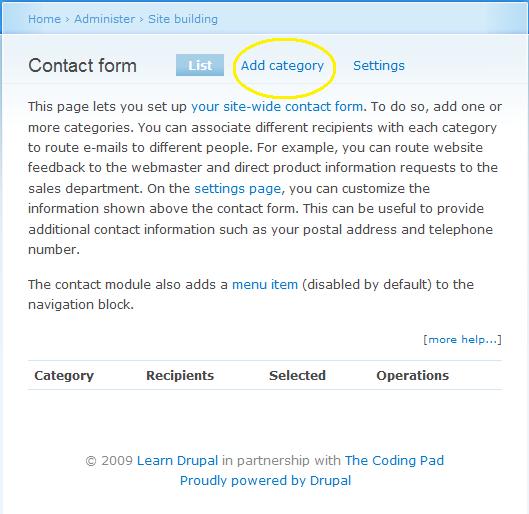
Go into Administer -> Site Building -> Contact form
This option was not there last time we looked at the Site Building admin area, but it’s there now because we’ve enabled the Contact module. Go ahead and open it.
Drupal allows you to create multiple contact forms according to your needs and to customize them. Before we can create a contact form, we need to create a category that the contact form will belong to. If you’re building a corporate website for example, you may want each department to have it’s own contact form, and so on.
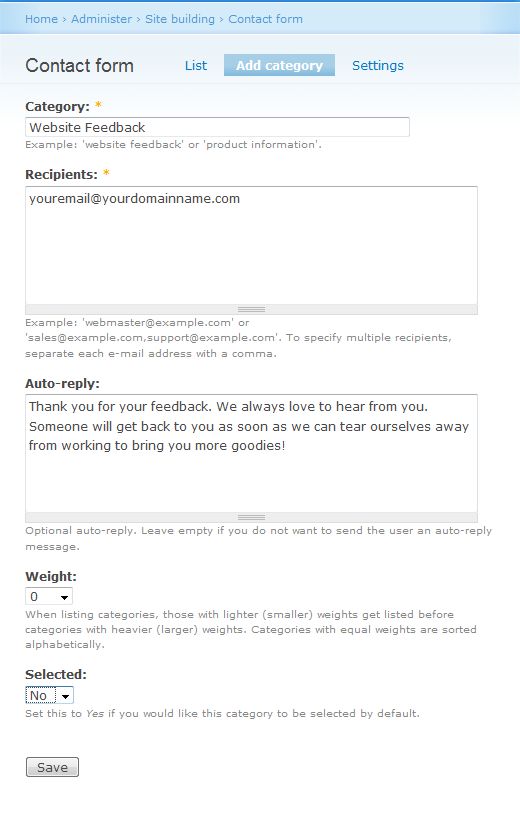
I will start with just a simple website feedback contact form. So let’s create that. Click on “Add Category as highlighted in the screenshot above. The fields are pretty self explanatory, so go ahead and enter your info.
Save your Contact form and it will now appear on the list. You can always come back and edit or delete this contact form, and add more as needed.
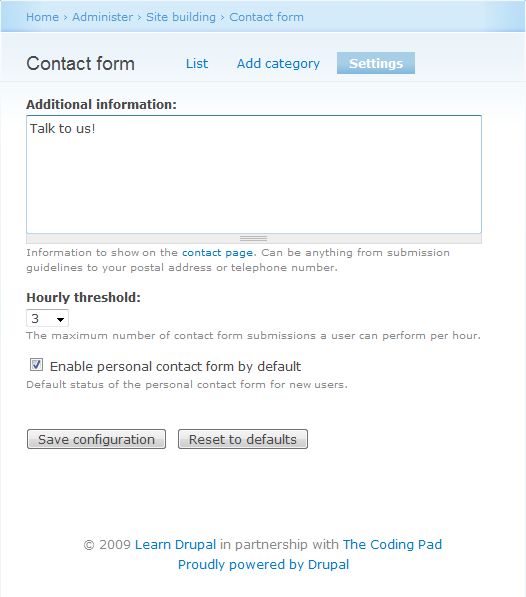
One more thing we may want to look at is the Settings of our contact form. Next to the Add Category link that we clicked before is a Settings link. Click on that:
You can change the message that appears at the top of your contact form, like I just did, and you can also control how often a user can submit a form. This is helpful for controlling spam to some extent, and reducing the load on your server. I leave the “Enable personal contact form by default” checked. Save configuration.
Beautiful! Dandy!
But where is the contact form???
I don’t see it! Well, we have to make it visible. We have to create a link to it somewhere in our site navigation so our site visitors can click it and use it. To do this, we need to go into Menus.
We will be talking about Menus as we go, and will talk more about them in detail, but for now, go into Administer -> Site Building -> Menus.
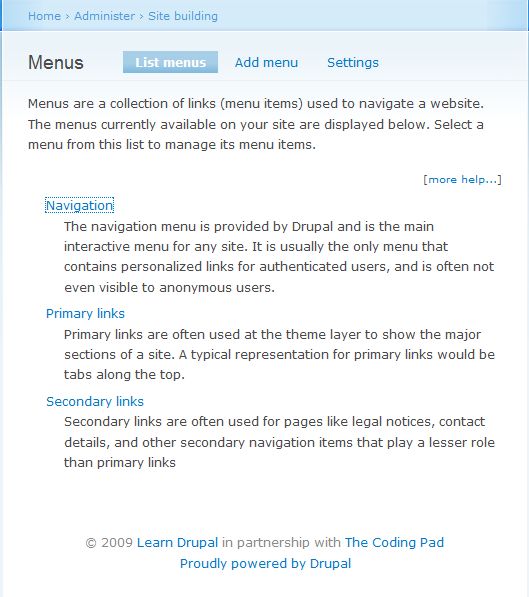
By default, Drupal comes with three Menus, Navigation, Primary Links, and Secondary Links.
Navigation is the meny on left hand sidebar that we’ve been using all along. It’s the main menu and contains personalized links for your users.
Primary Links menu usually appears at the top of the page by default, and is a good place for placing links to the major sections of your site.
Secondary Links menu can be used for many purposes, like the other two, and we’ll explore it more. In general though, it plays a lesser role.
I want to place my contact form link in a relatively prominent easy to find place, because user feedback is important to me, and I like people to be able to reach me, so I’m going to place it in the Primary links menu.
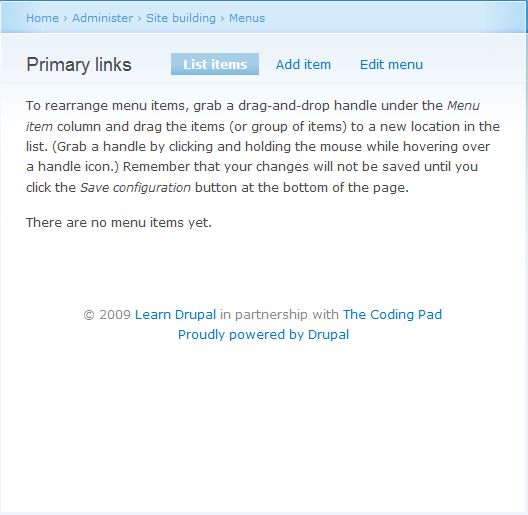
If you click on Primary Links you’ll find that it’s empty, there’s nothing there because we haven’t added anything. It comes empty by default.
Go back to Menus, and click on Navigation.
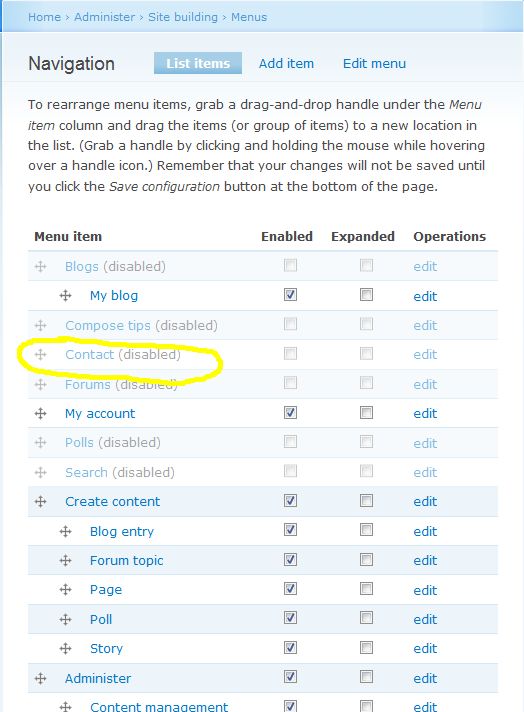
You can see that some items, including Contact, are disabled. You want to enable it, and edit it so you can set it to appear where you want it. Click on the edit link next to Contact.
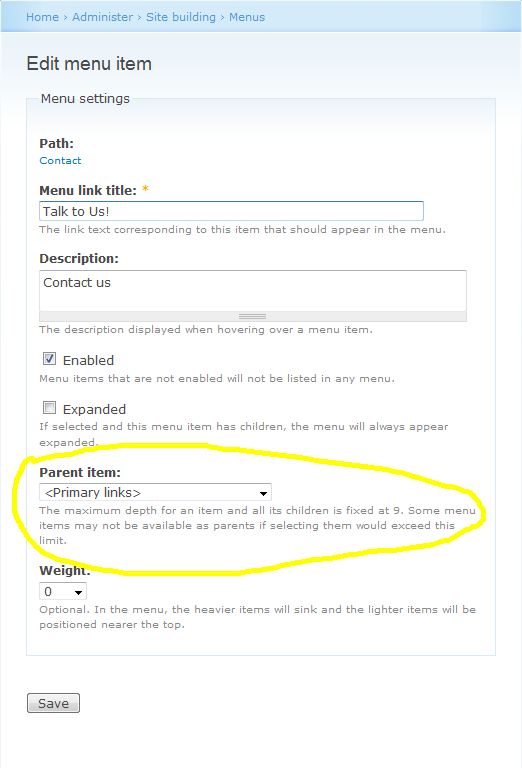
I’ve changed the Menu Link title to “Talk to Us!” because I want to be different. You can leave it as is if you want. If someone hovers over the link wondering what that’s all about, they’ll see a little hint next to their cursor that says “Contact Us” because I’ve added that in the Description box. Make sure you check the Enabled box, so it appears in the menu, and finally, select the parent item, in other words, where you want the link to appear. By default, all new menu items go into the Navigation menu, but we already decided we want it in the Primary Links menu. So click on the little arrow and scroll all the way to the very bottom and you’ll see Primary Links. Select that.
The weight option determines where in the order of items our link will appear. Heavier items appear later and lighter items appear first. We only have one item in the Primary links menu so it really doesn’t matter right now, but as we add more items, it will.
For now we won’t worry about it but we will revisit it later. Let’s leave it as it is.
Save your form and something miraculous will happen, I promise!
Look at the very top right corner of your page and what do you see??? (you can click on the image to enlarge it).
Yes! Our menu item for the contact form. If you click on that link it will take you straight to our contact form our site visitors now send feedback information and any message their heart desires!… hopefully all nice! Our email address is not exposed to the whole world to see and spam, but our visitors still have a way to get to us.
Any information sent through this form will go to the email address you specified when you created the form.
Awesome! Feeling excited yet?
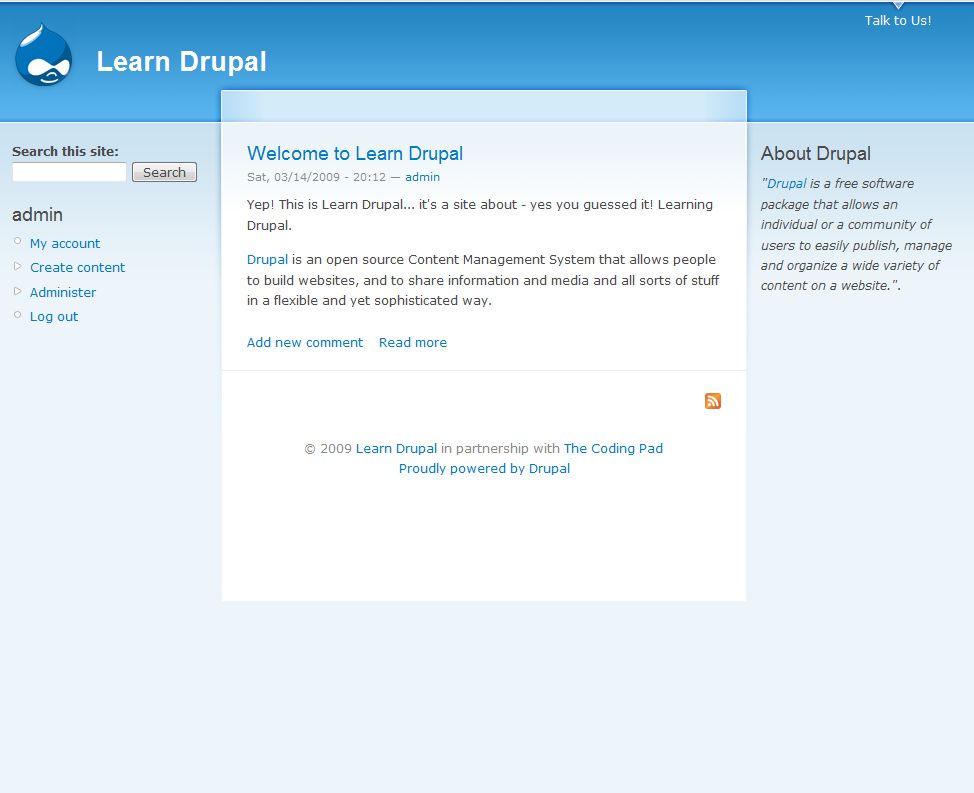
Our website is coming along really well. As we leave today, we’ve learned a little bit about content and adding content, and we no longer have that default Drupal message on the front page. We also learned how to add functionality by enabling modules, and we added a contact form to our site. We also learned a little bit about menus and our Contact form is now accessible to our visitors via the primary links menu. Navigating to the front page of our website, this is how things are looking!
We’ve made a lot of progress today, and hopefully you’ve learned a lot.
In the next post, we’re going to delve into themes and learn how to make our website look even more unique. We’ll play around with blocks some more, and our website will continue to shape up. So hang tight and stay tuned!
Feedback and comments, either here or at Learn Drupal, are always welcome :), so drop me a line in the comments!
I haven’t forgotten about homework, but it IS the weekend, so take it easy. But do play around with your site, go over everything we’ve learned so far, and experiment experiment experiment.

awesome! i love it. keep it up please?! thanks
morgandy,
Thanks for the feeback! Glad you’re enjoying the series and finding it helpful!
Be sure to subscribe to the blog feed so you don’t miss any installments, and don’t hesitate to ask any questions you may have.
thanks
mary
Best step by step guide for a Drupal beginner. Thanks.
best TUT for drupal out there.
Thanks! I appreciate the feedback!!
🙂
mary
if you log out you wont see any primary links
ryan
Yes, that’s true. I tackle that in Part 9 when I talk about users and permissions.
mary
Nice and clear tutorial..
Hope, we’ll get some more interesting from you.
Keep it up!!
Awesum blog..
thnks a lot..
u cudnot hv done ne beter 🙂 !!
Great tutorial
thanks a million
Hi mary i know this may be the wrong place to place my question but its a bit urgent if you can help please.
I have installed the tinymce module and its working fine except that i am having a tag in every entry which causes email to not function properly.
any hint on removing thjis tag?
thanks
sorry the tag is <p> (p)
Nada
Thanks for the feedback, glad you’re enjoying the tutorials 🙂
I personally don’t use tinymce for my Drupal sites. I much prefer fckeditor. But to remove the
tag you need to change some of the configuration options. Since I’ve never done it I had to do a little Google search 🙂
There seems to be some possible answers on the tinymce forums:
http://tinymce.moxiecode.com/punbb/viewtopic.php?id=2418
http://tinymce.moxiecode.com/punbb/viewtopic.php?id=3878
You can also read up on the configuration options on the tinymce wiki: http://wiki.moxiecode.com/index.php/TinyMCE:Configuration
Hope this helps somewhat!
thank you very much 🙂
This is excellent!
Thanks a lot for sharing this..
Hi, Great tutorial.
I have encountered an error after I enabled the modules : “Fatal error: Allowed memory size of 16777216 bytes exhausted (tried to allocate 71 bytes) in /var/www/drupal/includes/theme.inc on line 758”
I have searched the web and didn;t find any help.
Can you please help me?
Can you tell me more about your setup? Are you developing locally on your computer or on a hosted server? What version of Drupal are you using, and what theme?
Hi I’m developing on a local computer using Linnux Mint 7, Apache 2.2.11, PHP 5.2.6 and Drupal 6.13. I have this problem with all the themes:(.Thx
I think i solved the problem I increased the php memory limit.
Drupal 6 can be a bit resource hungry. Glad you got that solved. Try looking into ways to optimize your Drupal site, look at modules that you may have installed that you’re not using, look at your caching options, and such. There should be some information out there on how to minimize unnecessary use of resources and make your site more efficient.
Thanks for coming back and sharing your solution! 🙂
Greetings:
I’m brand spanking new to the worl of Drupal. I’ve been following along with you great series of tutorials in an initial effort to get my feet wet.
I did have one question though about this particular post (part 5) … I noticed that the email address that I specified the contact form’s messages were to go to shows up in the contact form itself. Worse than that, it’s visible in a field that is entitled “Your e-mail address”, when it’s really the email address the message is sent to. At best, that would be confusing to the user. I’ve poked around in the settings page and clicked the form’s “edit” link in the administrative section, but I can’t seem to figure out how to hide the destination email address. Any help would be soooo greatly appreciated!
Michael
I could be wrong but you’re probably seeing this email address because you’re logged in as admin.
What might have happened is that you were testing the contact form and entered your email address and now it’s cached.
Log out of the admin backend, clear your browser cache, and then check the form when you’re not logged in and see if the email address still appears.
mary
Mary –
Thanks for the feedback. I appreciate it!
Michael
All good as far as i am logged in as Admin. When i logout, the link called “Talk to us!” disappears from top (Primary Links section)?
It should have there itself, because anyone can give feedback.
Correct me if i am wrong. I have just started to learning drupal from here itself.
Abhishek
Abhishek
You are correct. I tackle this is in Part 9 when I talk about user roles and permissions -https://codingpad.maryspad.com/2009/03/26/building-a-website-with-drupal-6-part-9-users-roles-and-permissions/
mary
Oh, thanks. I think i raised this point so early…
Well at this point of time, we are having “Admin” block on left panel. It is visible to both, admin as well as user. As i can see my site has started taking shape, so I don’t want to show this admin panel for users.
Is this also you are covering up in next chapters?
My apology first if this question does not belong here.
What’s the best module for placing ads? By best I mean that I will be able to position anywhere I want on the page. The one I have right now does not provide that configuration. Example, I cannot place the ad block at content top position.
Thank you in advance.
There are so many modules out there in Drupal world! I honestly don’t know the answer to this question. What kind of ads are you placing and what module are you using? The solution that comes to my mind would be to not use a module at all. Just create a new block with your ad code and then position that block wherever you want it to appear as long as your theme supports the region. This is a simple solution but one that I think would work.
mary
Hi,
Thanks for the tutorials, they are really useful. I am struggling to get the search bar on my site though. I have done exactly what you have said but nothing appears. Do you know why this might be?
Many thanks
Check the theme configuration and make sure that the Search box is set to show. Some themes don’t have this enabled by default. If you look at the next installment of this series where I talk about themes, you’ll see what I mean.
Also, make sure you’ve assigned the search box to a particular region on your theme.
Hope this helps
mary
mary
Thanks man,
in case someone did not see the “Talk to Us” or ran into “access denied” when asking for /contact
you need to “Administer–>User Management–>Permissions”—> enable “access site-wide contact form” to anonymous user.
Hi Mary
These tutorial are great, one question
when I log in I see the home page, do i need to change the permission/role for the user-name and password I am using to log in?
Michael, I think this is the expected behavior. Then if you want to go the backend just click on the Administer link, or else type admin at the end of your url. Does that make sense?
Thanks Mary
admin at the end of the URL worked!
Hey! I want to know if the function mail works when on local server, because i got problems to try the contact form. By the way thanks a lot!
Abdoulaye
Not by default, you would have to configure it to make it work, and how to do that depends on what your local server set up is (Wamp, XAMPP, etc.). A search on Google for your particular setup should bring up some answers for you.
Best
mary
Hello,
I am new learner of drupal, I had created my own theme and I want to create 3 links my own theme ,
I have tried a lot but it fails.The links r coming on block page but not on front page
Please suggest me How to create the links and what r the required modules for that
Kalpana
I don’t completely understand your question. Where are you trying to place these links on your custom theme?
mary
I have created the 3 pages Home, About us and Contact and In my theme I want to apply these 3 pages as 3 links at the top. I added these 3 pages in
primary link section
Have you allocated the Primary Links block to a region on your theme?
yes , I have alocated this block in header region
Thanks for quick reply,
please give me some code what I have to change in info file and php file and is there any need to change in css
Kalpana
I can’t really tell what is going on in your theme that the Primary Links aren’t showing. To do that I would need to look at your code more closely.
I recommend that you compare your template files side by side with template files from one of the other Drupal themes to see what might be missing… Garland and Zen are a good starting point.
Also, take a look at http://tips.webdesign10.com/how-to-make-a-drupal-theme
mary
Thanking for reply,
In our site we have News and Event Block
and content of this block we want to change accrdingly please suggest what should I do to create this content , can I create page and how I will add the new content???????????
I don’t completely understand your question. When you create a block you add the content to it during creation and you can always edit it by going to the manage blocks page. If you want it to be dynamic then you should look up modules for managing events and such. You may also want to look at the Views module.
I am new to the world of website development. I tried several books, read them, but things really did not make sense till I tried your toturial.
Excellent work.
They say learning new things can be painfull, your toturial has made Learn Drupal a joyfull experience for me.
Thanks for the great guide! Really really helpful!
I have a question about this section though – the link you create for the Contact Form only takes you to the list of all Contact Forms… How would you make it point directly to the one, let’s say to the Website Feedback form you created?
wow! your tutorials are just sample and great. i was searching in 3 languages about how to start with drupal in a sample way and i think i’m on heavin. very helpful very sample very clear.
Really terrific tutorial, it’s like a book I cannot put down. Thanks, really!
Here’s atypo the SC doesn’t catch
“without them you’re[your] Drupal install will be totally messed up
I really enjoyed you post – eventually, I built my contact-us form – thanks to you.
However, I think that there’s a mistake in the Menu configuration – I simply added a new item in whereas I wanted the contact-us link to appear.
Thank you!
Wonderful! It’s the best Drupal tutorial I’ve been looking for! Thank you very much.
Good Tutorial.I am new to drupal and i am finding this tutorial very helpful.Thanks mary for this wonderful tutorial 🙂
Sourav
Thank you for the feedback, glad the tutorial is helpful to you 🙂
mary
GREAT GREAT TUTORIAL, thanks for taking the time to create such a helping document for us.
Thanks for the tutorials. I much prefer a written tutorial to a video tutorial. This has been quite easy to follow so far and is producing results with every step.
Thanks for the feedback guys, glad you’re finding the series helpful 🙂
Awesome tutorial, the further I am going the more I want to explore 🙂 THANKS!!!
many thanks, you are an effective teacher. So easy to get confused if someone is teaching you who does not have the ‘gift to teach’. Keep up the good work please…
Great tutorial!
a comment.
It says:
Navigation is the meny on left hand sidebar that we’ve been using all along.
It should be (see meny):
Navigation is the menU on left hand sidebar that we’ve been using all along.
Great tutorial !!!
Thanks bashir 🙂
I have an assignment tomorrow and i m following ur steps and i would say one thing……god bless you……you saved me……!!!!!!!