Welcome to part 7 of our tutorial on building a website with Drupal 6. Previously we covered:
Part 1: Introduction
Part 2: Installing Drupal 6
Part 3: Configuring your Site
Part 4: Playing with Blocks
Part 5: Playing with Modules
Part 6: Playing with Themes
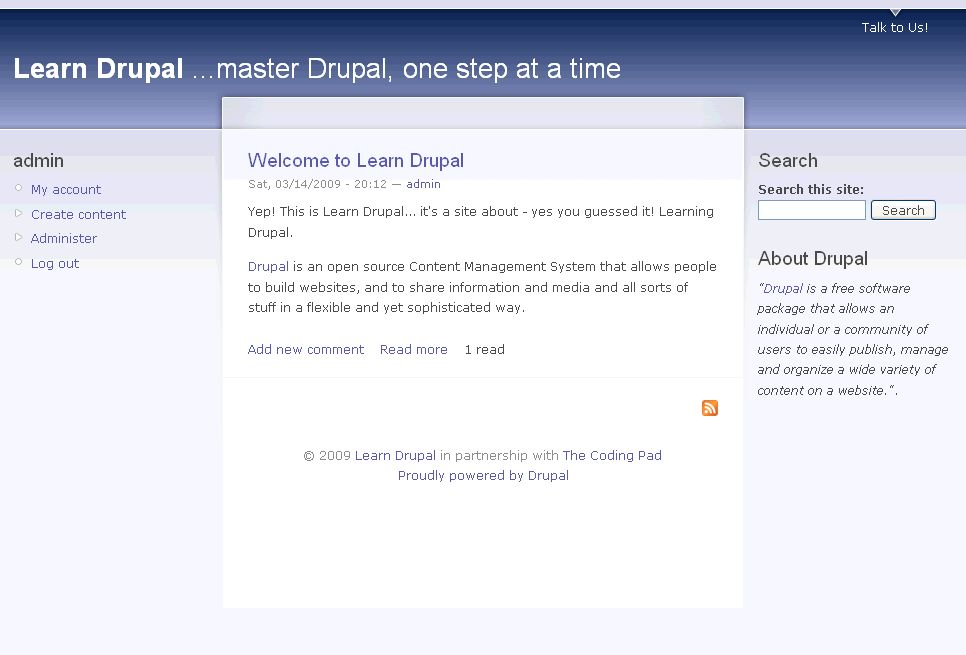
As we go through this tutorials I am building a Drupal resource site called Learn Drupal. In the last tutorial we played with blocks and planned and started implementing the layout of our website. So our website so far looks like this:
In the last couple of posts we talked about modules and themes and learned how to enable the core modules and the themes that come with the default Drupal install. Today we’re going to talk about installing and enabling contributed modules and themes so that we can extend the functionality of our website and have more options with what themes to use.
Digression: Cron
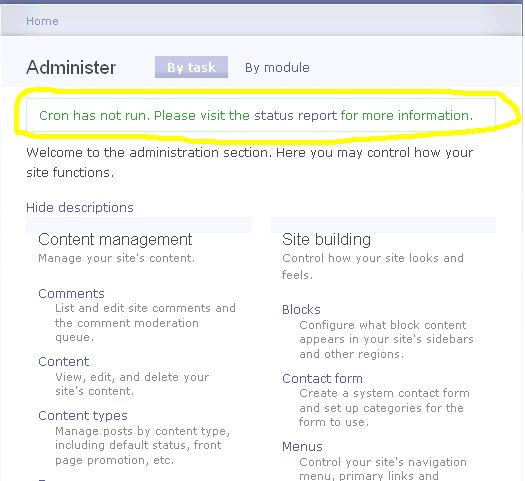
Before we go into that though, there’s one important thing we need to talk about. If you log into your site and go into Administer, at the very top you will probably see this message.
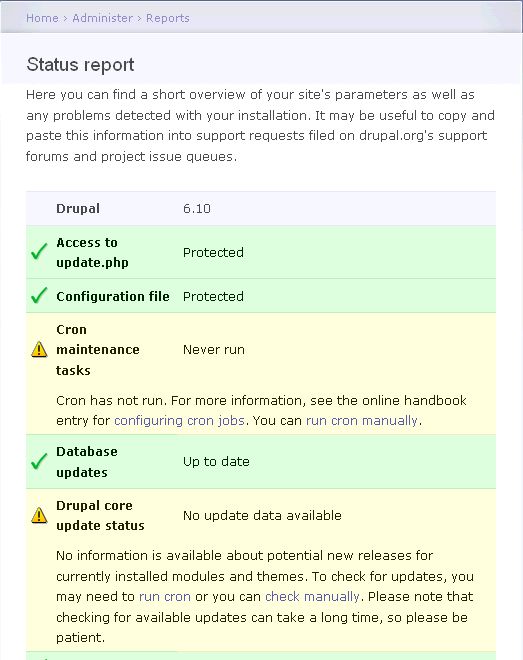
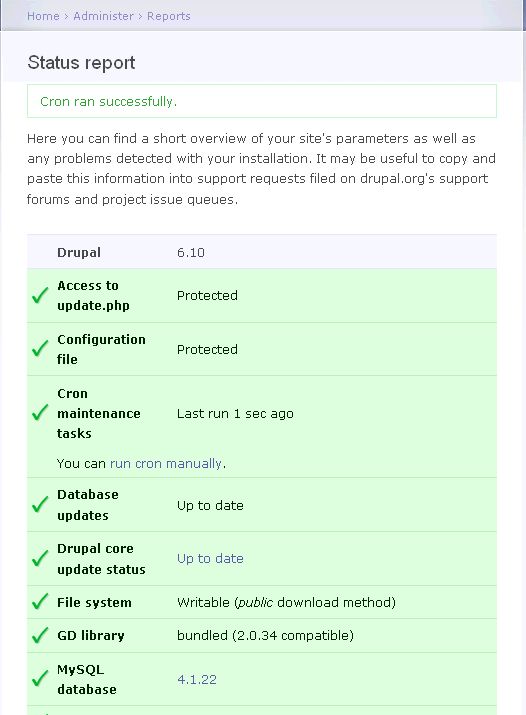
What does this message mean? Let’s click on Status Update:
You can see a warning sign against “Cron Maintenance Tasks” and it states that Cron has never run? The next warning below that also mentions the need to run cron to check for updates. Thinking about it, if you’ve looked at other pages of your new Drupal website you may remember seeing some messages about needing to run cron.
What is cron and why does it need to run?
cron is a time-based job scheduler in Unix-like computer operating systems. ‘cron’ is short for ‘chronograph’. (Wikipedia)
What cron does is allow your website to perform scheduled tasks, such as checking Drupal.org for updates to your modules and themes, updates to the Drupal core, collect information from websites if you’re fetching feeds and data from other sites, etc. How you set up cron for your website depends to a large extent on your hosting provider, and is not something I intend to go into in this post. You can contact your hosting provider and ask them how to set up cron for your site. There are also numerous articles and tutorials on the web. Areally good one for you to read is http://webhosting.devshed.com/c/a/Web-Hosting-Articles/What-is-CRON-and-What-Can-it-Do/. There’s also a cron module for Drupal called Poor Man’s Cron, which you may want to investigate after going through today’s post.
For now, we’re going to run cron manually simply by clicking the “run cron manually” on the previous screenshot.
You can see now that the warning messages have vanished, our site has run the scheduled maintenance tasks and all is well. I’m going to go ahead and set up a cron job for my site. If you have trouble setting up cron, you can come back to this page frequently and it will tell you when cron was last run and give you the opportunity to run cron manually, but this is not a very efficient way to do it, you do need to set up a cron job. We’re going to come across the importance of cron jobs again when we use the Aggregator module to add some features to our site.
Getting Back on Track
We want to learn today how to install contributed modules and themes to our drupal install so that we can extend it’s functionality and have a more varied number of themes to work with.
The process of adding themes and modules is not difficult at all. We already know how to activate themes and modules. There are some crucial things to keep in mind though:
- Where to find contributed themes and modules
- Where to place contributed themes and modules
Where do you find contributed Drupal Modules?
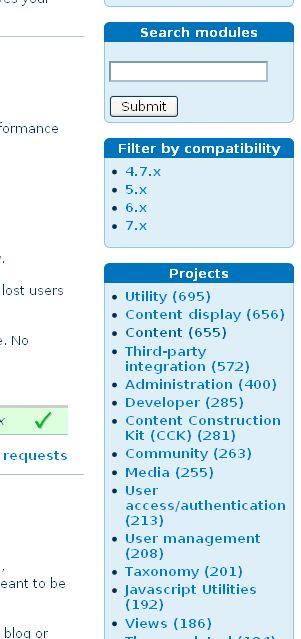
This one is easy. The main place to always look, especially for modules, is the official Drupal website module repository. There are so many modules that it’s hard to know where to start, and so they are organized by functionality to allow you to narrow down the choices. If you go to the drupal module page (http://drupal.org/project/modules) and look on the right sidebar, you’ll see a box titled “Projects”. This is where you can select what your focus is and see the modules classified under that project.
You can also filter by Drupal version so that you only see modules that are supported for your version of Drupal. There’s also a handy dandy search box to allow you to search for specific modules.
So say for example you want to implement some kind of rating functionality on your website where visitors can rate content, just look down that list of Projects and you see there are 98 modules (as of this writing) related to Evaluation/Ratings. Click on that and explore away!
Another way to find good modules is to read the Showcase section of the Drupal forums where people with Drupal sites strut their stuff and often discuss what modules they used to implement different features on their websites. You can gather a lot of ideas here. The third place to get ideas on modules to use is the Drupal community forums. Do your homework, ask specific questions, and be courteous and patient. There’s great help to be found in the community. And be sure to share what you know too!
Ofcourse, if you’re the adventurous type and you know how to code, especially in PHP, and you just can’t find that module that does what you want it do, you can always create your own module! Yes you can! And be sure to share it with the Drupal community, giving back is the way of Open Source. If you’re considering creating your own modules, a good starting point is The Drupal Module Developer’s Guide, on the Drupal website. Other resources include: Pro Drupal Development, Second Edition (Beginning from Novice to Professional) and Learning Drupal 6 Module Development [LEARNING DRUPAL 6 MODULE DEVEL]
.
Where to find Contributed Themes
Once again, for Drupal themes, the best place to start is the Drupal.org theme repository. As I mentioned in the last post, you can find these same themes organized in a different manner and sorted by version compatibilty at Theme Garden. There are many other sources of Drupal themes, and a search in Google should lead you in the right direction.
You can also buy Drupal themes at different places. The excellent source of all kinds of themes is ThemeForest, and they have a small collection of Drupal themes under Misc. You can also hire someone to create a Drupal Theme for you. Again, if you’re feeling adventurous and want to create your own themes, a good starting point is the the Drupal Theme Guide. Some cool books include again Pro Drupal Development, Second Edition (Beginning from Novice to Professional) and Drupal 6 Themes: Create new themes for your Drupal 6 site with clean layout and powerful CSS styling
.
How do you Install Contributed Drupal Modules and Themes
So now we have an idea where to find contributed modules and themes to our install, how do we install them? Most of them will come with install instructions, and you should read them carefully. In general though, the steps below will work for most themes and modules:
- Create folders for your contributed themes and modules. Go into your sites/all folder in your Drupal install. Create two new folders there, one called Themes, and one called Modules (if they don’t already exist). This is w
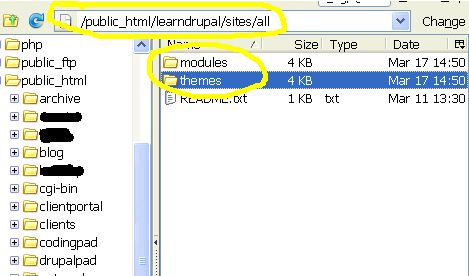 here you are going to upload your new themes and modules (themes to the themes folder and modules to the modules folder). You may be wondering why you don’t go ahead and install them in the existing modules and themes folders in the base of your install. Well, doing this allows you to separate your core install from additional stuff, which is important when it comes to upgrading your site or your modules and themes. This is the best practice in Drupal, to separate the core from the contributed. Here’s my FTP screen showing my sites/all/folder with the two new folders.
 - Download the theme or module you want to install and extract it to your desktop. The download will usually be zipped so you need to extract it. Look through the files and find the Readme file, usually named that, or it could be named something like Read This First, Instructions, or similar. Read through that and see if this module or theme has any dependencies (other modules it needs to do it’s work) and make sure your install meets all requirements if any. Also note any special installation or configuration instructions. Of course you want to make sure that your Module or Theme is compatible with your Drupal install version.
- Upload the folder to your Site: Using FTP upload the module or theme folder to your sites/all/modules or sites/all/themes as appropriate. If you’re developing locally on your computer of course you just need to copy and paste, no FTP needed.
- Enable and Configure your Theme/Module: We went over this in the last two segments of this tutorial, so you should be good to go. Remember also to that all instructions pertaining to your theme or module will be in the readme file.
Installing Contributed Modules
OK, so why don’t we try this out. I am going to install the Pathauto module for the Learn Drupal website which will help us make our urls look nice and intelligeble without too much effort on our part. I won’t go into configuring the Pathauto module in this post because that’s a whole tutorial in itself. I do recommend that Pathauto be one of those modules that you install as a habit in your Drupal websites.
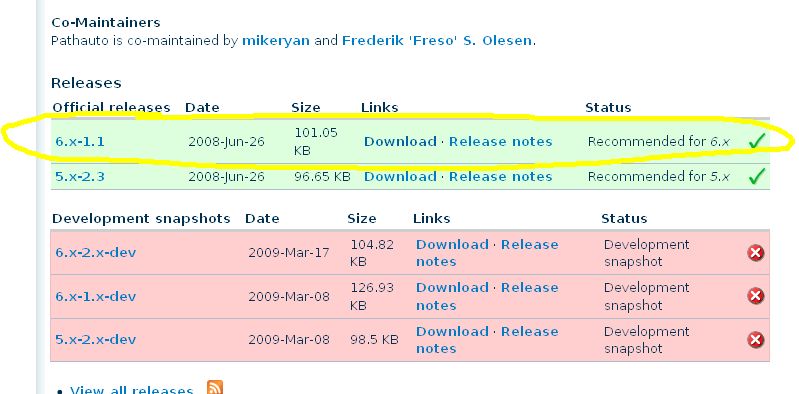
Go into the module page http://drupal.org/project/pathauto and read the text on the page to get a basic idea of the module. This will often tell you what the module needs to function, and in this case we see that we need the Token Module (found at http://drupal.org/project/token). Make sure you download the 6.x versions that are compatible with our Drupal 6.10 website.
Once you download these files, extract them on your desktop, read the readme files and make sure you’re all set to go. Open up your FTP program if developing remotely and upload the folders to your sites/all/modules folder. If developing locally then you just need to copy and paste your folders to the sites/all/modules folder.
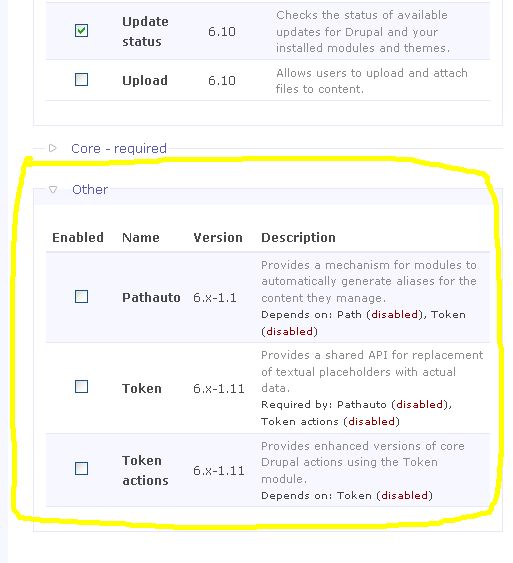
If we now go into the Administer -> Site Building -> Modules page, you’ll see the two new modules all the way at the bottom in the “Other” section:
You can see there that the module description tells you what the module depends on, and what other module on the list needs it to work. The Pathauto depends on the Token and Path modules to do its job, so we need to enable these two modules. We’ll also enable Token actions because we’ll need it later. The Path module is one of the core optional modules so scroll up on the page and find it and enable it.
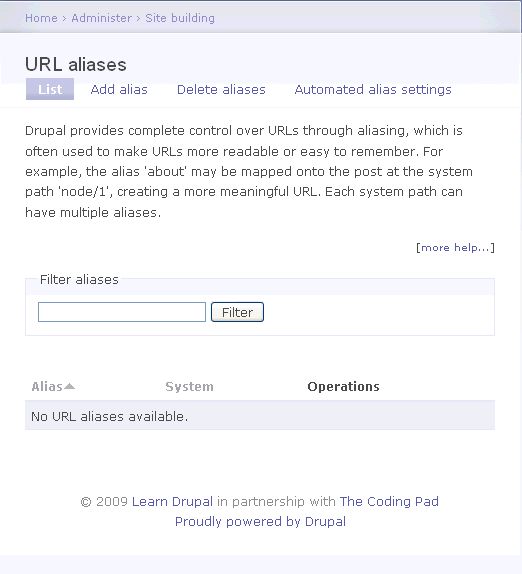
Once all four checkboxes are checked, make sure you click on “Save Configuration” to save your settings. If we now look at our admin screen you’ll notice a new entry under Site Building called URL Aliases. ( If you’re ever puzzled about where a new module’s configuration is done, either check the readme.txt file that came with the module, or go back to the Module’s home page (where you downloaded it), scroll all the way to the bottom, and find the Documentation link. Reading through the documentation should tell you more about where and how to configure the module).
Back to the URL Aliases page:
This is where we configure our Pathauto module to generate aliases that make our urls look not just friendly, but very nice and pretty. We will look some more at this page in the next posting when we start looking at the meat and bones of our website, adding content and creating pages and such.
For now, we will stop here, I think you have enough on your plate to work on. We’ve learned today where to find contributed modules and themes, where to install them and why, and how to enable them. In the next segment, we will start talking about Content, and add some content to our site. We will also talk about the Path and Pathauto modules that we enabled today and do some configuration of the Pathauto module.
Homework: (It never ends!)
- I’m sure you have some ideas of websites you want to build with Drupal. Look through the modules page and see the possibilities!
- Try to upload a contributed theme to your website. Look through the Themes Repository and find themes you like. I realize I didn’t go through an example here, that was intentional. See if you can go through the process yourself. Remember, this is a learning process!! If you run into any difficulties do post them in the comments section and we’ll address them.
- Find out how to setup a cron job for your website and do it.
Added to DrupalSightings.com
Thanks for the great tutorials!
Thanks Jim, glad you’re enjoying the tutorials. Thanks for the add!
mary
Thanks for this great series of tutorials…It was awesome…continue the good work
Hi,
When I enable pathauto, token along with path, I stop seeing anything in http://localhost/admin
Best Regards
Deepak
Sounds like you may be running into a memory problem. Have you tried clearing your cache? How much memory is PHP allocated in your setup?
Hi,
I increased the PHP memory to 144M. Even then the page is not showing.
Thanks
Deepak
Did you restart apache (or whichever webserver you’re using) after increasing memory? Also, did you clear your cache?
Not sure what could be causing this besides a memory issue. You could try another browser and see if there’s a difference. But make sure you restart apache and then try again.
The one thing I can think of is something got corrupted during the module download and upload and this may be causing your problem.
mary
Hi,
Yes I restarted the apache web server. In the site configuration – status I saw the PHP memory size to be 144M.
I am simply copying the complete downloaded module in modules directory.
Thanks
Deepak
Deepak,
144M is more than plenty. Did you change the memory limit in the php.ini file? Read this for more info – http://drupal.org/node/207036
Besides the memory issue, I can’t really think what else could be causing this. Take a look at your apache error logs and see if there are any entries that indicate an issue with Drupal, the modules, etc. The clue might be there.
mary
Mary:
Thanks so much for the advice on the Content Access Module. Your posts are really excellent. I was rereading Part 7 and I wanted to clarify one point. I have a web hosting account at GoDaddy, so the install is more or less automated. After the install, I have an HTML folder and all the Drupal folders are within HTML. Included are Theme and Module folders. I’m trying to figure out where I would create the new Theme and Module folders that you recommend. Also, I’m trying to use the Marinelli theme. Their install instructions say that it should be installed as a sub-theme. Can you tell me what a sub-theme is and how it gets created? Thanks again, Howard
http://drupal.org/node/225125
Thanks Deepak.
Howard
Glad the information helped. In the HTML folder where all your Drupal folders sit, there should be a folder named “sites”. Inside that folder should be two folders, “all” and “default”. Open the “all” folder and create two new folders -> “themes” and “modules”. Your downloaded themes go into sites->all->themes and your downloaded modules go into sites->all->modules.
For installing the subtheme, the link Deepak has provided should prove quite helpful. If not, let me know and I’ll help you out.
mary
Mary and Deepak:
Thanks so much for your help. In case anyone else is looking for info on sub-themes, in addition to Deepak’s link, a good example lies in the Marinelli theme folder. Just look at the Alagna folder (or giordano or gnifetti). Alagna is a sub-theme of Marinelli. Thanks again, Howard
thanks for sharing that info Howard
mary
Hi Mary. Here’s a Drupal/PHP question for you. In my setup, the author and post time don’t show under the teaser, but do show under the full view of a story. Postings at http://drupal.org/node/266730 and http://drupal.org/node/577454 point to the node.tpl.php file. I’ve tried several variations of the suggestions in these posts but they haven’t quite worked, unless I made some error along the way. One way, for example, displays the author and date twice under the teaser; another displays it under the teaser but not under the full view; and another wipes out the formatting of the page completely. Do you have any suggestions? Thanks! Keep up the great work! (Except do more of it!)
Andrew,
The first place I would look would definitely be the node.tpl.php file as the posts recommend. What theme are you using? I may be able to make a better suggestion based on your theme.
mary
Hi Mary. I’m using Alagna, a sub-theme of Marinelli. The URL is http://www.cuyahogafx.com. Thanks.
Andrew
Sorry for the delay. OK, I looked into the Marinelli node.tpl.php. If you want the author and date information to appear in both the teaser and full view, here’s what you need to do.
In the node.tpl.php you have a block of code that looks like this:
OK, right under that block of code, paste this:
PS: Remove the extra spaces that I added in the code tags, I put them there so the code would read correctly in WordPress.
This should now work. What the first block basically does is say that if what we’re seeing is the full view and not the teaser (hence the ! before $teaser, post the author and date info). The second block of code says that if what we’re seeing is the teaser view (notice there’s no ! before $teaser), then show the author and date.
Because we’re applying this to the overall node.tpl.php it will apply to Marinelli plus all it sub-themes.
Hope this helps 🙂
mary
Worked like a charm Mary. Thanks. I thought I tried that setup but if I did I must have been off slightly somewhere. Just one question I’m curious about. The .php file has tags around the < ?php print t('By ') tagging but they're omitted from your tagging above. However putting them in or leaving them out doesn't seem to make any actual difference. Are they there for some other reason?
Andrew
What tags are you referring to? The “< ?php" should be there with no space between the < and ?, similarly to the "? >” again with no space between them, I just added the spaces so they would render correctly in the comments and not be processed as code by wordpress. Basically the < ?php opens the block of code and the ? > closes the block. Anything between those tags gets processed as PHP code.
Is this what you meant by tagging?
mary
I just started a new drupal website (my first experience with Drupal) and after about 5 hours (installation included) I am now at the end of part 7 of your excellent tutorial.
You have done an amazing job, I am in my 70s and all works fine to this point. Congratulations and all the very best to you.
Costas
Absolutely brilliant series – have an issue re pathauto – I downloaded it and it is visible and configured OK .
Problem is that URL Aliases is not on my menu
additionally my Apache times out occassionally need guidance re how to find and increase increased the PHP memory
Please ignore problem re URL Aliases – now on menu but have problems as server crashiing out
Fatal error: Maximum execution time of 30 seconds exceeded in C:\wamp\www\drupal-6.20\includes\database.mysqli.inc on line 115
Any ideas welcome Thanks
DavidK
Have a look at http://drupal.org/node/66105
mary