Welcome to part 9 of our tutorial on building a website with Drupal 6. Previously we covered:
Part 1: Introduction
Part 2: Installing Drupal 6
Part 3: Configuring your Site
Part 4: Playing with Blocks
Part 5: Playing with Modules
Part 6: Playing with Themes
Part 7: Installing Modules and Themes
Part 8: Pathauto, Content, and Content Types
As we go through this tutorials I am building a Drupal resource site called Learn Drupal.
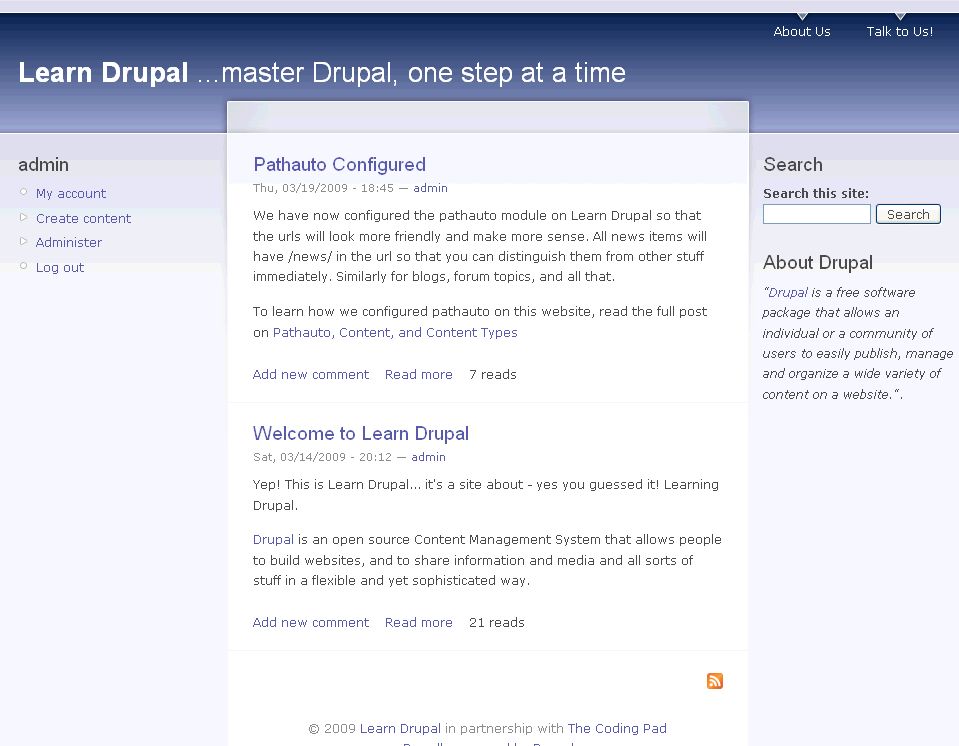
So far our website looks something like this: (you can click on the images for a larger view)
In this post we’re going to start looking at the basics of the interaction part of our website. What do visitors to our website see when they land on the front page? What can they do with the content they see on our website? Do we want them to be able to interact with the website at all, or do we want them to come, see, read, and leave? Well, in the case of a business website that may be your intention. But in most cases, you want your users to interact with your website, to leave their thoughts on the content, maybe even to contribute content, to vote on polls, to comment on photos, maybe even to start and maintain their own page on your website. Well, it all starts with user management, which we’re going to talk about today.
As you can well imagine, the topic of user management and all its complexities is one too wide to be covered in one blog post. So in this post I am simply going to introduce you to the basics of how user management works in Drupal, what roles are, and how to set permissions and manage users on your site and how they interact with your website.
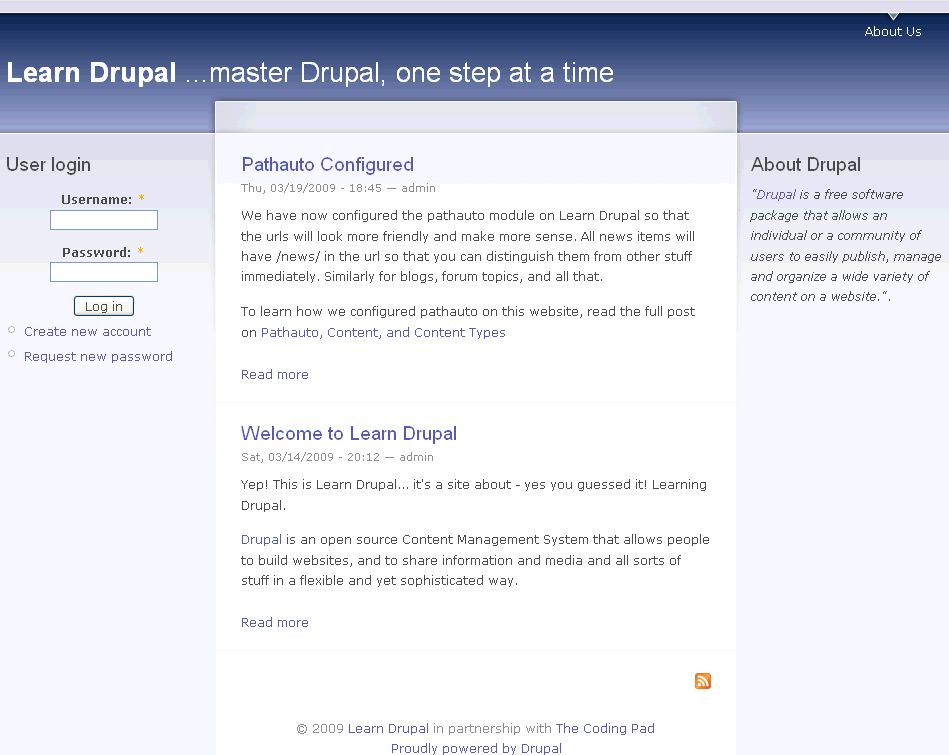
Permissions are a very important topic in Drupal. To illustrate, go to your site and logout. Then view the front page. Once I log out of Learn Drupal, this is what I see:
This is the view your visitor sees when they browse to your site. Incidentally, it’s easy to forget to check what your site visitor sees. We get so caught up developing and building our site that we forget that what we see is not necessarily what guests to our website will see, simply because being logged in gives us more access than a random visitor might have. So it’s important to log out every once in a while and make sure the visitor side of the website looks like you want it to.
As a good illustration of this point, look at our page. Everything looks fine except for one thing, the Contact form is not accessible, which means our site visitors have no way to talk to us and let us know what a fine job we’re doing. That’s not good. What’s the point of a contact form if no one can see it I ask you?
Now you may not want guests to be able to use the contact form, only registered users, but in my case, I want anyone and everyone to be able to contact me and tell me what a stellar job I’m doing at Learn Drupal. So this is definitely something I want to remedy.
If you’re observant, you probably also noticed that our search form has disappeared!
User Management Overview
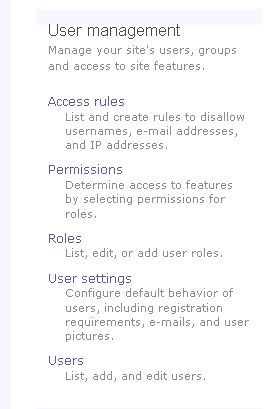
Let’s go ahead and log back in and go into the Administer page. Once there, look at the section titled User Management.
Access Rules allow you to control access to your site by setting rules to allow certain users not to be able to register or log on to your site. We’re not going to go too much into this at this point, but we will revisit access rules at a later date.
Permissions define what a user can or cannot do on our website depending on what role they fall into.
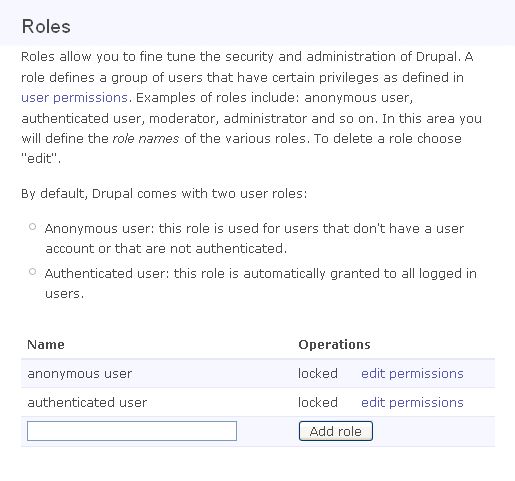
By default, Drupal comes with two roles, “Anonymous User” and “Authenticated User”. The anonymous user is one who is not logged into the site, while the authenticated user is one who is registered and able to log into the account. You can create more roles depending on the kind and complexity of user interaction you want for your website. The permissions that are given to the authenticated user will trickle to all other roles that you create by default, so you should ensure that you select your permissions carefully. If you want ordinary members to have fewer permissions than a “contributor” or “moderator”, then you want to give the authenticated user the permissions that you want for the ordinary member, and then add more permissions to the contributor or moderator.
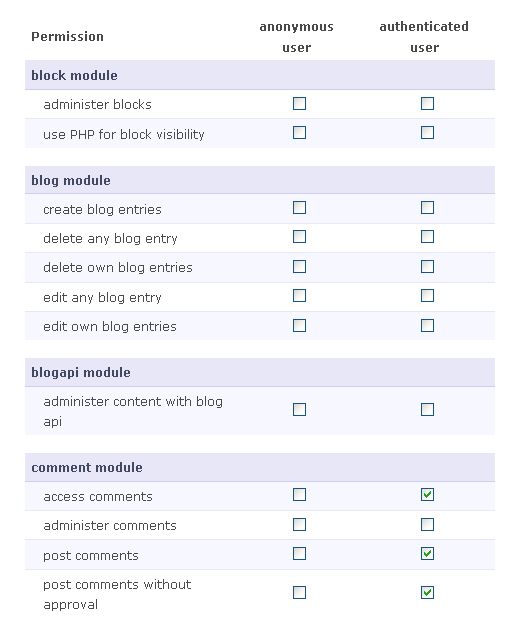
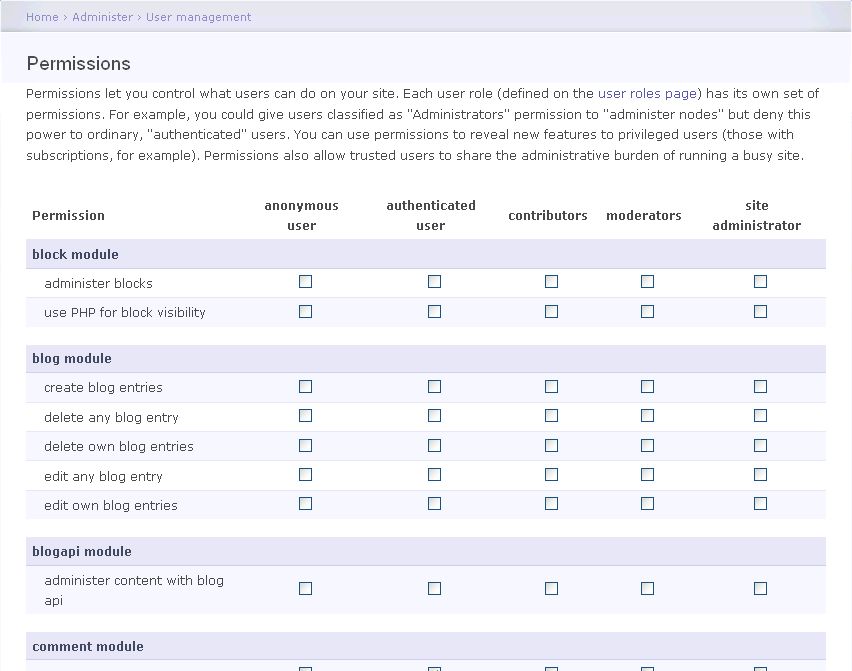
The permissions page gives you an overview of all the permissions, and allows you to set permissions for all roles in one place.
Roles defines a groups of users that have specific privileges as defined in user permissions. Examples of roles include: anonymous user, authenticated user, moderator, administrator and so on. On the Roles page, you define the role names of the various roles. You can also set the permissions for each role by selecting edit.
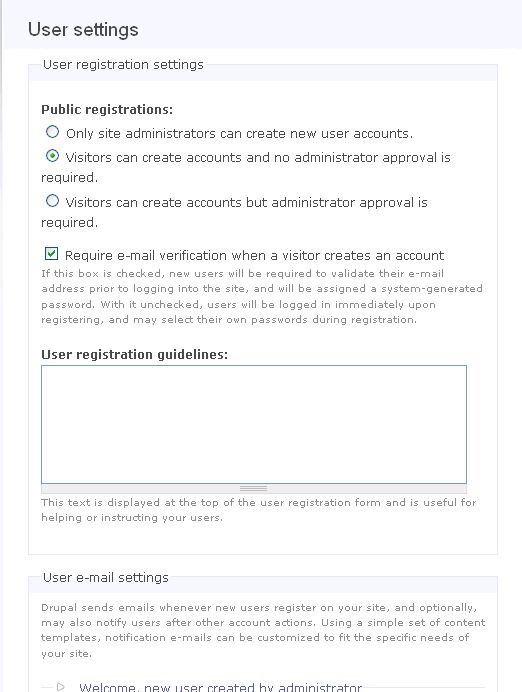
User Settings is where you can configure the default behavior of users, including registration requirements, e-mails, and user pictures.
Scroll through the page and see all the configurations you can set. Do you want to control who creates an account by moderating every user registration? Do you want your site to be by invitation only, i.e. visitors cannot create new accounts, you have to create all new accounts?” You can enter user registration guidelines, control what the text of the welcome email will say, whether users need to confirm their registration by email, etc. There are many options on that page and how you set them is a matter of personal preference.
Remember, if you select ” Visitors can create accounts but administrator approval is required”, you need to remember to check your email so that you can approve new users to your site.
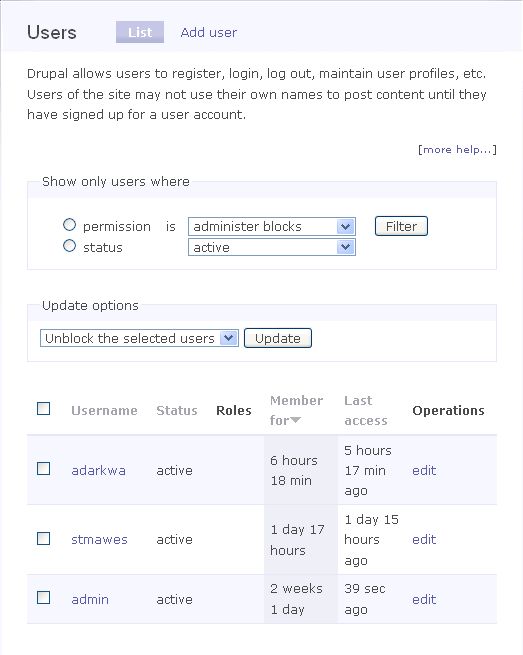
Finally, the Users page lists the users on your site, and allows you to add, block, activate, delete, edit, and otherwise manage site users.
Look at that! I have users on my website. Wow! You can see that you can choose to see only particular users by using the filter tool. For example, you can choose to view only users who have certain permissions or who are blocked. You can also, on this page, look at each user’s activity and track what pages they’ve visited and what activities they’ve been involved in by clicking on edit.
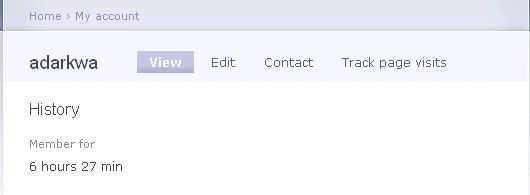
This profile view is very plain, and we will learn how to spice it up later, but for now it gives you the basic information. It also allows you to track page visits for your a specific user if you need to contact that user, or to edit that user’s settings (e.g. if you need to block them for some time for one reason or another one, or to activate their account if you have set moderated registration).
So after that brief overview, let’s get into the nitty gritty of it, create some roles and adjust some permissions to manage user interaction on our site.
I want Learn Drupal to be an interactive site for members and site visitors alike. Since this is primarily a resource and learning site, I want site members to be able to create content, write comments, have discussions, and generally interact with each other. As members become more trusted and active on the site, I want them to have more permissions and be able to do more things, and I want to decide that on a case by case basis.
Creating Roles in Drupal 6
So I will start off by creating some roles.
Note: Ideally, it is considered best practice to not use your number 1 account, the one you created when you installed Drupal, for routine administrative tasks, because it’s a very powerful role and you can easily make an irreversible mistake. It’s always advisable to create a separate user for yourself with an admin role that you will use for admin stuff, and reserve the main ID1 account for major maintenance, upgrade, etc. tasks.
So I’m going to create a Site Administrator role for myself, or for whoever may eventually run this site. I will also create the following roles:
- Moderators – since this is going to be an intensively interactive site, I will need moderators who can go through the site and clean up stuff, delete spammy comments, remove inappropriate links, etc.
- Contributors – these will be users who can add content such as tutorials, can have blogs, and can contribute articles that will appear on the site.
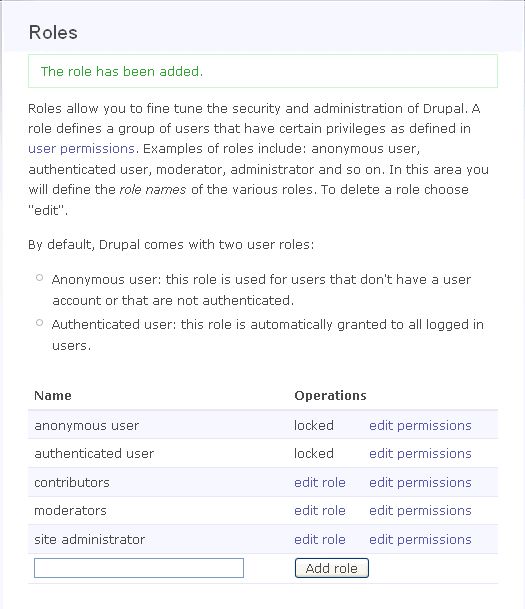
I may add more roles as my site grows, but these will do for now. So let’s hop over to Administer -> User Management -> Roles, and create the roles first simply by adding them into the box at the bottom of the current roles and clicking “Add Role“:
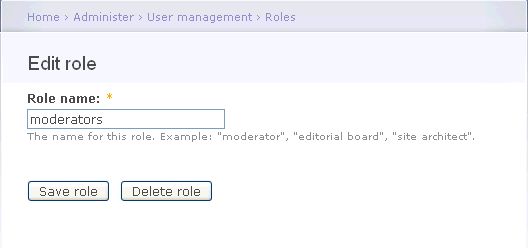
I now have my three new roles, and I can edit them and edit their permissions. Clicking on “edit role” gives you the option to change the name of the role or to delete the role.
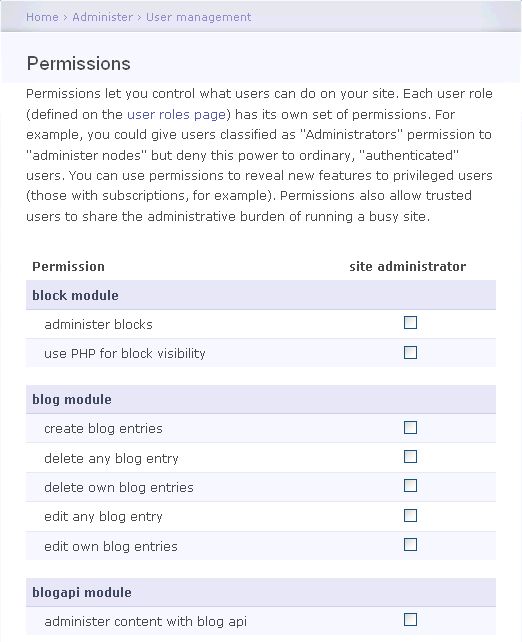
If you click on “edit permissions” you can set permissions specific to that role:
If you recall the Permissions screen that we saw earlier, the Permissions page allows you to set permissions for all roles on one page, but this page lets you set permissions for the particular role that you’re working with.
As you can see, our new roles have no permissions assigned to them yet, so we’re going to do that next. Instead of clicking on each role and editing it’s permissions separately, I want to see the big picture, so I will set the permissions on the main permissions page.
Setting Permissions on Drupal 6
On your site, navigate to Administer -> User Management -> Permissions
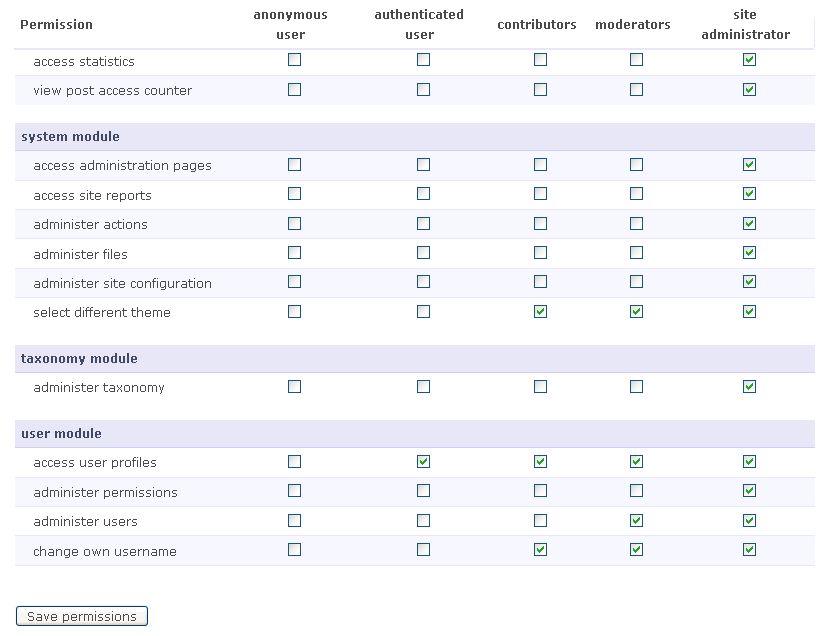
You can see new columns have been added for our new roles. All the roles you create for your users will appear here and you can set their permissions. Remember, any permissions you give to the authenticated user will apply to anyone who is logged into your site.
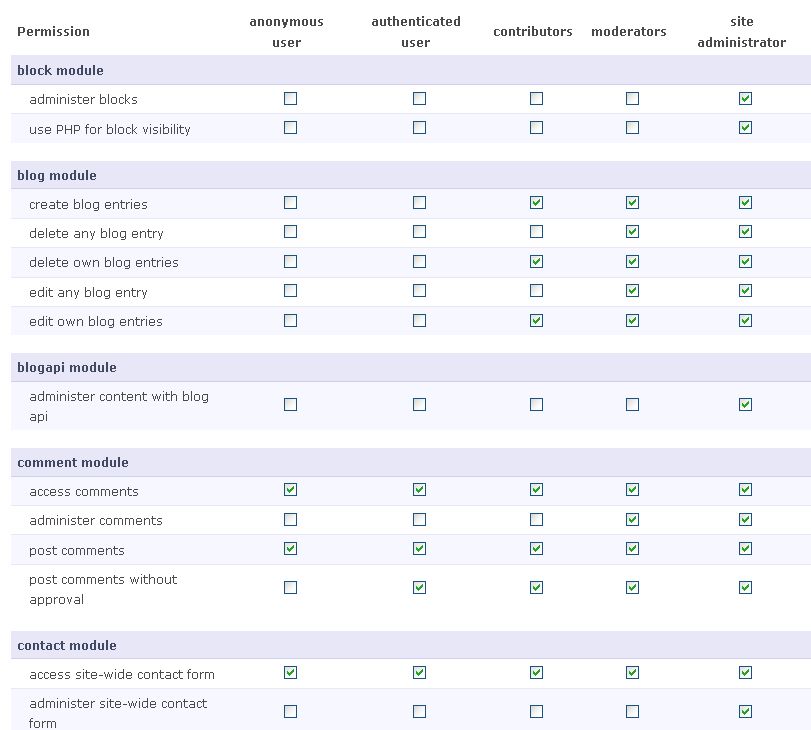
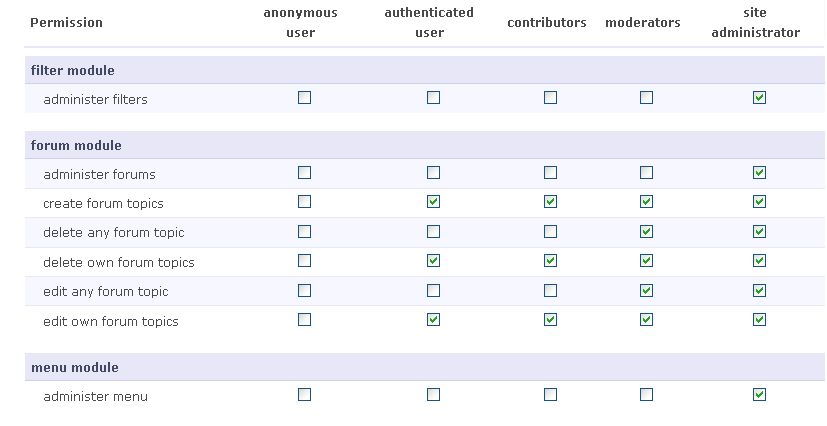
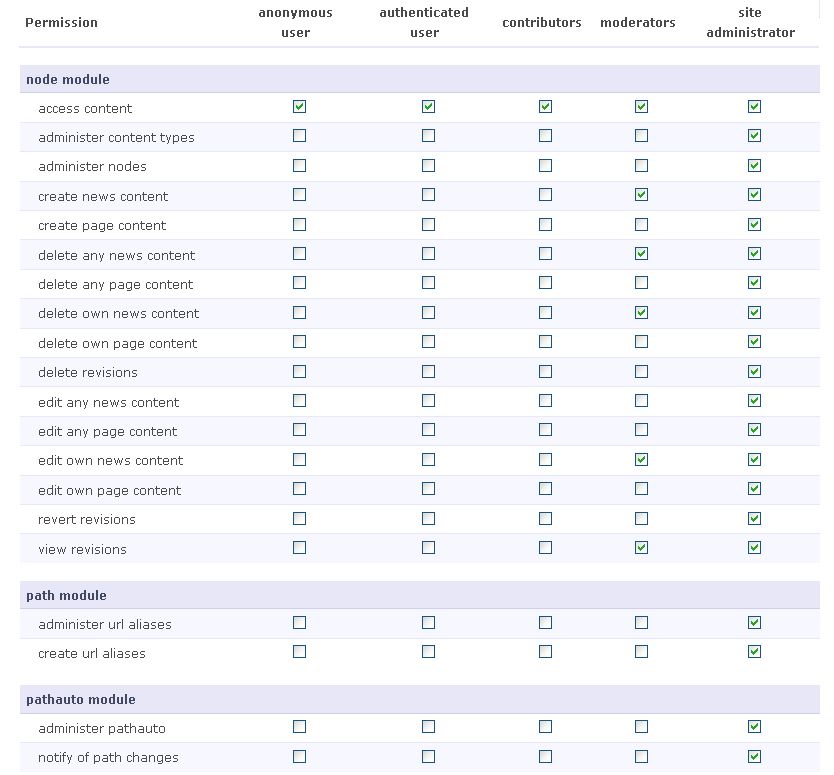
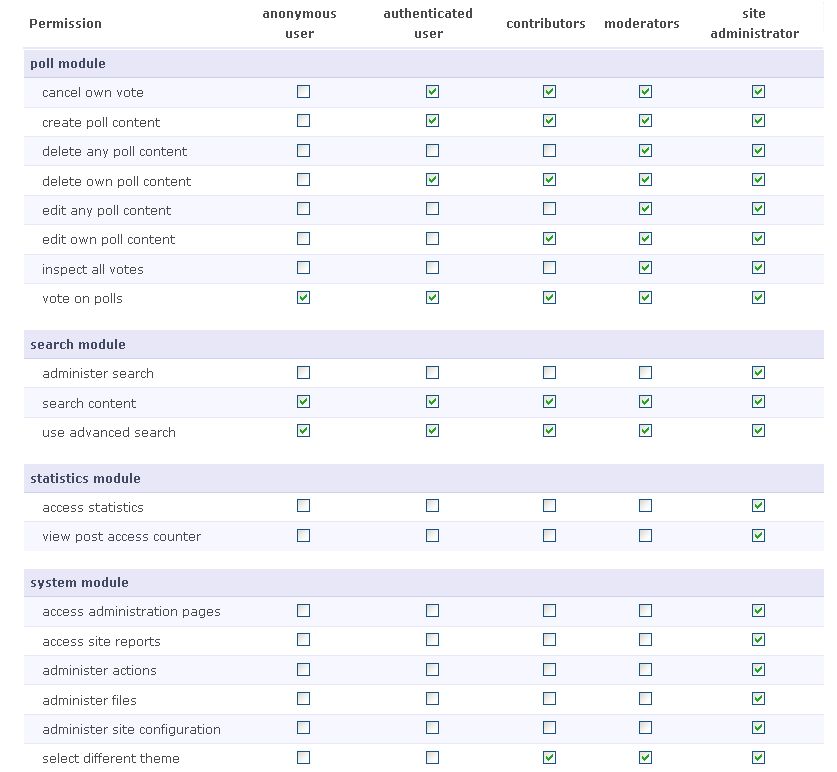
How you set the permissions here is, like I said, a matter of personal preference based on how you want your users to interact with your website. I want the Site Administrator to be able to do everything, so I check them all. In the next screenshots, I’m going to show you how I have set the permissions for my site. I will probably go back and fine-tune them, but this is how I’ve set them for now (remember you can click on the image for a larger view):
As you can see, setting permissions can be quite an intimidating task. It’s important as you plan your website to think about how you want your users and visitors to interact with your website, what roles you want authenticated users to play, and so on. The ability to create roles and assign permissions to those roles allows customizing how users interact with your site, and managing that interaction, which is a very powerful feature.
Before we call it a day, let’s go ahead and create that admin user that will allow me to do routine tasks without having to use my main ID1 account as I’ve been doing.
Adding a User in Drupal 6
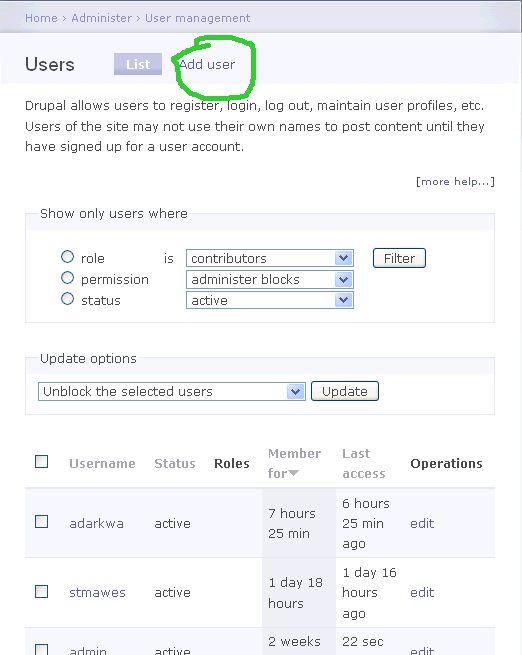
Go into Administer -> User Management -> Users, and click on Add User
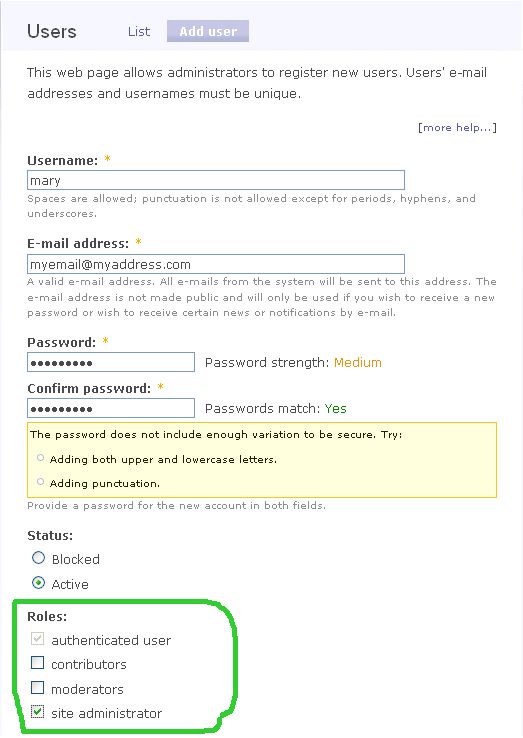
Then enter the user details for your the new user and assign that user the role of site administrator:
Then scroll down and click on “Create new account“. I didn’t select to send an email to notify the user of a new account since I’m creating this account for myself. If you have set your site so that you’re the only who can add users, you’ll probably want to check the “Notify user of new account” so your users know an account has been created for them.
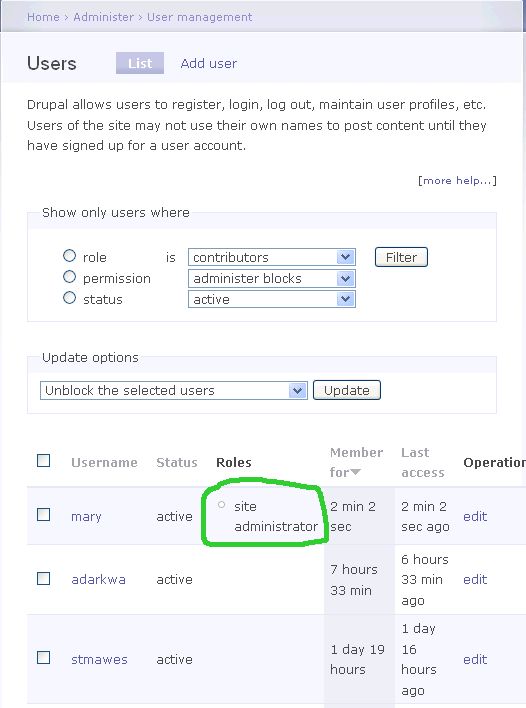
If you now go back to Administer -> User Management -> Users, you’ll see the new user listed there, as well the role that they are assigned.
If you now want to assign specific roles other than “authenticated user” to any other user, just click on edit against their name and you’ll see an option to select a role for them.
One last thing, if we now log out of the website, and look at the front page, you’ll notice that the Contact link and the Search form are visible to all site visitors even if they’re not logged in (authenticated”), because we set permissions to allow anonymous users to search the site and access the contact form.
IMPORTANT TAKE-HOME POINTS:
- Any permissions you give to the authenticated user role will apply to anyone who is logged into your site… did I say that before? Oops!
- Anytime you enable a new module or create a new content type, you need to go to the Permissions page to set how you want your users to interact with that module or content type.
- Don’t use your ID1 account for routine admin tasks. Create another account for that and reserve your ID1 account for major site maintenance tasks.
- Drupal is fun and powerful.
Homework:
- Think about what other roles you may want for your site, and what permissions you want the different roles to have. Add a couple of new roles to your site for practice (I know you can come up with some :))
- Create new users and assign them the different roles, and then log in as each different user and see if your permissions are working as you want them to. For example, if you designated a contributor role like I did, create a user who has the role of contributor and then log in as the contributor user and make sure you can create a blog entry, but not moderate content that you haven’t created, or any other task that the contributor should not be able to do. In other words, PLAY!
- Leave a comment here and let me know if this series if helping you and if you have any questions.
In the next segment, we’re going to look at our Reports section and see what information our Statistics module has collected on Learn Drupal, since it’s been online for a couple of weeks now. Until then, maintain your cool, and have fun with Drupal!

Excellent post. Very Helpful.
Impressive writing.
Rahel, thank you for the compliment. Hope the tutorials are helpful! 🙂
I want to build a drupal site for 2 different kind of users (User group A, and User group B). I want to separate them through 2 separate menu options (User group A – User group B). on the main page. I also want, that both groups are able to rate and to comment each other. I
And here comes my question: Is that possible with drupal?
Yes, that’s definitely possible 🙂
mary
Hi,
I will be grateful, if you can give an idea in a broader sense on how to achieve the above.
Thanks
Deepak Bhatia
Deepak
See my email to you
thanks
mary
Excellent post, it answered many of my questions. I still have one question remaining:
The site I’m envisioning works as follows:
Anybody can view any users’ profile, even if viewer is not registered
Registered users can post content
Some users will be enhanced into moderators
When viewing user profiles people should be able to contact the moderator role users, nobody else.
How would I put this together?
Thanks for your help!
Tom
The way to do this is by setting up roles and giving them the relevant permissions with regard to the different kinds of content.
Under User Management->Permissions, scroll to user module and set that unregistered can access user profiles.
Additionally, when setting up roles I believe you have options to decide who can have contact forms in their profiles, and so you can set this to only people with the moderator role.
Hope this helps
mary
Thank you, it is very helpful.
This is about my 3rd time thru your excellent guide to getting started in Drupal. It’s really more than just getting started … it’s a checklist for administration and a launching pad for the deep understanding necessary to get at all the goodies – written in plain English. Kudos indeed.
This is about my 3rd time thru your Drupal setup primer and have found it invaluable in so many respects. Drupal can get deep quickly – so your plain English checklist on the big picture and several important details is much appreciated. Kudos indeed.
BillyBob
thank you so much for your feedback. I’m glad you’re finding the tutorials to be so helpful! Good luck with your projects!
mary
This is a great site. The tutorial is terrific. I have two questions. 1. How can you set up a 2nd account (for admin) if you only have one email address? 2. Early on in this part you state that visitor can be inhibited from seeing parts of the website, i.e., only subscribers may have access to a particular page. But, I don’t see any permission that relates to this capability. Thanks so much.
Howard
Thanks for your feedback, I’m glad you’re finding the tutorials helpful.
1. As far as I know, it’s not possible to have two users with the same email address, so you need to have a different email address for your 2nd account. I could be wrong about this, and if I do find out differently I will post an update.
2. I didn’t get to cover that in this tutorial but one way to accomplish this is to use the Content Access module – http://drupal.org/project/content_access
This will enable you to allow and disallow viewing of certain nodes by role. Give it a try 🙂
mary
i want to build a site that has multiple users (i.e. user a, user b, user c). I want to be able to limit access to content so user a can access content specific to user a, user b can access content specific to user b, and user c can access content specific to user c.
Is this possible with drupal?
Thank you for the helpful tutorials
Allen
My first thought is that there’s a module for that :), but since I don’t have time to go looking for it right now, the first idea off the top of my head would be to create different roles assign each of your users a role, and then create custom content types and assign permissions to the content types accordingly. This might get tedious though depending on your needs.
What exactly are you trying to accomplish?
mary
Thanks Mary for the response.
I have several clients. I produce reports for each of these clients.
I want to allow each client to log in and access their pdf reports (while keeping them from accessing other client’s reports). Ideally the client would access a menu that takes them to “their” library page with a list of “their” files.
They would click on the list and “their” pdf would open up in a buit in pdf viewer (is there a pdf viewer module for drupal?).
Thanks for your thoughts.
Allen
I suggest you spend some at the drupal.org website in the modules section- http://drupal.org/project/modules. They’re sorted pretty neatly in categories and there’s search functionality too.
I would start by looking through the User Access/Authentication Modules and then the File Management modules. For example, you may want to consider the Private Downloads module (http://drupal.org/project/private_download)
mary
Hi Mary
I’m finding your tutorials very good and have run into a problem.
Well 3 problems actually.
First, I had the primary links working just fine positioned under the header, all good. Then I did something and they are gone, and replaced by My Account, Create Content, Administer, etc and these have disappeared from the left side of the Administrator page.
Second one is in the status report.
The file sites/default/settings.php is not protected from modifications, It is write protected according to chmod.
The directory sites/default/files is not writable, It is writable according to chmod.
Third, I downloaded several modules but cannot find how one “enables” modules.
Roger
1. You probably moved your blocks around. Go under Site Building->Blocks and move the Navigation menu back into the left side region and move Primary Links back into the header region.
2. Not sure about that one, it depends on your server settings. Clear your cache and see if the message changes.
3. Enabling Modules is covered in https://codingpad.maryspad.com/2009/03/17/building-a-website-with-drupal-6-part-7-installing-modules-and-themes/
Hope this helps
mary
Another problem is that I want the theme, menus and blocks changed in the user but not in Admin, is this possible please.
I’ve set a theme for user and a Garland for admin but the menus and everything else changes.
Not sure what you mean by this. Can you elaborate further?
mary
Thank you for posting such a thought out tutorial on Drupal. I am still a novice at web development, and truly new to CMS and Drupal. Your post is extremely helpful. Thank you again.
Brilliant series and have used this and drupal to totally rebuild my website (running but under construction) Stuck on one thing, when a logged in user adds conten I want to stop the filtered/unfiltered html content option appearing.
Sure it’s easy but I’m missing it.
Anybody?
Thanks
David
Have you created a user other than admin and checked what appears? They should only have the filtered option available. And you can rename and reconfigure it to what you want, but the default input format has to appear. To change and configure this, go to Adminster->Site Configuration->Input formats and make sure the default is set to Filtered HTML. If you then click Configure you can edit that to whatever you want it to be.
When you create different roles you select what input format you want them to be able to access. I usually suggest you reserve Full HTML for admins and your most trusted user roles.
Always create demo users and give them different roles and permission levels and then log in as the demo user to see the website as they will do. This is the best way to make sure your website works like you want it to for each role and user type that you have.
Hope this makes sense
mary
Thank you, thank you. Suddenly it all came together! Have immersed myself in Drupal over the last few days after only hearing about it 5 days ago.
Very pleased with how my site is going (www.nephrotic.co.uk). Most of it due to your tutorialss. I know all the commands I need are in the ADMIN menus – it just seems a struggle to find them sometimes. Thanks again
David
Thank you for writing this guide because I have found it very useful – much better than anything else I have seen.
Thanks for the feedback john!
Hi Mary,
Great tutorials! Is there a way to have a WYSIWYG editor appear when adding news, pages, etc? (really any kind of page that can have HTML in it)
Hi Mary,
When I am trying to log into my localhost drupal, it’s asking me for username and password. Is there anyway I can directly go to admin page. I added user but I think I did something wrong.
Thanks in advance!
Vishu
You do have to log into your admin page in Drupal, whether you’re on localhost or on a shared server. When you installed Drupal you created a user and a password, and that’s what you need to enter when you log in. Hope this makes sense
mary
Cannot tahnk you enough for the awesome tutorial..Thanks again 😀
You are doing a great job with this tutorial, and I wonder, why I stop writteing? We want learn more drupal things from you!!!
Milos
Don’t worry, there’ll be more Drupal tutorials coming 🙂
mary