Welcome to part 4 of our series of tutorials on building a website with MODx CMS. So far we’ve looked at:
Part 1: Introduction to MODx
Part 2: Installing MODx
Part 3: Working with Templates
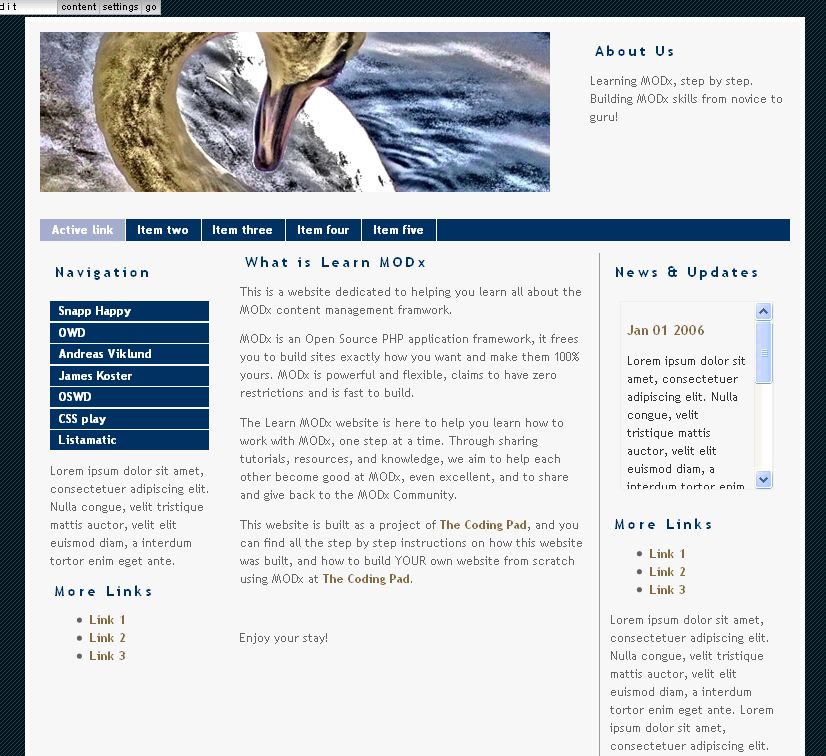
As we work through these tutorials, we’re building a MODx resource site called Learn MODx. In the last installment we started working with templates and moved our site from using the minimal base MODx template to the nice blue Swansong template. So far our website looks like this: (you can click on the images to see a larger view)
In this tutorial we are going to get a gentle 🙂 introduction to chunks. I had mentioned in the last post that we would delve into chunks AND snippets in this post, but I realized after some thought that I was being a tad too ambitious. I feel that it’s better to introduce each in its own post. I apologize for any crashed hopes and dreams, and any harmed puppies and turtles, but we will look into snippets in the next post.
So what are these chunks anyway? Chunks, to me, are like little mini-templates.
From the MODx official documentation:
“Chunks are simply blocks of plain text or (X)HTML markup that is inserted directly into your page at the location you place the tags.
Chunks are useful for any content or HTML markup that you might want to repeat in different pages or different templates. They are a good way to keep your template code clean and uncluttered with odd bits of content.”
It’s important to know that a chunk cannot contain PHP code. For that you would need to use a snippet or a TV (Template Variable). A chunk CAN contain snippets and template variables that do have PHP code.
Chunk calls take the form {{chunk}}.
As we continue working on our template, we’re going to create some chunks, clean up our template and separating it into manageable uncluttered components that are readily editable.
Let’s take look at our template. What parts of it will we want to reuse on different pages and on any related templates? Well, we know each page will have a header, a footer, and the sidebars. If we create any related templates, they will probably have some or all of these sections. So these are excellent candidates for chunks.
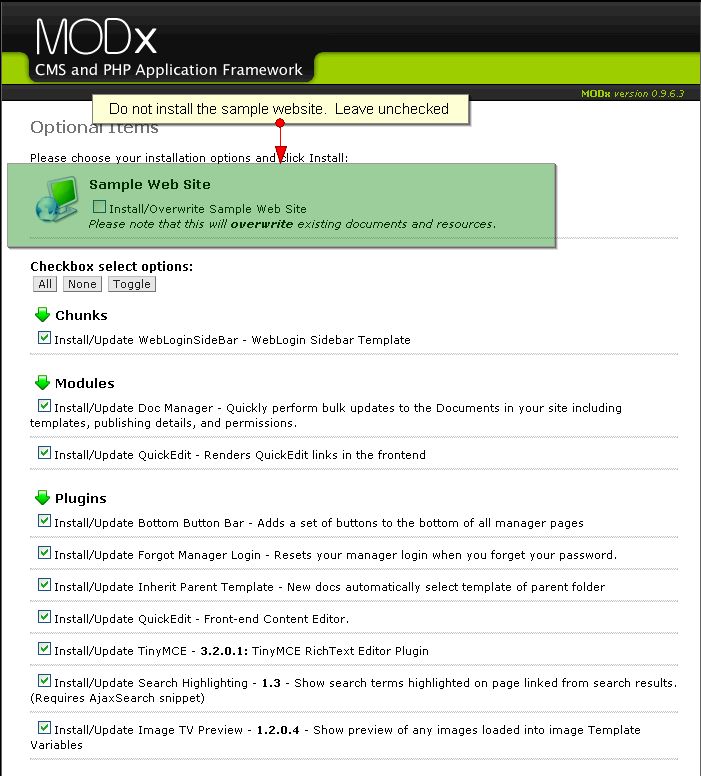
Chunks, like Templates, are part of the MODx resources. One of the premade chunks that you can preinstall, and that we chose to, is the WebLoginSidebar. Remember this screen? It has a list of the chunks, modules, etc that we had the option to install at the beginning.
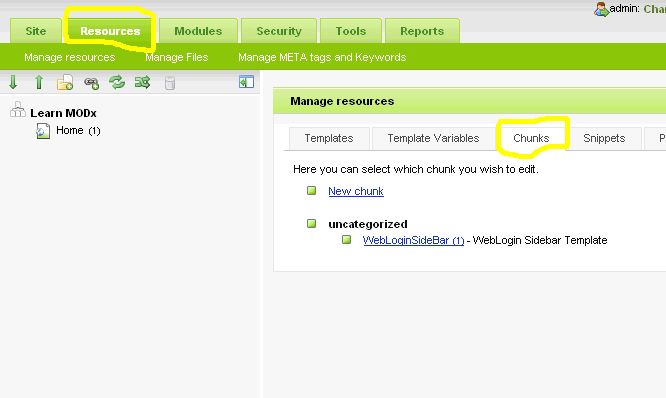
OK, let’s get rolling. We create and edit our own chunks of reusable code by navigating to Resources -> Manage Resources -> Chunks
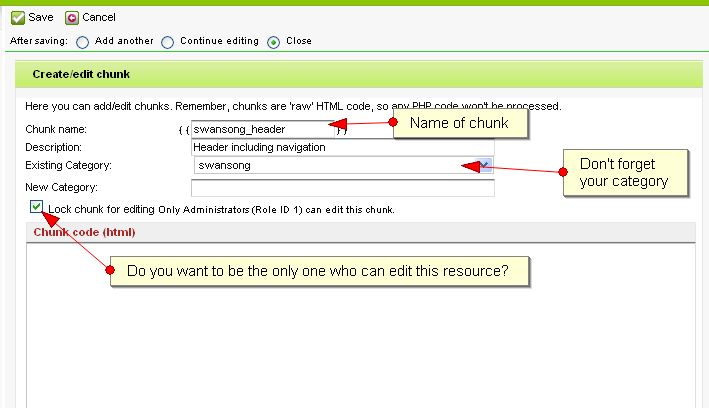
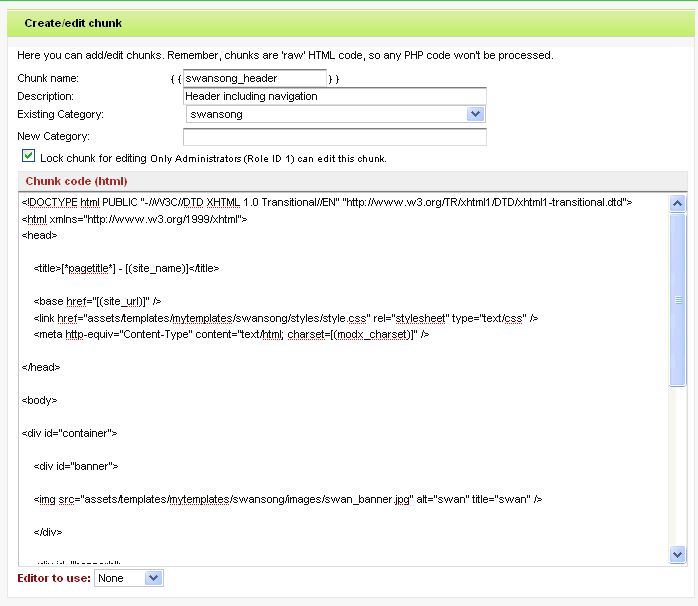
Click on “New Chunk“, and then enter the information for our new chunk. Let’s start by creating a chunk for our header. This will contain our template header code as well as the top navigation menu. Don’t forget to assign your new chunk to the swansong category.
For now, leave the body of the chunk blank and save it.
DO YOU WANT TO BE THE ONLY ONE WHO CAN EDIT THIS RESOURCE?
I should have mentioned this when we talked about templates, but one thing you’ll notice as you create any resource, be it a chunk, a template, a snippet, is that you have a little checkbox that asks you if you want to Lock the Chunk for editing. I always check this little box because I want to be the only one who edits chunks and such on my site. Even if someone else has access to my admin area, for example a moderator, or such, I don’t want them to be able to edit these structural components of my site. So this is something to keep in mind. It won’t affect you since you’re the admin, but you want to think about if you want others to be able to edit the chunks and snippets. If there are some that you want to not have anyone else edit, then you do need to check that little box.
OK, now that I have that off my chest, let’s go ahead and create three more chunks, one for the footer, one for the left sidebar, and one for the right sidebar. I have named mine swansong_footer, swansong_leftsidebar, and swansong_rightsidebar.
Since you’re creating several chunks one after another, you can save time by moving from one chunk creation page by toggling on the “After Saving: Add Another” radio button:
Incidentally, this little time saver is available when you create any resource or document.
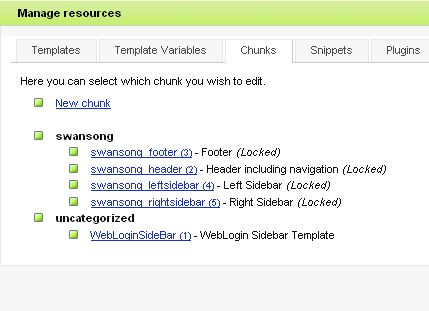
Once you’re done, your chunk management page should now list all your new chunks.
Let’s go ahead now and add the code from the relevant sections in our template to the chunks we just created.
While still in the Manage Resources screen, navigate to Templates, and click on the SwansongHome template to open it. Cut all the code from the top of the template (i.e. the doctype declaration, all the way to the closing <div> tag just before the sidebar div starts). Save the template, and then navigate to the header chunk and paste that code in that chunk.
So your header chunk code spans:
<!DOCTYPE html PUBLIC "-//W3C//DTD XHTML 1.0 Transitional//EN" "http://www.w3.org/TR/xhtml1/DTD/xhtml1-transitional.dtd">
.
.
.

<li><a href="#">Item five</a></li>
</ul>
</div>
Save your header chunk. Navigate back to your template, and in the place of all the code you just cut out, place the chunk tag:
{{swansong_header}}
If you preview your website, nothing has changed. It looks exactly the same, but your template code is getting cleaner.
We’re now going to repeat this process for the other chunks. Take all the code for the left sidebar, cut it out of the template, and paste into the left sidebar chunk you created. Just to clarify, this is all the code starting from <div id=”sidebar”> to just before the <div id=”sidebar-b”> tag.
In it’s place, place the chunk call {{swansong_leftsidebar}}
Rinse and repeat for the right sidebar, and finally for the footer. It’s a good idea to preview your site at every step to make sure nothing’s broken as you move from step to step.
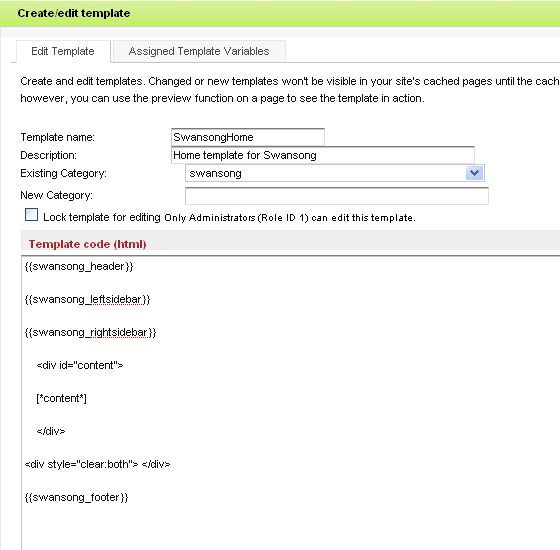
When we’re all done, our website looks the same, but look at our main template:
Doesn’t that look clean??
The really awesome thing about this is that I can now edit the different parts of my website template without having to scroll through a maze of tags and divs trying to figure out what’s what.
Moreover, if I create a new template based on the Swansong template, such as if I add a blog to my site and I want the blog left sidebar to be different from the main page left sidebar, all I have to do is create a different left sidebar chunk and call it into my blog template in place of the existing one.
I hope you’re starting to get the idea! Chunks are awesome, aren’t they?
Alright, most of the work on our chunks is done for now, our template has been cleaned up, and now I just want to make it a little more personal and get rid of the remaining filler text that came with the template. It’s easier and more manageable to work with now that we have it all neatly separated into chunks.
Let’s head on to the footer first and personalize it with some personal information. Remember we need to leave the designers name there as part of the usage license.
So navigate to Resources -> Manage Resources -> Chunks, and click on the footer chunk… ahhh, you’re an old hand at this aren’t you? I bet you didn’t even need me to tell you how to get there :). Make whatever changes you want to make ensuring to leave the Design by… intact per the license. Edit the sidebar chunks also.
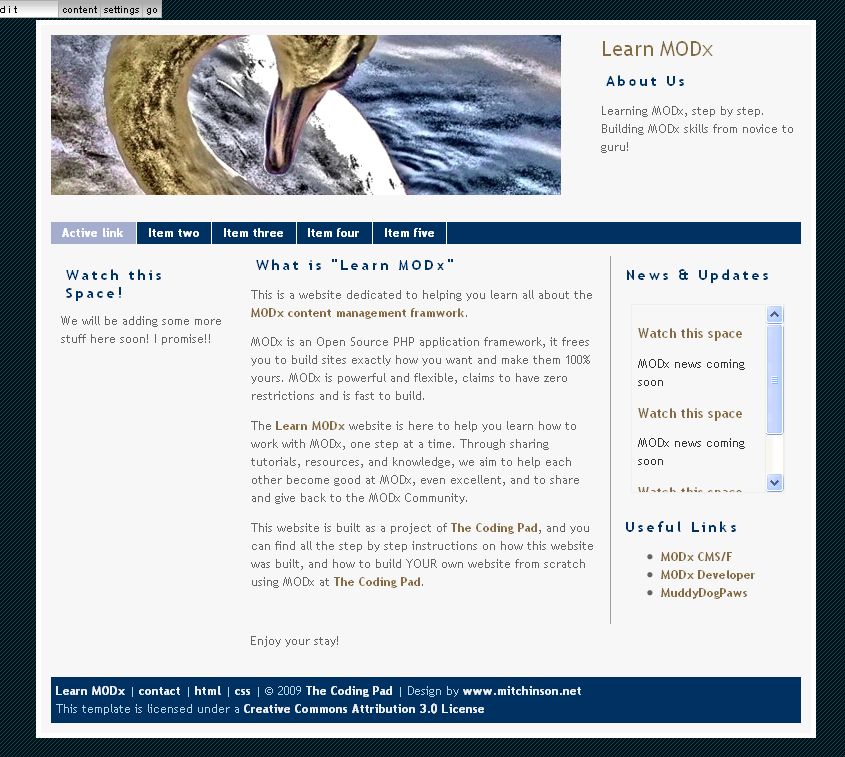
On the right sidebar, on the lower part, I am going to place a list of links to some of my favorite MODx blogs and such, in the More Links area. In the upper section, and in the left sidebar, I will put “watch this space” filler text because we’re not quite ready to add anything there just yet. You can put whatever you want in your sidebars!! This is what my final product looks like, you can see the footer area now contains my information, and the sidebars look a little different too. We’ve removed all the filler text and put our own in.
Alright!! Progress! It may not look like much to an outsider who’s just casually visiting our website from day to day, but we know better. A lot of work went into making our website look almost exactly the same as it looked from the time we started this tutorial.
Summary
Today we learned the basics about chunks, how we use them to store our reusable pieces of code so that our templates look cleaner and become more manageable. Remember always that you can not store PHP code in chunks, but you can call snippets in chunks, and snippets store PHP code, and these snippets are what we will be looking at in our next post.
As always, thanks for hanging with me to the end of the this installment. Remember to leave a comment on your way out, whether it’s just a note saying you read the thing, or something more detailed – a question, a clarification, a hey… anything really… oh, except spam ofcourse! 🙂
Hang tight, stay tuned! And do remember to grab your copy of the MODx Web Development book!
More Reading on Chunks and such:
http://svn.modxcms.com/docs/display/MODx096/Adding+Chunks
http://bobsguides.com/modx-chunks.html

I’ve managed sites using ModX before but never installed and dev’d from scratch. This series has really helped me. Thanks!!
I am totally new to web development but this tutorial is really a good resource for any beginner.
Thank you for the tut.
I am really appreciating this tutorial. Thank you for posting it.
Hey !
I’m discovering your tutorials and all what I have to say is Thanks for the clarity =)
I’ll move to the next one right now !
I’ve been working through these tutorials so far and found them all perfectly easy to follow. Bravo!
Moving on to the next lesson, then…
Thanks for this tutorial. It’s been ridiculously helpful.
Wow, great stuff. I just started to use ModX and this really helps out a lot. Great tutorial to get things started. I’m about to go to part 5 where hopefully more magic is about to happen.
I posted this question on the forum, but I wanted to re-phrase the question to you as well and get your feedback.
Can you explain why you used [*content] instead of making the content a chunk in itself? I presume you did this in order to avoid multiple chunks/templates, but I’m confused as to how this resource field is used. And furthermore, your thought process into why you placed the resource field within the main div itself and not placing the div within the resource field.
I haven’t been able to follow your tut on TVs and I think this might be why. Thank you so much!
alan
Not entirely sure I understand your question, but let me see if I can help. The [*content] tag represents the main content field when you create a new page. So when you go into the manager backend and choose to create a new document, whatever you enter in the main content area is parsed into the part of your template where you placed the [*content] tag.
In the template I used, the main static dummy content for the page was inside the div, and since I wanted to replace this static dummy content with dynamic content from the pages I create, I therefore needed to place the [*content] tag inside the divs.
What TVs do is that they allow you to create multiple content fields of different kinds, giving you a lot more flexibility.
Does this help?
What’s the link to your forum question?
mary
Thanks so much for all your hard work to put these together, Mary. God Bless you!
Just wanted to let you know this tutorial series is easy to understand and very helpful. Thanks!