 In this post we’re going to go over how to get the MailChimp snippet set up and working on your MODx Evolution site. MailChimp is a service that allows you to send email newsletters, manage subscriber lists, and track campaign performance. You can of course simply create the forms and such directly in MailChimp and paste the supplied code into your site, but this little snippet works just great. The directions I will outline here are also covered in the documentation inside the snippet folder, but I thought I would go over it for my own future reference and for anyone who may not be aware that this snippet exists or who may have had trouble setting it up. I am using MODx Evolution 1.0.2 and will be setting this demo up on the Learn MODx website.
MailChimp
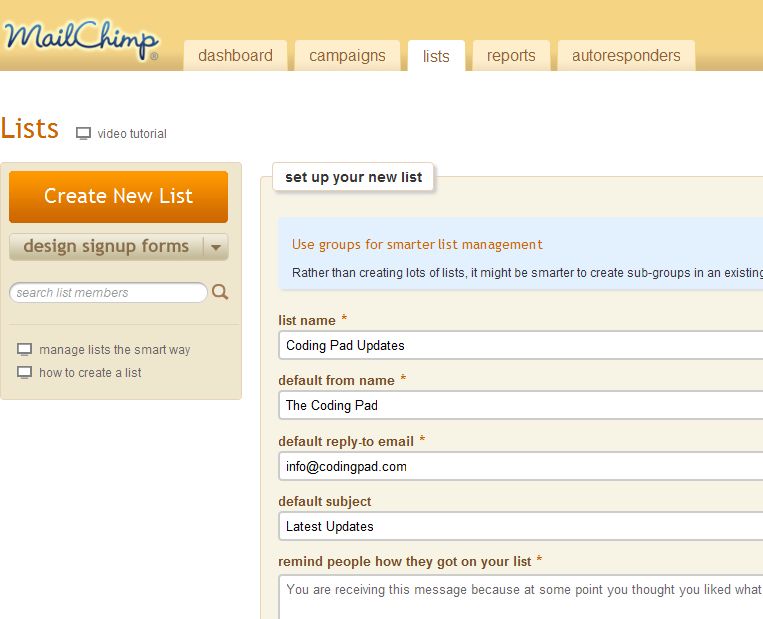
You need a MailChimp account and at least one list to work through this tutorial. Setting up an account on MailChimp is free, and you can opt for the free plan to start out and then upgrade to the paid plan as your needs increase. We’re going to create a demo list for the coding pad for this tutorial.
Get the MODx MailChimp Snippet
The snippet to make this work was created and generously shared by MODx developer Garry Nutting and is available on the MODx forum. I am also attaching the snippet to this post for ease of download. But make sure you visit the thread for support and more comments.
Download the MODx MailChimp snippet
Install the Snippet
As always, the process of installing the snippet is pretty straightforward.
- Extract the files to your desktop or other convenient location.
- Inside the zipped file you will find the folder named ‘mailchimp‘, inside of which are two folders – ‘classes‘ and ‘includes‘ as well as several files. Upload this mailchimp folder to your assets->snippets folder.
- Next, in your site manager, under Elements->Manage Elements->Snippets, create a new snippet and call it mailchimpSubscribe. In the code block, paste the code found in the subscribe.snippet.php file.
Configuring the snippet
So now we have the snippet installed and ready to go, but you need to do one more thing to make sure that it can access your account and get information about your specific lists. To do this, you need to edit the file config.inc.php that’s inside the includes folder. Here, you need to place your MailChimp account user name and password. Simply replace <USERNAME> with your username and <PASSWORD> with your password. You can do this before uploading the files, or afterward in the manager.
Create the Form
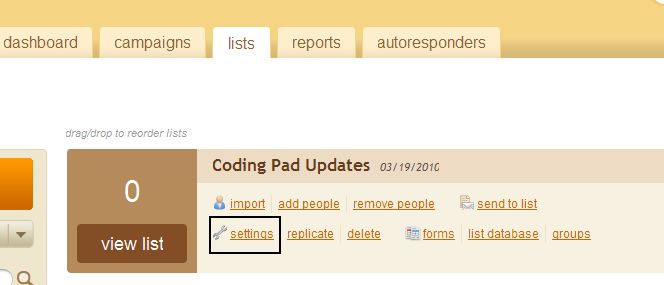
Next, you have to create a chunk with the actual form that users will fill out to subscribe to your list. Again the process is pretty straightforward. When you create a list in MailChimp, you decide how many fields the form should have. It can be a simple form with just an email address, or one that has more fields, such as first name, last name, and email. The default fields when you create a form are currently first name, last name, and email address. Adding more fields is easy, go to your list, and click “Settings”
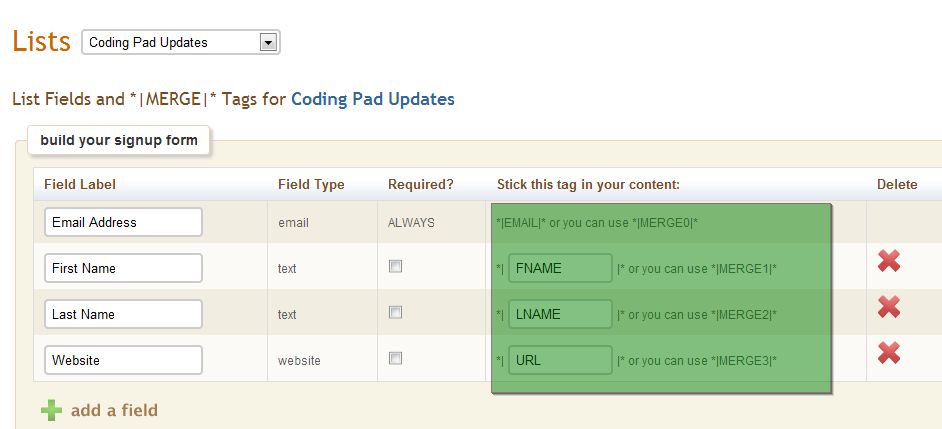
Click on “List Fields and *|MERGE|* Tags“. Here, you can add new fields that your user will fill when subscribing to your list. For our demo list, we’re going to add a field for the subscriber to add their website url. You can also delete the first and/or last name fields here if you don’t want them to appear. The only field that must be present is the email field.
Make sure also that you note the tag names for the fields (highlighted below in green) as we will need these to create the form chunk.
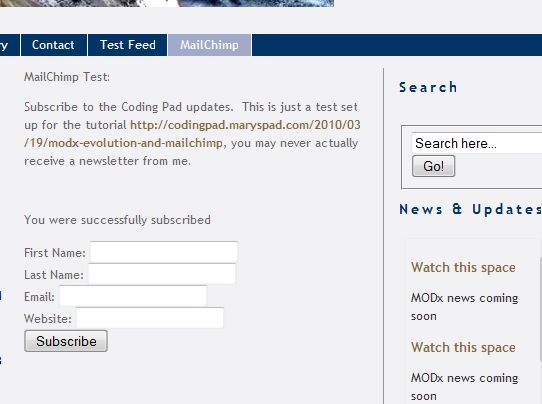
To create the form, create a new chunk and call it whatever you want. I will call mine mcSubscribeForm. In this chunk, we simple enter the usual HTML for a form, with MODx variables, and our field tag names from MailChimp. Note that the field names have the prefix mc_ and then the tag name.
<p>[+MailChimp.message+]</p>
<form method="post" action="[~[*id*]~]">
 <label>First Name: <input type="text" name="mc_FNAME" value="" /></label><br />
 <label>Last Name: <input type="text" name="mc_LNAME" value="" /></label><br />
 <label>Email: <input type="text" name="mc_EMAIL" value="" /></label><br />
 <label>Website: <input type="text" name="mc_URL" value="" /></label><br />
 <input type="submit" name="subscribe" value="Subscribe" />
</form>
You can add more labels and inputs depending on your fields or remove the ones you don’t need. To add another field that you had created for your list form you would use the same syntax as above:
<label>LABEL : <input type=”text” name=”mc_TAG” value=”” /></label><br />
The Subscribe button MUST retain the name “subscribe”, so leave that unchanged. Once this is done, your snippet is more or less ready to go.
You can also add checkbox or dropdown type of fields but I honestly haven’t tried it, but I’m sure it’s doable. For now we’re going to keep this simple.
Calling the Snippet
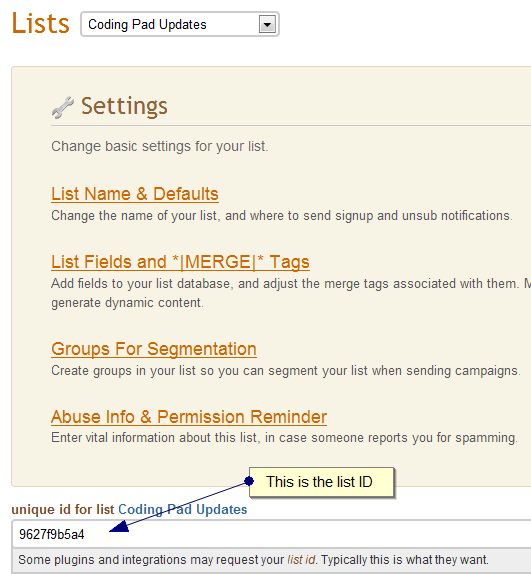
The last thing we need to do before calling our snippet and setting things up is to find our listID. You can find this in MailChimp by going to lists and again by selecting “Settings” as before. Scroll down the page and you’ll find the list ID. Copy this somewhere, you will need to insert it into your snippet call.
So now you’re ready to go. The snippet call is pretty straightforward. The two parameters are &form, which is the name of your form chunk, and &listId, which is the list ID for your list.
[!mailchimpSubscribe? &form=`your_form_chunkname` &listId=`your_listID` !]
In my case, the snippet call with my form chunk name and my list ID would be:
[!mailchimpSubscribe? &form=`mcSubscribeForm` &listId=`9627f9b5a4` !]
If you’ve done everything right, you should now get a form on your site where your users can subscribe themselves to your list and you can send them newsletters and campaigns.
You can ofcourse style the form to your heart’s content by adding the appropriate CSS to your style files.
This snippet is nice and works well in allowing a more seamless integration of MailChimp within your MODx website. It doesn’t have a lot of parameters but it does the trick. Test it and let me know how you like it. Also, don’t forget to visit the forum thread and drop a thank you to Garry for creating this and making it available for us to use.
More Reading and Resources
Download the MODx MailChimp snippet
MODx forum thread
MailChimp Knowledgebase
Hi Mary, great blog post 🙂 The post explains the setup perfectly and will make it super-easy for MailChimpers everywhere to get it working with MODx. Keep up the good work!
(And, thanks for the mention!)
Hey Garry
Thank you for stopping by, for the comment, and for the snippet! 🙂 It works great! Glad you like the post!
mary
This is what I want for my independent candidate for president web site. name ‘ mail / website with only name required.
Then, after the visitor comments, the comment is posted. I want to put this on every page. I have modX uploaded in a file. I have b2evolution uploaded and word press, too.
Originally I wanted to use Modx but the person who uploaded it for me said I should use word press. I don’t like word press.
Could someone give me a hand?
Michael Stephen Levinson
Mike
Do you have MODx already installed? If you go through the beginner tutorials (see link at the top), they will walk you through the process of installing MODx, adding your template and content, and then adding the ability for others to comment. WordPress is great if you’re building a blog.
I recommend that you set everything up on a separate folder or subdomain first so that it doesn’t mess up your existing website and then once you have it working you can transfer it over to your main domain name.
If you want someone to build the website for you I can do it at a fee – just use my contact form to send me more details.
Hope this helps
mary
Another super excellent tutorial!! This will be very useful to many people.
MODx and all its devotees are lucky to have a supporter like you 😀
Thanks Wendy! I wouldn’t have started playing with MailChimp if it wasn’t for you 🙂 So thanks for the inspiration and the challenge 🙂
mary
Hi Mary Hi Wendy Hi Gary,
I’m a poet, not a programmer. By way of an introduction, here is a little poem:
Night watch on the ship’s prow,
The stars are out in disorder,
Every thing ever been seen,
By the naked eye / Is out tonight.
The key to the poem is the word(s) “every thing.”
Every star, comet, planet, reflecting asteroid, cosmic particle . . . every thing – everything what? Everything ever been seen? Been seen how? Been seen by the naked eye (pause) is out tonight.
The world’s whole long term history (before Hubble) is brought to the bow of a ship in the wilderness of the open sea . . . dazzling . . . every thing ever been seen , By the naked eye / Is out tonight.
I like the newfangled way of dividing the last line of the verse with a computer geek forward slash for a pause.
Mine is a giant sense of words, world orders and word hors d’oeuvres, a new word order; but I don’t do computer code beyond some html. I liked html when I first saw it because my name is michael levinson . . ml.
I recently published “New World Hors D’oeuvres” (sub-titled) The Recipe for World Peace. Here is a pdf of the 224 page book:
{link removed} and here is {link removed} where you can see and hear the opening column in my Television Scripture that begins with Adman and Even in the Gar Den ov Edum.
(What an introduction!)
I have modx on the michaelslevinson.com web server . I host with Hostmonster. I like them. The “C panel” has a link to ‘simple scripts, so the installation was a couple mouse clicks. But from there I am in trouble.
I could probably, by trial and error, maybe insert code for a link to the modx folder but what i want is that simple beautiful modx blog -leave a comment window to show up at the bottom of my home page (the index.html page) and maybe above the window “post a comment and the poet will post back.” Maybe i will add a line about how I want to campaign for president – online one on one via the blog window – not flying around on airplanes and doing rope lines as that is just wasteful and useless.
I am not going to be able to figure out how to do this by myself so I need to convince one of you guys to either go on my site and do it, or send me the simple steps with the code.
I am very tight for money currently living on $800 a month out of which comes rent, utilities, food, gas, car insurance. But my web site is getting thousands of hits a month!
I am also getting ready to file big time complaint against all the TV networks with FCC and I am asking for 21 million dollars in damages – that besides another filing in Federal District Court against the networks and FCC which will jump under the law from the district court to the Supreme court. Suffice to say I have a lot on my plate.
I could put up a spiffy ad for your services. I don’t need to build a web site (though mine could be improved) but I do need some of your expertise. I suspect i am talking about less than an hour of actual work because this is all 2nd nature to you programmers, but I am not NOT disrespecting the value of your knowledge.
Look at “New World Hors D’oeuvres because I could come up with a signed 1st edition. That is all for the moment.
In good faith
Michael S. Levinson
Michael
This is just my personal blog. I recommend that if you need free help you post on the MODx support forums and if you are patient people will walk you through the process of what you need to accomplish. I also advise that you post on websites like getafreelancer.com where there is a wide range of providers who offer a wide range of services for relatively low rates. I think you will have a good chance of success there.
Best wishes
mary
waaaaaaaa sniff sniff
I guess someone somewhere will give me a hand. Thanks for the pointer
Michael S Levinson
I have used Omnistar Mailer http://www.omnistarmailer.com for 3 years now and I like it.
Chris
thanks for the link, I’ll have to check that one out and see how easy it is to integrate with MODx.
mary
Hi Mary. I am stuck at editing the config file.
I went to manger>includes in Modx and opened the file but
I am not finding the lines .
do you mean these lines?
$database_user = ‘myname’;
$database_password = ‘mypassword’;
or should I be looking in Mailchimp?
thank you,
I’m sure I’m missing something simple-just not sure what it is.
Update: I was able to do everything else in the tutorial easily. I’m just stuck on the config file part. The file only seems to refer to Modx sessions, so I don’t know what to change. Any chance I could get a screenshot?
Lisa
The includes folder you should be looking at is the one inside the mailchimp snippet folder, NOT the one inside the MODx manager folder.
So you’re looking at assets->snippets->mailchimp->includes
Hope this helps. Sorry for the confusion.
mary
Oh… now I get it.
The config file in the mailchimp snippet folder.
It’s working great. Thanks so much for answering my question.
No worries, glad you got it working 🙂
Hi Mary. When i test the sign up form sign in i see the error message “Login to remote service failed”.
I checked the mailchimpSubscribe snippet and the password and username are correct. any suggestions about where to start debugging?
Hi Mary
Thanks for the excellent tutorial. I’m having fun with MailChimp!
Hope the move goes well.
Best
Hi
I set up an account now with mailchimp and now i’m on the process of sending a test newsletter. I think so far it works, now the problem is i want to send it but the “Send” button is grayed out?
I thought the price plan is free for subsribers 0-500? Why i can’t send it then?
Best
Tintin
I assume this problem is on the MailChimp end and not on MODx. I only use MailChimp occasionally and have never had that problem, but I suggest you ask in the MailChimp forums – http://jungle.mailchimp.com/forum. Someone there might have an answer for you
best
mary
Anyone know if anything has changed recently? I had everything working and now instead I get an error:
fsockopen() [function.fsockopen]: unable to connect to api.mailchimp.com:8 (Connection timed out)
I have the correct username, password and list id setup, but this has me stumped.
Jon
It’s still working fine for me and I haven’t changed anything. I’m unable to reproduce this error. Has anything changed on your server?
mary
Ok thanks Mary, not sure if something has changed but couldn’t figure it out so went with the embed code from MC instead which is an ok workaround and the client seems happy.
Will these instructions work for integrating with MODx Revo 2.0.7+??
Aside from the different notations for snippets and chunks and whatnot…
Thank you, Tom
Tom
I haven’t tried it so not entirely sure the snippet will work as is or if it needs any modifications to correspond to any changes in the MODx API.
mary
is there anyone here tried to use this snippets on REVO?
Thanks
If you look at the same forum post on page 3 -> http://modxcms.com/forums/index.php/topic,30590.40.html, someone has implemented this for Revo. Look specifically at the attachment in Post #51 http://modxcms.com/forums/index.php/topic,30590.msg353106.html#msg353106
🙂
I have a question, i istalled the script but i get “There was a problem subscribing you.”
Can anyone help me? or have any clue?
Anton
Sometimes the mailchimp service goes down. I sometimes get that error. If you’re getting it repeatedly can you post and tell me your environment settings, what version of MODX, etc.
mary
I get the message:
Login to remote service failed
I can’t find MailChimps field:
Stick this tag in your content
Does the remote service error got anything to do with the fields or because of some MailChimp update?
I guess this old way doesn’t work anymore, I have tried the new way by using the API. Still no success atm. (revo update)
4r
For Revo, have a look at mChimpX or modMailChimp. I personally haven’t tested either of these so would be interested to hear how you go with them.
Thanks Mary, I will test that 😀
I need them for Evo, these 2 links are for Revo 🙁
Just noticed your `learn modx` site also has the: `Login to remote service failed` message.
Anyone knows if this still works with modx evolution 1.0.6 and above?I too get the “Login to remote service failed” message on your test website Mary (learn modx).
Maybe mailchimp’s api has changed?
Kostas
Thanks for your comment. I do think the mailchimp API has changed since I wrote that tutorial. I will have a look when I get a chance and post an update if necessary.
cheers
mary
Thank you for your quick reply Mary. The link inside the config file “http://api.mailchimp.com/1.1/”
gave me this hint, since it couldn’t still be version 1.1 after that long 😀 .
Looking forward to the changes 🙂
http://www.clippercms.com/forum/extra-development-and-coding/mailchimp-module/
wow,thx 4r, i will give it a try. I didn’t even realize modx evolution had been forked to clippercms (silly me).
So just to confirm this snippet no longer works?
I am getting the same ‘Login to remote service failed’ message using Evo 1.10.
I also wondered if special characters in your password might throw this off?
Eliot
I need to look into this. I think MailChimp may have changed their API and how you access it. I have switched to using Aweber for most of my needs so I will need to revisit this again and take a closer look. I’ll post an update (and send you an email) when I have some answers.
mary
Hi Mary, do you have any updates on this snippet yet? Keep making such awesome tutorials!