Drupal 6 Site Builder Solutions – A Review

I want to preface this review by saying that this is the very first Drupal book I have ever owned, and I’m very excited about it.

Drupal 6 Site Builder Solutions

I started working with Drupal last year and quickly fell in love with it.  I begun building websites and learning as I went from the numerous Drupal tutorials online and the Drupal website documentation, and by experimenting by myself.  Because I learn best by seeing things done and doing them myself, I am constantly in search of resources that teach me how to build something, not just theoretical descriptions.  Theoretical descriptions are good and have their place, but the best way to learn how to do something is to DO it.  I have created a series of tutorials on building a website with drupal from scratch, that are based on Drupal 5.  But it’s time to move on to Drupal 6, and as before, the best way to learn is to do.

drupal-logo

That is why I am so excited about the book Drupal 6 Site Builder Solutions by Mark Noble.  The book tackles learning Drupal by walking you through the process of building a fully functional small business website from start to end.  There is no fluff in this book. It starts you from the beginning and goes step by step, explaining the theoretical aspects and the whys along with the hows, which I think is the most appealing thing about it.  There are no abstract explanations just for the sake of it, everything fits into the scheme of building the website.

The author starts out by laying out the needs of the new websites,  outlining the differences between a traditional static HTML website and a dynamic CMS based website, and then pointing out the advantages AND disadvantages of using Drupal.  He then jumps right into the creation of the Good Eatin’ Bistro website.  Like I said, no fluff, you start getting your hands dirty and seeing Drupal at work right from the beginning of the book.

Continue reading “Drupal 6 Site Builder Solutions – A Review”

Building a Website with Drupal for Newbies – Adding Content

This is the sixth segment in my series of tutorials on building a Drupal website from scratch. I have been working on a lot of stuff and sort of drifted away from working on these tutorials, but I’m back to finish this up. This definitely won’t be the very last Drupal tutorial I ever do. I anticipate that you’ll be seeing a lot more Drupal related stuff at the Coding Pad, but this will wrap up the beginner basic stuff on getting the website completed.

OK,so far we’ve Introduced Drupal, learned how to install Drupal, we then set up and configured a Drupal site, and we went over how to build the Drupal site with blocks, menus, and modules. Finally, in our last tutorial, we talked about content. Recall that I have been working on a website concurrently with this tutorial: The Drupal Pad, and everything in these tutorials is implemented on that site.

So in the last tutorial we looked at the options under creating content,and we discussed the various default content types. So why don’t we go ahead and start fleshing out our website. Recall I said that we would start out by installing the Pathauto module so we would get our urls looking good from the start? I’ve decided to make that the topic of a different Drupal tutorial so as not to get things too complicated. Let’s just go into content for now and we’ll look at Pathauto in the next Drupal tutorial.

Continue reading “Building a Website with Drupal for Newbies – Adding Content”

Building a Website with Drupal for Newbies – About Content

This is the fifth segment in a series of posts on how to build a Drupal website from scratch. In the time since I wrote the last Drupal post, I have been learning more and delving deeper into the power and beauty of Drupal, and will be sharing a lot more in future posts, but these next two posts will wrap up the basics of building a Drupal website.

If you’ve been following this series, we have Introduced Drupal, learned how to install Drupal, we then set up and configured a Drupal site, and finally we went over how to build the Drupal site with blocks, menus, and modules. The site that I have been working on concurrently with this tutorial is The Drupal Pad, and everything in these tutorials is implemented on that site.

In this final section, we’re going to look at adding content to our site. We have a pretty basic website at this point, with a basic front page but not much else.

Drupal comes with some inbuilt content “types”, with the ability to create more. This ability to create and custom design your own content types is one of the things that makes Drupal a really powerful CMS, and we will go more into detail on this later. The two main content types built into Drupal are “Story” and “Page”.

By definition, Stories are articles in their simplest form: they have a title, a teaser and a body, but can be extended by other modules. The teaser is part of the body too. Stories may be used as a personal blog or for news articles. So you could use the story type to create news articles, blog post type of entries (if you don’t want to enable the blog module), articles, etc. On the other hand, a page is useful if you want to add a static page, like a contact page or an about page. I find myself using pages for things such as Site Disclaimers, Terms of Use, etc.

If you enabled the blog module or the poll module, then you’ll have extra content types, the Poll, and the Blog Entry.

Continue reading “Building a Website with Drupal for Newbies – About Content”

Building a Website with Drupal for Newbies – Setting up your Site

This is the third in a series of tutorials on how to build a Drupal website. In the first segment we introduced Drupal, and went over what we would need to work with Drupal. In the second part, we went over how to install Drupal, either using a script installer such as Fantastico, or manually. If you have followed the tutorials this far, you should have a clean Drupal install in its raw form, ready to go.

In this third installment, we are now going to start setting up our website, looking at and modifying some Drupal settings, and generally getting it to look more like a unique website. As I create this tutorial, I am going to be building a Drupal website, and putting the screenshots here so that you can follow along and see the website evolve as we go. Since the website will be evolving as the tutorials evolve, if you are reading this tutorial long after this post was written, the website may look nothing like the screenshots, but you will be able to see what we have done so far. Everything I do on the sample website I will describe here. The sample website that I am building to accompany these tutorials can be found at http://drupalpad.maryspad.com.

Assuming you successfully completed the install process as we described it, you can now log in using the user account that you created, which is the super user account, and start to build out your site. Remember that if you used a script installer to do your installation, the account was created automatically based on the information you gave. If you installed manually, then you need to create a user account, which will automatically be designated as a super user account. Log into your new website using this account, and let us start setting up our website.

I will outline here the steps I usually follow in the order I follow them. At this point, your website should be looking something like this:
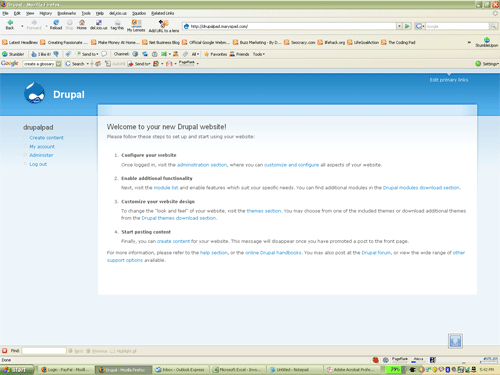
Drupal fresh site look

Site Configuration – this is usually my first stop. This involves setting up my site name, creating clean urls, and setting up other things.

a: Setting up Site Information

To set up your site information, click on Administer, on the left hand side panel. Click on “Site Configuration”, and then “Site Information”. Here you can enter your site name as you want it to appear at the very top, enter a slogan and mission if you want to, and footer information for your website. The site slogan and mission information are really optional, and if you enter it, you have the option to enable whether or not this information will be shown using the theme configuration, which we will go into later. In my example site, I will call the site The Drupal Pad.

In the footer section, you can enter information that will appear all the way at the bottom of every page of your website. This is an excellent place to put any copyright information and link to any other other websites you want to. One really cool thing is that you can use HTML in your footer. In my example, I want to mention that this website is part of the Coding Pad, and also enter some copyright information, so I enter this information there like so:

©2008 The Drupal Pad in partnership with <a href=”https://codingpad.maryspad.com”>The Coding Pad</a>

Then because I want to credit Drupal for this excellent CMS, I also enter the text “Proudly powered by Drupal” with a link to the Drupal website.

You can also set how you want to have Anonymous users designated should they post a comment or such, if you enable anonymous posting. I usually change this from the default “Anonymous” to “Guest”, because I think Guest sounds much friendlier.

b: Set up Clean URLs.

The next step that I do is to set up clean urls. These are much friendlier for SEO purposes, and more importantly, they allow you to change how urls will appear in the browser bar. So instead of the url looking like http://mywebsitehasdirtyurls.com/?qnode134 it will be a lot cleaner, like so http://mywebsitehascleanurls/node/1. You can go a step further, as we will in setting up this website, to change the urls so they are directly related to the title of the page, which will involve enabling the path module, and entering aliases for each of our pages. The end result will be our urls looking like so: http://mywebsitehasurlsthatrock/drupal-tutorial. This is so much more user friendly isn’t it?

We will go into how to do all this in a while, and will need to enable a module for this, but for now go ahead and enable clean urls. Drupal will first check to see if your server supports clean urls, so when you first click Clean URLs under Site Configuration, you will see the two radio buttons to enable or disable the clean urls, and then this message:

Clean URLs:
This option makes Drupal emit “clean” URLs (i.e. without ?q= in the URL.) Before enabling clean URLs, you must perform a test to determine if your server is properly configured. If you are able to see this page again after clicking the “Run the clean URL test” link, the test has succeeded and the radio buttons above will be available. If instead you are directed to a “Page not found” error, you will need to change the configuration of your server. The handbook page on Clean URLs has additional troubleshooting information. Run the clean URL test.

Click on the link to run the test, after which, if the test is successful, the radio buttons will be enabled and you can select “Enabled” and then save configuration.

There are many other settings that you can play with under Site Configuration, but these will do for now. I usually leave the rest at their default settings when I am first setting up a website, and then I go back in and change them as needed. Once you’ve become a Drupal guru you can decide what you went to change early and do it, but for now we will start with these two.

One more note, if you are expecting to have traffic while building up your site, you can temporarily take your site offline and leave a message to let your visitors know that the website is under maintenance and will return. This is particularly useful if you’re migrating your site and Drupal and don’t want visitors to be met with your new empty default install. You can still work on your site while it is offline and put it back online as soon as you’re satisfied that it’s ready for general viewing. If it’s a brand spanking new site and you expect to be done in a short while then it’s not necessary to do this.

To take your site offline or put it back online, go under “Site Configuration, and click on “Site maintenance.”

If you do take your site offline, please remember to get it back online when you’re ready. It’s easy to forget to do this since as the admin logged in you can see it, and you may forget that your visitors can’t see it.

You can see the progress so far with the site name and footer on my sample site here. Your site and mine still look pretty raw and have the Drupal content on the front, and besides the site title and the footer, there’s not much else there to make it look like a website, but in the next part we’re going to change all that… patience is the key.

In the next segment of this tutorial, we are going to start building our site. We will enable modules, and add content, and make some more changes to the settings that will make our website begin to look more unique and to have some substance to it, all pretty exciting stuff!!
Building a Website with Drupal for Newbies – Installing Drupal

There are many resources out there on how to install Drupal, so I am going to go over this in brief in this post.

If your webhost provides you with control panel that has a script installer, check if Drupal is listed. An example of a script installer is Fantastico, which comes with cPanel. Using a script installer makes the process pretty painless. Make sure though that you have the latest version of any scripts you may install using a script installer such as Fantastico. Otherwise, you may want to visit the homepage and download the updates.

In our case, we want to install Drupal 5.7. Even though there’s a new version out (6.0), as of this posting a lot of the modules have not yet been updated to work with 6.0. So we’ll go with 5.7.

If you don’t have a script installer like Fantastico, or you just want to do the install manually, the process is a little lengthier but not too complicated. There are install directions at Drupal webisite, but I’ll break them down here for you:

1. Create a database and user, and assign the user to that database. Make note of the database name and username and password as you’ll need them.
2. Extract the drupal archive that you downloaded into a folder on your hard drive.
3. Using your ftp program, upload the files in this folder into your domain folder where you wish to install Drupal.
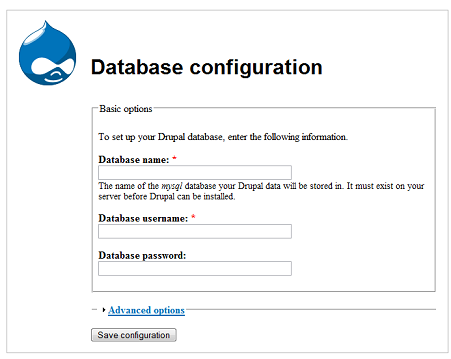
4. In your browser, type the name of your website where your drupal folder is sitting, and you will be prompted to enter your database information:

Drupal Install

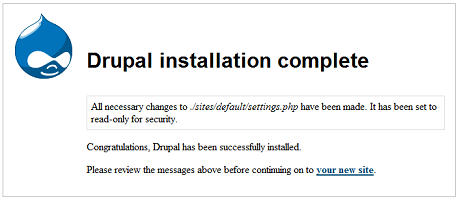
5. Enter the database configuration information from step 1, and then click on “Save Configuration.” If all is well, you will see this screen.

Drupal Install Complete

6. After this you will need to create a user account for yourself. This very first account that you create is designated by Drupal as the admin account and is a superuser account.

Your website is now installed and you’re ready to set it up, which we will cover in the next tutorial.

You can find more detailed installation instructions at the Drupal website (http://drupal.org/getting-started/5/install). If you have any problems doing this install you can post them here and we will discuss them, or you can also check the Drupal forums to see if there is a solution there.

In the next installment, we will walk through the process of setting up your new website.