Welcome to part 6 of our series of tutorials on building a website with MODx CMS. So far we’ve looked at:
Part 1: Introduction to MODx
Part 2: Installing MODx
Part 3: Working with Templates
Part 4: Introducing Chunks
Part 5: Introducing Snippets
As we work through these tutorials, we’re building a MODx resource site called Learn MODx. In the last installment we introduced snippets and learned how to use them to add functionality to our website. Specifically, we used the Wayfinder snippet to create a basic functional navigation system for our website. So far our website looks like this: (you can click on the images to see a larger view)

In this post, we’re going to continue to explore the basics of MODx by looking at Template Variables (TVs). We will add some more functionality and features to our site and move a step forward in our MODx knowledge.
What are Template Variables?
A Template Variable (TV) is an extra or custom Resource Field that is created by the site developer. A TV is used or displayed (via a Content Tag) to represent a value inside a template or a document. MODx allows you to have a virtually unlimited number and types of TVs. TVs are assigned to the Templates in your install. (MODx Wiki)
The TVs on a page are replaced with the actual value entered by the user when the page is displayed. TVs are called “template” variables because they can only be used in templates that you assign them to.
In this post, we’re going to create and use template variables to add custom fields to some of our MODx pages. There are many many uses for TVs, and this simple example is just one of them.
My Goal?
Since I am creating a MODx resource website, I want to have a section where I can list and talk about books that are useful to anyone interested in MODx, a sort of Library section. I want the pages in this section to have a basic description of the book as well as a cover image linking to an external website (such as Amazon.com) where the visitor can read more and if interested, buy the book. I could add a lot of other stuff, but for the purpose of introducing you to TVs, this will do.
Let’s start off by creating a new template for the library section. Since at this point it won’t be too drastically different from the main SwansongHome template, I’m simply going to make a duplicate of the SwansongHome and rename it.
In the admin backend of your MODx website, go to Resources -> Manage Resources -> Templates, and click the SwansongHome template to edit it. Once it’s open, click on the Duplicate option at the top:

Once you select this, the new template will be created and you just need to change it’s name and any other pertinent information. For now, the code will remain the same:

I’ve renamed the template to SwansongBooks. So far so good, we can now save this template.
So we know that we’re going to be listing a number of books using this template, and each book will go in it’s own page. For purposes of organizing and aggregating (coming in the next post 🙂 ) our book information, we will need to group our documents under a parent document, or in a “container”. In MODx, a container is simply a document under which other documents are grouped (kind of like a folder, except the folder is actually just a document – confused yet? 🙂 ).
OK, let’s do this. Let’s go ahead and create a new document and call it “Library”. This document will use the SwansongHome template, have an alias of “library” and have no content in it’s body for now.

Make sure to uncheck the “Show in Menu” for now, since it’s just going to be an empty container.
So now in our document tree we have a new page “Library” with an ID of 6 whose content is blank. I’m going to leave it unpublished for now.

Let us now create a new document under Library, where we will put in the details of our first book. To do this, right click on “Library” and select “Create a Document Here”. This will create a “child” document.

The first book I want to add is, fittingly enough, the MODx Web Development book. So the title of the new document will be MODx Web Development, and the other settings as below. Assign it to the new SwansongBooks template. For now I will borrow some text from the book’s webpage for the content section. Be sure again to uncheck the Show in Menu box, since we don’t want this in the menu.

You’ll notice from the screenshot above that I’ve put some text into the Summary (introtext) area. This will come in handy later. Save this document,and you should now see that “Library” has a little + next to it, indicating that you can expand it. If you click on the + sign you can now see the new document we just created.

Let’s go ahead then and preview our new document (right click and select Preview). It should look pretty much like any other page we’ve created since we haven’t added anything different to the SwansongBooks template.

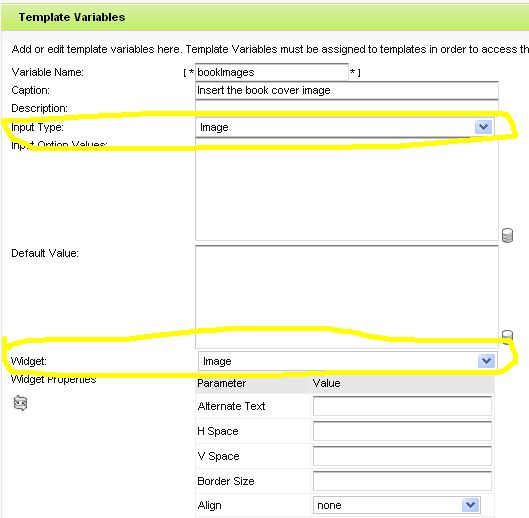
Let’s now think about how we’re going to add the book cover image to this page and others like it. We want the image to be clickable, so this means we need two extra input fields – one for the image and one for the link. Let’s go ahead and create two template variables for that purpose.
Go to Resources -> Manage Resources -> Template Variables

This is the page where you create and have your TVs listed. At the moment we have no template variables for our site, so go ahead and click on “New Template Variable” to create a new TV.
We’re going to name our TV “bookImages”, and it’s input type is naturally going to be an Image.

For now I’m going to leave all the other stuff blank since this is a simple basic introduction and demonstration. There is PLENTY you can explore about each of the input types that would take a blog post of it’s own. For now, it’s enough to know that our TV doesn’t have any default values, nor will it use any data bindings, all topics we will explore in the future.
If you’re going to directly display your input, you need to specify a widget type. In this case, for my purposes I don’t need an output widget since I’m going to use a different method for my output.
Template Variable Output Widgets make it easier for users to add special visual effects to their web sites in a matter of seconds. With just a few clicks you can add a Marquee or a Ticker to scroll or change content on your website, a Data Grid to display a formatted table of data from a file or a database, an always-present floating display box and more. Again, too much to go into in this post.
Assign this template variable to the SwansongBooks template and to the swansong category, and for now that will do. Save the template variable.
Go ahead and repeat the process to create a second TV for the link. Call it ImageLink, have it’s input format be “url” and don’t assign it any widget. Remember again to assign it to the SwansongBooks template and swansong category and save it.

Cool, so now we have two new template variables and we’ve assigned them to the SwansongBooks template. If we now create or edit any documents that are using that template, we should see two new input fields, one for the image and one for the link. Let’s open the MODx Web Development page we created for editing and scroll all the way to the bottom:

You can now see our new fields at the bottom. Since I have two pieces of information that I want to present as one, I’ve decided to use a chunk to output my information.
To do this, I need to create a new chunk, which I will call bookChunk. I will assign it to the swansong category. With the TinyMCE editor selected (at the bottom left corner of the text editor), I am going to upload an image to the editor and assign it a link. You can completely bypass this step but I’m using it so I can have my markup working before I add my TV placeholders.

I already have a book cover of the MODx Web Development book on my desktop, so I’m going to upload that and then select it and add the page link to it. In the upload dialogue, when you click on the icon at the end of the Image url field, you’re presented with the image browser. I have created, using this browser, a folder called “BookCovers” for all my book covers.
Once this is done, and I can see my book cover in the chunk, I will now save it, insert the chunk in SwansongBook template, and test it to make sure it works.
Open SwansongBook template and place the chunk call just above the [*content*] tag, and then save it.

If we now preview our MODx Web Development document that uses the SwansongBooks template, we should see the book cover above the main page content, and your image should be clickable taking you to the link you specified.
You may notice though, depending on your source image, that the image may be too large. Mine is, it’s actually covering the sidebar. I need to scale it down, and you can do this before or during the upload, to a preset size. I am not too concerned about styling right now, so I will scale it down in the html in the chunk.
OK, so we know the code for our image works, let’s go ahead and replace the links with the template variables so that whenever this chunk is called, it displays the relevant information for the document calling it.
Open the bookChunk for editing, and turn off the TinyMCE editor (toggle it to none). This should reveal the code.

We are going to replace the url to our image with our TV tag [*bookImages*] and the link to the book website with our TV tag [*ImageLink*]. (I apologize my naming wasn’t very consistent 🙁 ).
I am also going to put [*pagetitle*] in the title and alt attributes since the title of the document is the title of the book, so that works (remember this tag from our templating tutorial?). I’ll also add a border=”0″ to remove any borders.
Finally, to resolve my size issue, I am going to scale my image down to 75% of its original size. This is probably not the most optimal way to do this and will affect my other images, but as I mentioned before, I am not too concerned about styling at this point. I will probably need to go in later and add some more styles to this template, probably add a div for the book images and float them… etc. For the purposes of this tutorial, ignore my heathen ways and just focus on the TVs 🙂
Alright, so my code in bookChunk will go from:
<a title="MODx Web Development" href="https://www.packtpub.com/modx-web-development/book" target="_blank"><img title="MODx Web Development" src="assets/images/BookCovers/MODx_Web_Development1.jpg" alt="" width="406" height="502" /></a>
to:
<p><a title="[*pagetitle*]" href="[*ImageLink*]" target="_blank"><img title="[*pagetitle*]" src="[*bookImages*]" alt="" width="70%" height="70%" border="0"/></a></p>
Alright! Let’s now save the chunk and preview our page. There should be nothing there because we need to edit the document and add our link and image so that the TVs can pick them up and display them in our chunk.
Open the MODx Web Development document for editing, scroll down to the bottom, and using the two new TV fields, insert your image and link.
If we now preview the page, we should see something like this:

And if you click on the book cover, it should take you to the web page for the book.
There’s a lot more that we can do with this. We could add more TVs to this template and do a lot more, but I hope that this is good enough for a start and to give you a good idea of what MODx template variables are and what you can do with them.
Remember that this is a basic beginner’s series, so we have really only just touched the surface on the concepts covered here, so be sure to visit the more reading links at the end of the post to expand your knowledge. And don’t forget to grab your copy of the MODx Web Development book.
In the next post we’re going to continue working with our library section, publish and make the book pages accessible to our site visitors, and explore some more MODx functionality and power.
In the meantime, go ahead and add a few more pages to your library section, see if you want to play with some styling to make it more visually appealing, and hang tight till our next post.
As always, please feel free to leave a comment, say hey, ask a question, offer suggestions or corrections, but don’t leave spam – my plugins will catch it 🙂 etc.
More Reading
http://sottwell.com/how-template-variables-work.html
http://svn.modxcms.com/docs/display/MODx096/What+are+Template+Variables
http://svn.modxcms.com/docs/display/MODx096/Template+Variables
Great Great resource!! Thanks a lot!
Thanks so much for taking the time to write this up. I don’t think I’d have thought of putting them in a chunk, but it makes sense once one thinks about it. It’s also a further eye-opener to me with regard to just how flexible MODx can be. I only hope my aging brain can match the flexibility of MODx! 😉
Hello Mary,
Thanks a lot for all the work you are doing. I am new to CMS. Your tutorials are of gr8 help to me.
Could also please help me out on how to work with friendly URLs.
Thank you
Tweety
Thanks for your feedback. I will soon be doing a post on how to configure your MODx website and will address friendly urls then.
mary
Hi Mary,
Great post about TVs.. it got man brain thinking of all sort of cool ideas with modx. The only thing that I’m suck on is using TVs and chuck from a database query with sorted tables..
It would be a great if you can show us that. 🙂
-Tyler
Tyler,
Thanks for the feedback. I’ll be doing a lot more with TVs in future MODx tutorials, this was just a basic introduction 🙂
I’m not completely sure I understand what you mean by using them with a database query with sorted tables? You can use @ bindings with TVs, so maybe you’re talking about something in that direction?
mary
Another great job done
Keep it up
This TV tutorial along with a bit of help from the MODx Web Development book just helped me to create a TV for the meta descriptions on each of my pages, a metatag that I feel is of utmost importance. They’ve got to be unique for each page these days.
Yay!
Great tutorial. A couple of issues: when you create bookChunk, you show the insertion of the sample image, but not the step of making the image a link.
Another, for some reason, your image scaling of 70% causes the images to be stretched a lot vertically. If I leave off the scaling, my images look fine (250 px wide).
I am still trying to find out why my Library page does not look like yours. Ditto does not seem to be running. My Library page shows the last book entry!
Bob
Thanks for your comment. Regarding making the image a into a link, this happens in the bookChunk code. The part href=”[*ImageLink*]” is what makes the image into a link. Does that make sense?
If you’re copying and pasting the code directly from my tutorial, be careful because WordPress or the theme I’m using messes up the quotation marks. So if you pasted the code directly, go in and change the replace all your quotation marks ” and just type them in directly.
Depending on the source of the images you’re using, you may not need to do any scaling.
Does your library page show all the entries or just the last one? Can you paste the code of your ditto call here? Also, are you developing live so that I can take a look at your page?
mary
Hi Mary – Bob is right that you do not set up the image link in the original chunk. You use the editor to put an image in but no link. Only a small detail and it is obvious later when you use href=”[*ImageLink*] to replace the supposed image link from before that does not exist…. 🙂 Great tutorial BTW.
J.
I’m having the same problem. I got an image from my disk installed in the chunk, and it appears fine on the Web page, but there is no link, and I can’t find where I was supposed to actually attach any link to it.
Fantastic tutorials, though! Thanks so much for all your hard work!
Dave
Have you followed all the steps and double checked your code? Are you using MODx Evolution or Revolution?
new to this, but what is the actual benefit of creating the bookchunk? unless you plan to use that chunk in another template?
Chris
Thanks for your comment 🙂 . The one beautiful thing about MODx is that there are a lot of ways to do the same thing. Creating the bookchunk is just a personal preference for me but it also allows me the flexibility of using that chunk somewhere else, like in another page, or calling it into a different template if needed.
You can choose to do it a different way. I find separating things into chunks makes the website more manageable and creates reusable components.
mary
Thanks so much! Loving your tutorials 🙂
Hi – love the tutorial Mary and i really hope we see some more soon
My question is how would i set up a back button on the book page? (back to the previous ditto call page)
Also would it be possible to include date information on the book page? the ditto pages can call it with the [+date+] function but what if you also wanted this displayed on the book page?
dave,
Thanks for the feedback. Not sure I haven’t actually tried this before but I’m sure it can be done. Let me work on it and I’ll get back to you.
I don’t undesrtand how to assign an image to the tv. Didn’t you replace the image link with your template variable code in your tutorial ? Sorry..I’ll prolly figure it out eventually.
This is where I think I got lost:
“Alright! Let’s now save the chunk and preview our page. There should be nothing there because we need to edit the document and add our link and image so that the TVs can pick them up and display them in our chunk.
Open the MODx Web Development document for editing, scroll down to the bottom, and using the two new TV fields, insert your image and link.”
Could you specify what you mean by ‘using your 2 new TV fields, insert yout image and link’ Nowhere is the actual image that was uploaded and then replaced in the chunk code referenced. In the tutorial you said to delete the image code and replace it with the chunk code so no reference to an img file anywhere 🙁
Rich
I hope that you’ve been able to find the answer to your question. When you follow the tutorial to the end, are you able to get it working? Remember that earlier in the tutorial I referenced a BookImages folder where I had uploaded my images? When you click insert on the image TV it takes you to your folder structure and you can navigate to where you’ve uploaded your images and select the one you want to insert.
Make sure you have the right template selected so that the two TVs show up. I hope this is clearer. Let me know if you’re still stuck and I’ll try to explain it better.
thanks
First of all, there seems to be more than one Bob posting on this site, one of them is me. So I changed my nick to avoid further confusion…
You wrote;
“I am also going to put [*pagetitle*] in the title and alt attributes since the title of the document is the title of the book, so that works ”
But it the code for the BookChunck, alt attribute is set to
alt=””
then shouldn’t that be:
alt=”[*pagetitle*]” ?
You’re absolutely right, my mistake 🙂 Thanks for pointing that out.
Eagerbob, I think we’re missing a bit out somewhere. I don’t recall uploading BookImages, and the ID of my Library is 3 not 6. Hopefully I can find the missing pieces…
Mary, I managed to sort myself out – I must have skipped a part in my eagerness.
Your tutorials are fantastic. Thank you so much.
Tracey,
thanks for the feedback. Glad you got that sorted out!
Glad you’re finding the tutorials helpful 🙂
I am in the middle of changing over from Rapidweaver for the Mac to MODx. So far everything as been going fine with this tutorial. Very well done.
I am however having trouble getting through Part 6. It’s not working for me. All I need is a more detailed explanation as to what to do.
Thanks!!!
Randy
Glad you’re enjoying the tutorials. I’m afraid you’re going to have to be more specific about what part you don’t understand. I’m not sure how much more of a detailed explanation I can give, but if you ask specific questions I may be able to help. Try reading up on TVs from the links given and then work through the tutorial and post specific questions on what you need clarified.
thanks
mary
Hi Mary!
Thanks for getting back to me. I’m just trying to wrap my head around the concept of TV’s and getting the two you created to work. I will read some documentation on TV’s and hopefully I can find a screencast that explains this. Thanks so much for creating this tutorial!!
Randy
Hmm, I did notice from the comments that a few people were having a little trouble with this. If I can figure out a time to do it I may do a screencast or another tutorial on TVs. I can’t say I’m an expert on them but I may be able to make it a little bit clearer.
If you do come up with specific questions feel free to ask them.
mary
Hi
I was rereading this tutorial and then this idea popped up in my head: “hey, if template variables can only be used with a template, isn’t it a bad idea to use them for content?” (I like to program and develop according to Object Orientation and standards rules)
since separation of content and presentation is an important thing. Cause when you change your template, you loose content (in this case, the books).
Is there anything in MODx like TV’s that can be used whatever template you’re using?
But anyways, really nice tutorials, it’s just a remark, not something to bring you or your work down or anything, it’s really nice 🙂
This tutorial helps me a lot, but i am not able to get the book image in the front page, How can i get it
Anusuya
What do you mean that you’re not able to get the book image on the front page? Are you able to upload the image and then link to it? What part are you having trouble with?
mary
Hi Mary,
Remember I was having problems with Part 6? I decided to restart your tutorial from Part 1 again. So far so good but I don’t know what I am mising here but I am still stuck on Part 6. I don’t have the book image that you used in your example so I just used the logo.png file.
I have the FCKeditor-Resources Browser window open, I selected the logo.png file and clicked upload. I see it in the Insert/Image window. Do I just click on the Insert button or is there something else I have to do? When I click insert and then preview the Modx Web Development page, I can see the image but when I click on it, nothing happens? I’m sure I forgot to insert a link somewhere, but I can’t continue this part 6 lesson until I resolve this. What should I do?
Thanks!!
I think I figured it out. I figured out how to add a link to the picture. I linked the picture to my web site. When I previewed the page, I clicked on the image and it brought me to my web site. I hope this is the desired effect I am supposed to have when doing this?
I spoke to soon. I really need more detailed clarification regarding Part 6. Still somewhat confused. I’m sure I will make it through this lesson before I move on to Part 7 🙂
Randy, I think what I’ll try to do is try to make some time to create a screencast where I go over TVs in more detail. It might help answer your questions.
Thank you so much Mary!! A screencast of TV’s better explained would be fantastic!!
Randy
http://www.mcran.com
I created a bookchunk,I selected TinyMCE editor,then i click the insert image button,one small window was opened,I clicked the browse button,then i create one folder called bookcovers and i placed one image in that folder, I insert that image with title and description,I am able to see the preview.Then i clicked save button. The code is:
.Then i insert that chunk to template.
{{First Website Header}}
{{Firstwebsitlsidebar }}
{{Firstwebsitersidebar}}
{{bookchunk}}
[*content*]
{{Firstwebsitefooter}}
then I saved, if i clicked the previev I am not able to see any image. May i know the problem?
Thanks for ur reply
The code for bookchunk is:
Hai.,
After adding the bookChunk to the template,I could not able to see the book cover above the main page content. But I am able to see the preview in the bookChunk.
Anusuya,
Are you developing online or on your local computer? If online, can you give me access to your manager backend so I can take a look? Send me an email with the details using the contact form.
mary
Tis was the best chapter yet, got me all giddy thinking about whats possible! I love modx..so far! 🙂
John,
Yes, MODx is pretty exciting once you start grasping all the possibilities!! Enjoy and good luck with your projects 🙂
mary
I have some problem understanding how the book’s summary text does appear in the site preview. You put the text in the introtext field, however, in the template I only see a [*content*] tag, but no [*introtext*] tag:
[*content*]
Stefan
If you look a little more closely, you’ll notice that the summary does not appear on the book page, just the main content. We’re using the summary in the main Library page which you will see in Part 7 when we talk about Ditto 🙂
mary
I took a closer look and realized I overlooked the following sentence:
“For now I will borrow some text from the book’s webpage for the content section.”
So this was my mistake.
Thanks again for this great tutorial!
Stefan
You’re welcome!
mary
Vraiment super blog ! Merci pour ces incroyables tutoriaux ! Je commence à comprendre ModX et c’est SUPER !
TestIT
Thanks for your feedback, glad the tutorials are helpful!
(and many thanks to Google Translate 🙂 )
mary
Hey Mary!
Thanks so very much for your generosity of time in preparing these tutorials. I very much appreciate your efforts. Your lessons are superb. I have been understanding thing clearly until #6, so I have a couple of questions.
Regarding the MODx Web Development page, where or when is the ‘Summary’ text supposed to appear? I don’t see it when I preview the any pages.
Also, things seem to work when I use the TinyMCE to add text and to upload and display an image the page, but the Template Variables fields for ‘bookimages’ and ‘imageslink’ in the ‘General’ settings for the Modx Web Development page have confused. After uploading the book cover image , that image does appear just below the ‘insert book cover’ field and the a url is in its field. But, neither item seems to show up in any preview.
Where should they appear?
Is the URL meant to refer to a links such as another website? Thank you again!
onda
Thanks for the comment. Glad you’re finding the tutorials useful. We will use the ‘Summary’ text in Part 7 of the tutorials when we talk about Ditto. We will aggregate all our books on a main Library page and use the summary text on that page.
Regarding the image upload, did you follow all the steps as described in the tutorial? The idea is to replace uploading through TinyMCE with uploading through the TV, and then place the url that you want to open when the image is linked in the other TV. This would be advantageous say if you wanted people to click on the book cover and be directed to Amazon.com with your affiliate url. Go through the steps again and tell me where you’re getting stuck. I know this part of the tutorial can be a little tricky
mary
I think I found the problem. I mis-typed ‘bookimages’ instead of ‘bookImages’ in the ‘chunk’. Now I do see the book cover images for the 5 pages I’ve created. Just the image though, nothing else. Is that correct?
And, would the ‘chunk’ be the correct place to
adjust image size for these book covers?
Thanks very much. I am forging ahead.
You can resize the image sizes in the chunk or in your css by targeting your images with a class name 🙂
Hi Mary, First off, I want to say a Big Thank You for your tutorials. I took a day and went through them on after another.
A question on TV’s. How are these TV’s connected on the database with the document they are associated with? Has a new table been created when you create each TV? I think TV’s are the hardest thing for this dyslectic to get my arms around. Thank you
Thomas
Thanks for the feedback, and you’re welcome. Pretty much everything in MODx is stored in the database. Four main tables handle TV related content and stuff, they are:
modx_site_tmplvars
modx_site_tmplvar_access
modx_site_tmplvar_contentvalues
modx_site_tmplvar_templates
Look at these tables and browse them using phpmyadmin or whatever database management tool you use. You should get some insights from there. Additionally, this thread in the MODx forums discusses how to delete TVs from the database and may give you some insight on the matter.
http://modxcms.com/forums/index.php?topic=44442.0
Another good resource: http://www.sottwell.com/how-template-variables-work.html
TVs can take a little time to make sense but they are powerful and worth getting very familiar with 🙂
mary
Thank you Mary, I think the table modx_site_tmplvar_contentvalues really makes it much clearer on the connections with the document ID. For me at least, even the concept of the Template Variable becomes much clearer.
Hi Mary,
Your a star, enjoying the tutorials very much. However I am hung up on this one! bookchunk is not working for me. I get the ‘alt’ text only which has the link, but no image.
I read your answer on cutting and pasting and re-typed the double quotes.
I am probably doing some newbie mistake, but if you could help I would be in your debt.
(Developing online so happy to give you my details (via email I guess)) .
Cass,
Sure, shoot me the info via the contact form and I’ll take a look.
mary
Excellent tutorials, easy to follow, no words will ever full fill how great you are. keep up the good work. once again many thanks.
Thanks for the feedback Buddhi, much appreciated 🙂
mary
I was wondering if you could give some tuts how to make left col menu as shown in the template 11 please.
Once again, thank you so much for your hard work sharing with people like me. Now I can just follow your tut and make an excellent website.
A great stuff.
Buddhi,
If you mean the left menu on the Swansong template, yes, I can do that. Give me some time and I’ll put it up. It will probably be a generic Wayfinder tutorial but I’ll use that template as one of the examples. Good enough?
mary
Oh, thank you so much for taking my problem in consideration. I can not wait this tut to be posted here. Yes, it would be even better if you could use the same template as an example.
Waiting for your tuts
Buddhi
Hello Mary. Like everyone else, I appreciate your work and love it.
However I find myself stuck in this tutorial. I went through your walk through twice. I feel like I did everything as you say but the image is not appearing in my preview and I do not know what I am doing wrong.
Gedion
A little more information about your setup would be helpful. Are you developing locally or on a live server?
Does your TV appear as expected and are you able to click to upload the image? What shows up on your page? What does your code look like?
If you’re developing live, please provide the link to your website and I’ll take a look
mary
Thank you for the quick response. I don’t know how much I should share but I’ll just try to answer your questions.
I am about to share my work. Please don’t laugh at my noobness : (
I am working locally.
My TVs seems to appear as expected.
Nothing shows up in my page. It looks exatly like the way we did it in tutorial 5.
Here is what my bookChunk code looks like
< a title="[*pagetitle*]" href="[*ImageLink*]">
Gedion,
The WordPress editor does funny things to code in the comments. I usually put spaces between parts of the tags to make it not process the code. I have fixed your comment so the code shows.
Thanks for sharing your code. OK, so what you have there is simply an anchor tag which will create a link, but you’re missing the img tags to display the image. These should be within your anchor tags for the image to show, just like you would place the text to be clicked on there. The part you’re missing (assuming you named your TVs the same as mine)
is
< img title="[*pagetitle*]" src="[*bookImages*]" / >
So your complete bookChunk should look something like this:
< a title="[*pagetitle*]" href="[*ImageLink*]" >< img title="[*pagetitle*]" src="[*bookImages*]" / >< / a>
Make sure you remove the spaces I added after each< and before each closing > in all tags
Hope this helps
mary
I modified my bookChunk code as you suggested. Still no luck for me : (
Gedion
Gedion
Did you make sure the TV names are correct? Have you uploaded the image? What shows when you view the page source from the front end?
mary
I think I have done all that. I emailed you my page source.
Didn’t get an email. The better option for sharing code is http://pastie.org, I prefer that to email. Just create a pastie there and then send me the link to the pastie or post it in the comments here. Also, paste your chunk code for your bookChunk and also the code for the template you’re using for the book pages.
mary
I swear I sent you the source page and not my page. Here is the source page again.
http://pastie.org/947163
and my bookChunk
http://pastie.org/947171
p.s. I really appreciate your patience and timing response.
Gedion, is this the source for the page where you’re calling your bookChunk chunk? Are you sure you’ve assigned the correct template that has the bookChunk call in it? This looks like the source for your home page. The reason I ask is that I don’t see your bookChunk code anywhere in that source. Please look through the steps again and make sure you’re assigning the bookChunk chunk to the correct template, and then assigning the page where you want to upload the images to the right template. It might make sense to go over the tut again, I have a feeling you’re missing something.
mary
Mary,
I want to make sure I fully understand this because this step is not working for me. We set up 2 template variables that are associated with the SwansongBooks template so that every book we add to the library should have the option to add a cover image and a link to an external site.
Once we have selected the image and link and ‘save’ the page, then on the preview I should be able to click the title of a book from the library list and and see the image and be able to read the full description. Correct?
I stuck to your naming conventions for the chucks and TVs but once I click on the title of any of the books, I don’t see anything in the ‘content’ area.
This is the bookChunk chunk
http://pastie.org/1084843
This is the SwansongBooks template
http://pastie.org/1084851
and my TVs are named:
bookImages
ImageLink
Thanks for any help you can give me
Jacob
What version of MODx are you using? Are you developing live or on a local host? If live it would be easier to help you if I can log in and take a look.
You can send me more info via the contact form
mary
I just wanted to say a big ‘thank you’ for these beginner tutorials.
I’ve been wanting to dive into modx for a while but never got beyond installing a test site and taking a quick look under the hood. Your tutorials are precisely the training wheels I needed/was looking for.
Having spent some time learning how to style sites, then add behaviour using javascript (and now jquery) and learning some basic PHP I’ve wanted to get into a CMS. I started with Drupal but became horribly frustrated by its structure and stopped. I then switched to WordPress which is bliss but clearly not the tool for every job. Hence turning to modx.
Your tutorials are very useful indeed, helping me understand the modx structure clearly and pointing to additional resources for expanding the areas that you touch. Of the many tutorial sites I’ve visited over the last couple of years this is one of the most useful, most clearly laid out and written, and thus most rewarding.
I can’t thank you enough for the time and energy spent creating them and wish you much happiness and success as your deserved reward.
Thanks again.
Syrah
Syrah
Thank you so much for your feedback, it means a lot to me 🙂
Best of luck with your projects and with your MODx journey
mary