Welcome to part 4 of our series of tutorials on building a website with MODx CMS. So far we’ve looked at:
Part 1: Introduction to MODx
Part 2: Installing MODx
Part 3: Working with Templates
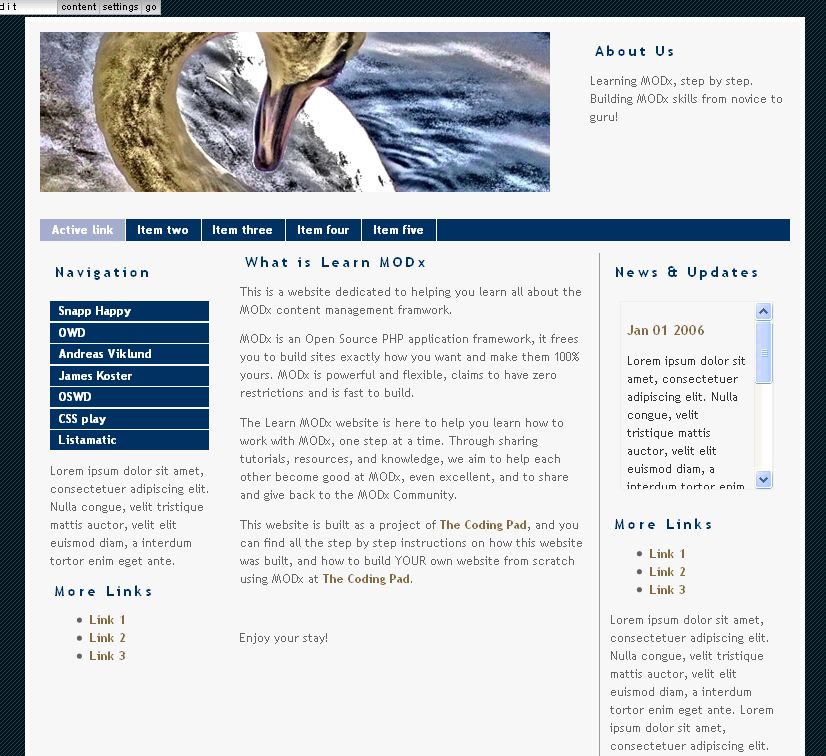
As we work through these tutorials, we’re building a MODx resource site called Learn MODx. In the last installment we started working with templates and moved our site from using the minimal base MODx template to the nice blue Swansong template. So far our website looks like this: (you can click on the images to see a larger view)
In this tutorial we are going to get a gentle 🙂 introduction to chunks. I had mentioned in the last post that we would delve into chunks AND snippets in this post, but I realized after some thought that I was being a tad too ambitious. I feel that it’s better to introduce each in its own post. I apologize for any crashed hopes and dreams, and any harmed puppies and turtles, but we will look into snippets in the next post.
So what are these chunks anyway? Chunks, to me, are like little mini-templates.
From the MODx official documentation:
“Chunks are simply blocks of plain text or (X)HTML markup that is inserted directly into your page at the location you place the tags.
Chunks are useful for any content or HTML markup that you might want to repeat in different pages or different templates. They are a good way to keep your template code clean and uncluttered with odd bits of content.”
It’s important to know that a chunk cannot contain PHP code. For that you would need to use a snippet or a TV (Template Variable). A chunk CAN contain snippets and template variables that do have PHP code.
Chunk calls take the form {{chunk}}.
As we continue working on our template, we’re going to create some chunks, clean up our template and separating it into manageable uncluttered components that are readily editable.
Let’s take look at our template. What parts of it will we want to reuse on different pages and on any related templates? Well, we know each page will have a header, a footer, and the sidebars. If we create any related templates, they will probably have some or all of these sections. So these are excellent candidates for chunks.
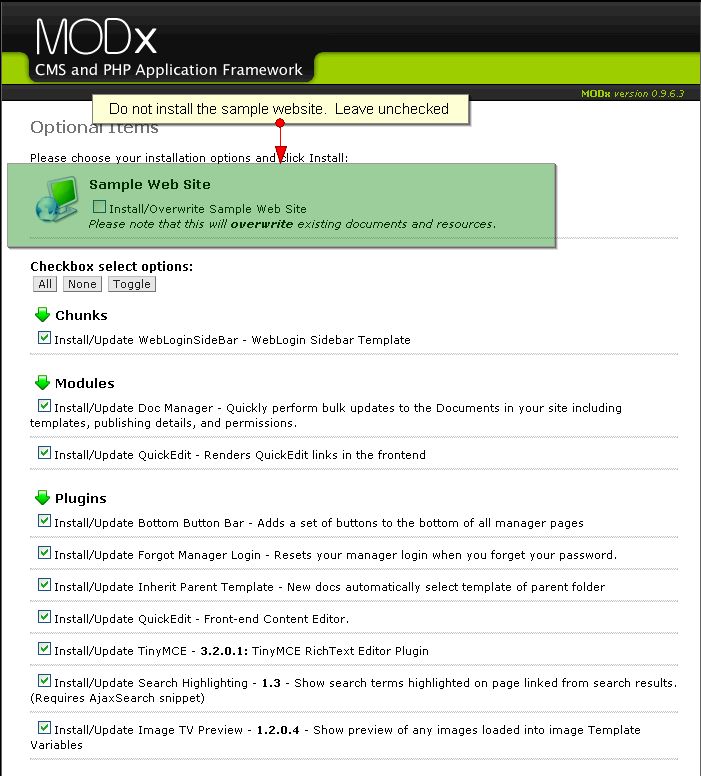
Chunks, like Templates, are part of the MODx resources. One of the premade chunks that you can preinstall, and that we chose to, is the WebLoginSidebar. Remember this screen? It has a list of the chunks, modules, etc that we had the option to install at the beginning.
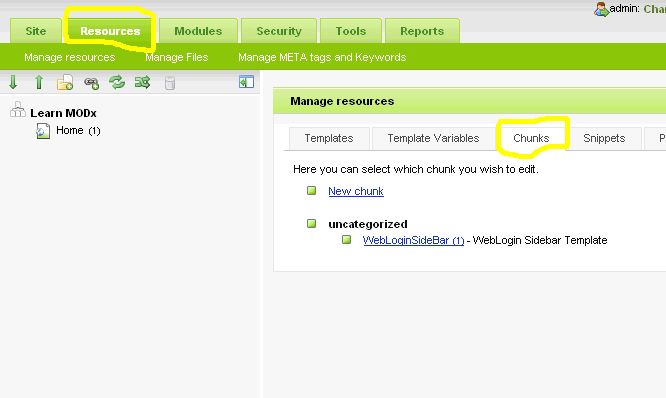
OK, let’s get rolling. We create and edit our own chunks of reusable code by navigating to Resources -> Manage Resources -> Chunks
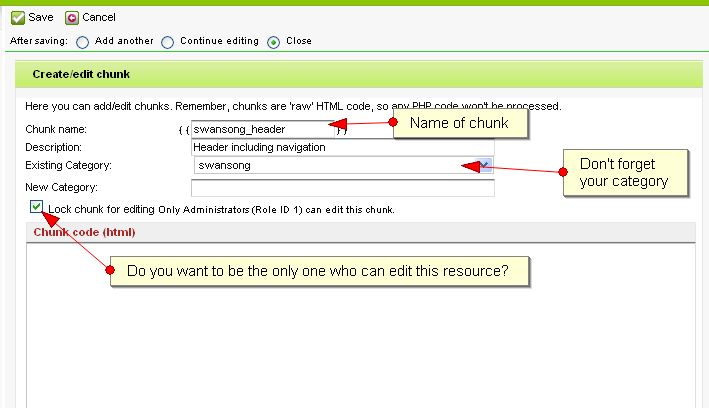
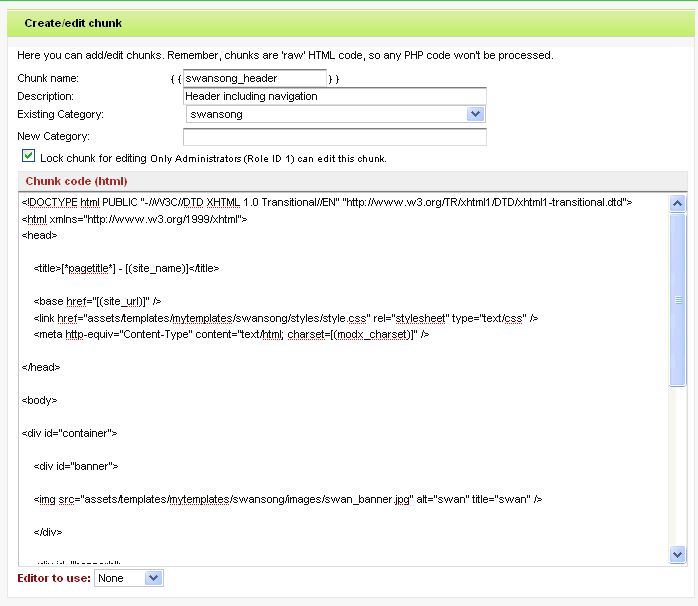
Click on “New Chunk“, and then enter the information for our new chunk. Let’s start by creating a chunk for our header. This will contain our template header code as well as the top navigation menu. Don’t forget to assign your new chunk to the swansong category.
For now, leave the body of the chunk blank and save it.
DO YOU WANT TO BE THE ONLY ONE WHO CAN EDIT THIS RESOURCE?
I should have mentioned this when we talked about templates, but one thing you’ll notice as you create any resource, be it a chunk, a template, a snippet, is that you have a little checkbox that asks you if you want to Lock the Chunk for editing. I always check this little box because I want to be the only one who edits chunks and such on my site. Even if someone else has access to my admin area, for example a moderator, or such, I don’t want them to be able to edit these structural components of my site. So this is something to keep in mind. It won’t affect you since you’re the admin, but you want to think about if you want others to be able to edit the chunks and snippets. If there are some that you want to not have anyone else edit, then you do need to check that little box.
OK, now that I have that off my chest, let’s go ahead and create three more chunks, one for the footer, one for the left sidebar, and one for the right sidebar. I have named mine swansong_footer, swansong_leftsidebar, and swansong_rightsidebar.
Since you’re creating several chunks one after another, you can save time by moving from one chunk creation page by toggling on the “After Saving: Add Another” radio button:
Incidentally, this little time saver is available when you create any resource or document.
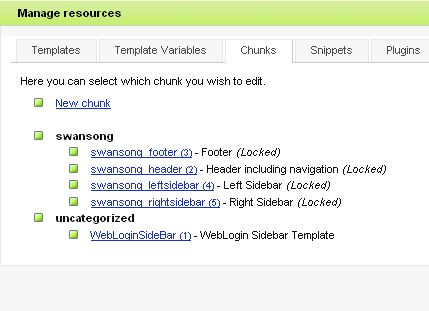
Once you’re done, your chunk management page should now list all your new chunks.
Let’s go ahead now and add the code from the relevant sections in our template to the chunks we just created.
While still in the Manage Resources screen, navigate to Templates, and click on the SwansongHome template to open it. Cut all the code from the top of the template (i.e. the doctype declaration, all the way to the closing <div> tag just before the sidebar div starts). Save the template, and then navigate to the header chunk and paste that code in that chunk.
So your header chunk code spans:
<!DOCTYPE html PUBLIC "-//W3C//DTD XHTML 1.0 Transitional//EN" "http://www.w3.org/TR/xhtml1/DTD/xhtml1-transitional.dtd">
.
.
.

<li><a href="#">Item five</a></li>
</ul>
</div>
Save your header chunk. Navigate back to your template, and in the place of all the code you just cut out, place the chunk tag:
{{swansong_header}}
If you preview your website, nothing has changed. It looks exactly the same, but your template code is getting cleaner.
We’re now going to repeat this process for the other chunks. Take all the code for the left sidebar, cut it out of the template, and paste into the left sidebar chunk you created. Just to clarify, this is all the code starting from <div id=”sidebar”> to just before the <div id=”sidebar-b”> tag.
In it’s place, place the chunk call {{swansong_leftsidebar}}
Rinse and repeat for the right sidebar, and finally for the footer. It’s a good idea to preview your site at every step to make sure nothing’s broken as you move from step to step.
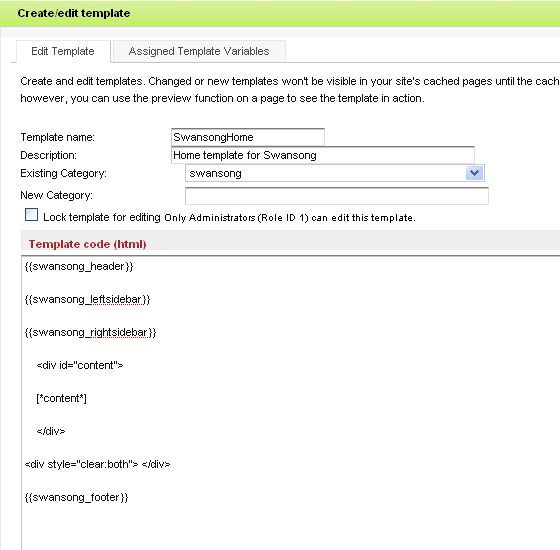
When we’re all done, our website looks the same, but look at our main template:
Doesn’t that look clean??
The really awesome thing about this is that I can now edit the different parts of my website template without having to scroll through a maze of tags and divs trying to figure out what’s what.
Moreover, if I create a new template based on the Swansong template, such as if I add a blog to my site and I want the blog left sidebar to be different from the main page left sidebar, all I have to do is create a different left sidebar chunk and call it into my blog template in place of the existing one.
I hope you’re starting to get the idea! Chunks are awesome, aren’t they?
Alright, most of the work on our chunks is done for now, our template has been cleaned up, and now I just want to make it a little more personal and get rid of the remaining filler text that came with the template. It’s easier and more manageable to work with now that we have it all neatly separated into chunks.
Let’s head on to the footer first and personalize it with some personal information. Remember we need to leave the designers name there as part of the usage license.
So navigate to Resources -> Manage Resources -> Chunks, and click on the footer chunk… ahhh, you’re an old hand at this aren’t you? I bet you didn’t even need me to tell you how to get there :). Make whatever changes you want to make ensuring to leave the Design by… intact per the license. Edit the sidebar chunks also.
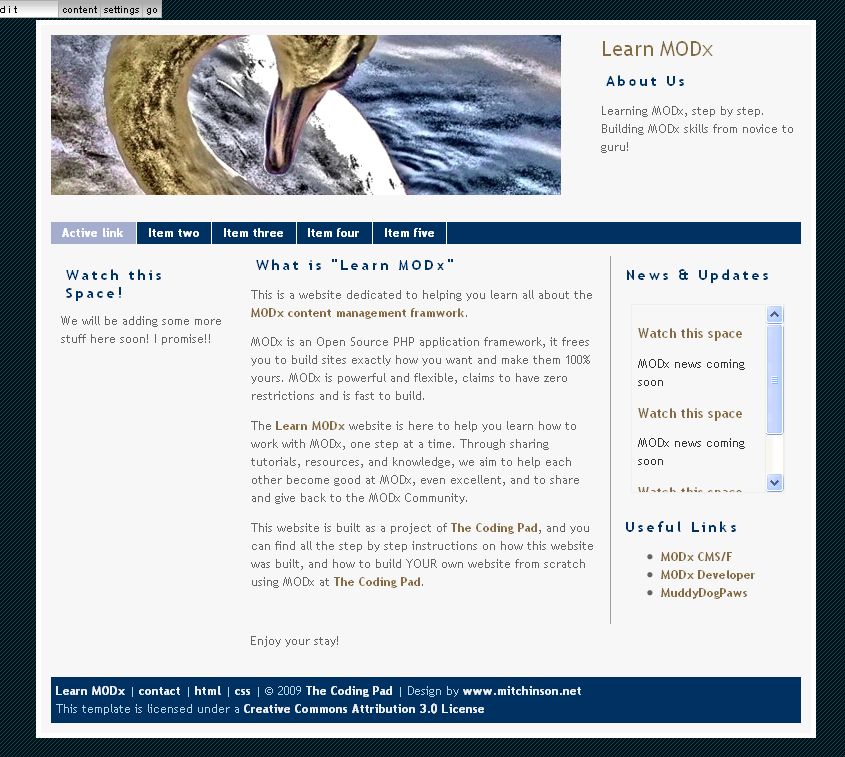
On the right sidebar, on the lower part, I am going to place a list of links to some of my favorite MODx blogs and such, in the More Links area. In the upper section, and in the left sidebar, I will put “watch this space” filler text because we’re not quite ready to add anything there just yet. You can put whatever you want in your sidebars!! This is what my final product looks like, you can see the footer area now contains my information, and the sidebars look a little different too. We’ve removed all the filler text and put our own in.
Alright!! Progress! It may not look like much to an outsider who’s just casually visiting our website from day to day, but we know better. A lot of work went into making our website look almost exactly the same as it looked from the time we started this tutorial.
Summary
Today we learned the basics about chunks, how we use them to store our reusable pieces of code so that our templates look cleaner and become more manageable. Remember always that you can not store PHP code in chunks, but you can call snippets in chunks, and snippets store PHP code, and these snippets are what we will be looking at in our next post.
As always, thanks for hanging with me to the end of the this installment. Remember to leave a comment on your way out, whether it’s just a note saying you read the thing, or something more detailed – a question, a clarification, a hey… anything really… oh, except spam ofcourse! 🙂
Hang tight, stay tuned! And do remember to grab your copy of the MODx Web Development book!
More Reading on Chunks and such:
http://svn.modxcms.com/docs/display/MODx096/Adding+Chunks
http://bobsguides.com/modx-chunks.html

I like my CMS chunky like my soup http://www.chunky.com/ 🙂
Great post.
A cool bonus about chunks are that they will only be cached once (on the MODx cache) no matter how many times they are used. This can keep the cache overhead a bit lower. In the example above the template is only a few lines of code and the common elements are only cached once, so if you had multiple templates it would weigh less than without chunks.
Great tutorial! Walk-throughs like this one are so helpful to people just getting started. I love MODx, but I probably never would’ve bothered learning it if not for similar beginner-level tuts around the Web.
I’d love to see this series continue into some of the more advanced features — especially PHx and ListIndexer.
Shane,
Thanks for the cool bonus info and the once again very useful feedback! Makes sense that you want your web pages to load up faster, and using chunks makes this easier.
But now I’m hungry for some chunky soup!! 🙂
mary
aladage,
Thanks!
Yes, I find walk-throughs very helpful and an easy way to learn how to do stuff, which is why I love doing them.
I do anticipate and plan to take this series as far as I can into advanced topics. I wanted to start from the very beginner level so that those who are completely new to MODx can follow along and have something to reference when we get into the more advanced features.
I’m also still learning so this is a great way for me to keep notes and to give back to the community!
thanks again!!
mary
Great set of tutorials dude… Thanks
Great tutorial. I’ve read them all so far and want more! I’m looking forward to the more advanced stuff. Do you need ideas?
iPad, you’re welcome! 🙂
Jason, thanks for the feedback. Ideas are always welcome. I have a plan I’m working through to get through the basics and then I have some tentative ideas for the intermediate to advanced topics, but any suggestions are more than welcome!
thanks again
mary
lol…I spoke too soon. I’ve been powering through tons of tutorials, including yours (which has been amazing) and found the answer to my question. What I was curious about previously, was how to use Ditto along with TVs, along with Chucks to format the TVs output and then use the Chuck as the template in Ditto.
What I’m on to trying to learn understand, is how to assign imagery to a chunk. For example, think of a web designers portfolio site. Often you click on a project they’ve worked on and it takes you to a page with some additonal info with some buttons that show imagery for the project. I can assign an TV to that template, but what if I had 30 pictures to assign. 30 image TV just in case is a pain. So logic to the form, would be more reasonable. I don’t know if I’m making any sense. I’m a beginner…
nice nice nice, please make more
Jason,
I’m not 100% sure I understand what you mean but I think I may have an idea of what you’re trying to accomplish. I really would have to think about this some more, I’m not yet good enough at MODx to shoot an answer right out 🙂
Also, don’t forget to visit the MODx forums and ask any questions you may have, the community there is very helpful. I’ll post back as soon as I have an answer for you!
mary
rickoje
Thanks for the feedback, definitely will have more MODx tuts coming soon.
mary
I’m too new to Modx to describe what I’m trying to do. Just keep making awesome tutorials! I’m sure I will have questions along the way.
Thanks buddy you have done a great job
at the initial stage where when i give the path of the css file it didnt work. but when i copied it to the main folder and gave it as styles.css it worked. i dont know why but it took me a long time to figure it out and my last option worked.
Thanks again buddy for your wonderful job
Mary,
These tutorials are great! I would almost rather wait for YOUR book to come out, then buy the MODx Web Development book. 🙂
Last year I tried to build a site with MODx and didn’t find any good tutorials for beginners. You also inject just the right amount of humor to keep it interesting. Thanks for all the great work.
Ian
Thank you for your kind words 🙂 and for the feedback. There’s definitely not much out there for MODx newbies at the moment, and it can be hard to get started, so I’m glad that these tutorials are finding a good audience.
Hang around, there’s definitely more to come! 🙂
mary
This is an excellent series on Modx – thanks.
Done part 1 to 4, so far. It’s this kind of clear hands-on tutorials that I like for learning web development. Thank you very, very much!
Nikke
Thanks so much! Just getting into MODx and working through your tutorials. Great stuff. So far so good…..everything makes sense.
Cheers!
Candipants
You’re most welcome!! MODx is fun and powerful too. Glad everything is making sense… don’t hesitate to ask if you get stuck 🙂
I found this tutorial excellent. Everything went perfect, except that the content expands to the left as the left sidebar shrinks.
I noticed this at the very start, because the last line of the content slips to the left, under the sidebar; but the whole thing turns into a two column template, with a little corner on the top left, when you cut down the contents of the left sidebar to what appears in your last “Watch this space” screenfull.
How can I keep the left sidebar intact?
Greetings from Florence, Italy!
Here I am back… there is a serious problem here, which may mean a problem with this whole (otherwise) extraordinary tutorial.
I have tested the original Swansong template, as I downloaded it, before the Modx modifications.
I simply copied out two more lines of text and added them to the content section.
The result: the content flows out beneath both the left and right sidebar.
I don’t know why it didn’t happen with the examples you used here, maybe you downloaded Swansong before some change was made to it. I have the problem both with Mozilla and IE7.
Obviously, there is something missing in the css of the original template.
Anybody have any idea?
Hi Miguel
Not sure why this is happening. Are you building your site live or on your computer? If you’re doing it live, do you have a link i can look at?
It’s difficult to troubleshoot this without looking at your code. Sounds like a css issue just from reading your message, but I would really need to look at your whole template to get an idea of what’s going on.
If you’re developing live, give me the url to look at. If not, drop me a line through the contact form and we’ll explore it further.
thanks
mary
Simply the best tutorial for MODx..
I have lots of questions but i have a sneaking feeling they will be answered in later chapters..
THANKS!!!
thanks for the feedback tomato! 🙂
I’d like to say thank you for the tutorial too.
I looked into MODx before, managed to put up a site and changed the template to my own, but then I got more or less stuck. Found the online documentation for MODx to be incomplete and scattered accross the internets. What I needed was a step by step tutorial like yours.
I followed the tutorial along sofar, found it easy to understand and follow and everything works as it should. Glad to see that you keep on adding more chapters to what is already the best tutorial sofar.
Thanks again !
Bob,
thanks for your feedback! 🙂
Thanks for this info. It’s quick, concise and easy to follow! I’ve learned more about MODx in the past few pages than any other resource.
I’m using 1.0.0. There’s some diffs, but so far it’s easy to translate!
Bane,
Thanks so much for your feedback. Glad to hear you’ve found the tutorials helpful and that you’re able to apply them to 1.0! 🙂
mary
Just wanted to second that last opinion. I have been trying to work out how to get into MODx and have found nothing really helpful until your tutorials. So big thanks for making the effort!
Thanks very much for this series, I’m in the process of moving over to MODx and this series has been a revelation. I’m going through it a second time now as I redesign the site.
Many many thanks. Your technical info is spot on and the “tone” of your writing is very good; a lot of ‘how-to’ sites are very terse and dry but yours is chatty and warm without losing anything.
Well done!
Your education experience really shines through in these tutorials.
You have a gift at making this understandable. I too am a newbie, and I appreciate how you have broken it down to the smallest possible steps to walk us through.
Often times, even basic tutorials I find miss steps and processes that can really slow down comprehension.
Thank you very much for doing this. Good luck with your studies.
Jess
thank you for the feedback, i really appreciate it 🙂
This is really a fantastic tutorial. I’ve been torn between Drupal and anything else and think ModX is the winner. Last night when I got to this chapter the site was unavailable. I almost couldn’t sleep because I wanted to continue.
Instead I played Call of Duty and killed many Nazis. This is really a very nice way to teach this product and it shows how easy it is to use.
Thanks for doing this.
Art
I’m sorry the site was offline and you had to resort to violence in Call of Duty! Glad you’re enjoying the tutorials! 🙂
mary
Hi,
I have been doing PHP development for a number of years but am just now cutting my teeth in ModX. I have to say that your tutorials are great. They cover the basics really well and give enough of the conceptual grid to get someone over the initial hump. I see that there is only one ModX book out there right now. Maybe you’re a good candidate to work on the next one?
Jim
thanks for the feedback 🙂 I really appreciate it. I have definitely thought about writing a book, and may still do it, but time is pretty scarce, so I try to spit out these tutorials whenever I can. Besides, this way I can keep the information free 🙂 But you never know, the book may happen one day!!
thanks again, and hope you visit again.
mary
Very useful series of bits. It is not that easy to even start into MODx. Drupal and Joomla and WordPress and similar high profile stuff have many informational sites and books but MODx … not so.
Currently I am vacillating between MODx and Concrete5 which is worth a look too.
Thanks for your efforts.
Frank,
It’s true that there’s not that much information out there on MODx but it’s getting better and more and more websites and blogs are coming up all over the web. Bear in mind that MODx is younger than most of the CMSs that have been out there for a lot longer, but it’s a great system and one well worth learning.
You can find a growing list of MODx resources here: https://codingpad.maryspad.com/2009/04/13/modx-resources-and-tutorials-on-the-we/
Mary,
I hit the same problem as Miguel as I worked through the (great) tutorials. I found the answer – if you copy the code from your page the <div id="content" in part 3 has the wrong double quotes on content, and so if you copy and paste (very lazy, I know), it doesn't get recognised!
Ken
I think I’ve solved that problem now, thanks for pointing it out!
Absolutely brilliant tutorials and screencasts!
Tried Joomla and many others and got frustrated with them all for one reason or another. I wanted a CMS with tree navigation and found MODx fitted the bill. Then I found your tutorials and was hooked.
Spent an hour this morning trying to solve the problem others had with the left sidebar until I read the comments and found the solution. Learned a lot in the process so the time was not wasted.
Keep up the good work.
David
David
thanks for your feedback. I’m glad the tutorials have been useful to you. I think I’ve finally solved the problem with the quotation marks being all wrong. Sorry about that.
mary
i’m lovin it thanks for your work!
You’re welcome! Thank you for your feedback.
mary
thanks for your tutorials. I have struggled along to learn what I have. Your tutorials are really helping me put it all together.
Jerry, glad to hear the tutorials are proving helpful. Thanks for the feedback 🙂
Just want to say many thanks for such a fantastic tutorial, I cannot emphasise just how much difference these type of friendly lessons make. Usually I would have switched off for another rainy day, but you make it such light reading and more importantly FUN!!
So I will speak for all others who haven’t posted here but felt the same as me, a BIG thank you!
Tim, thank you so much for the feedback! 🙂
mary
Awesome tutorial. I know I bit more now. I’m super excited about modx, thanks again for doing this. now on to the snippits =)
These tuts are great. This is so much easier than I was worried it would be.
THANKS for the help.
You’re welcome! 🙂
Thank you for the feedback!
mary
Hi Mary thank you for your website I have just finished watching the video regarding the interface changes from 0.9.6 to 1.0.0. I have now moved onto the chunks section here, but when I tried to do the same thing to the footer well, it just goes away.
The main thing that has confused me is the abundance of chunks already present (including one for ‘footer’), is this what comes with the template I am using?
I attempted to include the code for the template and what part I used for the footer but apparently ‘my comment looks spammy’ and could not be posted. Here is the part I took out for the footer (if this works):
Powered
by MODx Template © 2006
modXhost.com
MySQL: [^qt^], [^q^] request(s), PHP: [^p^], total: [^t^], document retrieved
from [^s^].
Thank you 🙂
Figured it out, forgot the {{footer}} 🙂
Whoops!
Drew,
LOL! 🙂 Glad you were able to figure it out even before I had the chance to moderate and approve your comments! 🙂
mary
Thank You yes 🙂
The ‘header’ didn’t go quite as planned. It worked perfectly for everything in the section, but upset the search bar and header image a bit when I tried it.. Probably either my fault or there is just too much going on in that code to be placed in a chunk, I’m not sure. Regardless I am on my way thank you very much 🙂
If you see something that would help on my header or if there is a reason that a chunk is inappropriate in that case would be happy to know more. Thanks again Mary.
Drew
Drew
What’s the link or the chunk code?
mary
Hi Mary, unable to post the code in the comment due to a spam filter. I tried putting it one of my modx sites pages for you to look at but that broke the page and displayed the code a million times. 🙂 I am unsure of how to post html code into a modx page at the present time.!!!
If your site is live just send me the login info via the contact page and I’ll take a quick look. Or else paste the code in a text file, create a dropbox account (it’s free) upload it there and let me know what the link is. The help i can offer outside of the comments is usually at a fee but I can take a look and let you know.
mary
Hi Mary here is the dropbox link to the txt file 🙂 Thanks
Drew
http://dl.dropbox.com/u/4427631/Header%20Chunk%20Detail.txt
Drew
From a quick glance at your code and the template you’re using, my first guess is that you ran into conflicts with the CSS, heights and widths, and positioning issues. Because you’re trying to add flash and other elements into an already existing header area that has it’s own elements, you really have to examine your code and placement of elements and see how they will fit into the existing header and align with everything that’s already there as well as with the CSS. You’ll notice for example that your drop down menus are hiding behind your graphic. These are the thoughts that immediately came to mind after looking at your code. The solution may be simpler or I may be missing something, but I think that’s where your problem lies.
Just out of curiousity, what version of MODx are you using?
mary
Hi Mary using v 1.0.2
I will try removing the flash (that was a good experiment in it’s own right) and attempt to try again.
I was a bit confused as to why the menu is so far down in the code, but I am using the ‘modx host’ default template, so I assume it is written that way for a reason! 🙂
I will let you know how it goes.
Drew
Hi Mary, I have two Chunk related questions in my study of Modx Chunks.
First, might it be important to have the html base reference – in a chuck or is that just inherited from the template?
Second, I have a bit of code that contains Javascript. And I think that chucks are the proper place for this. I run this code outside of Modx Evo and works fine. I put it into a chunk and then call the chunk in my document and no errors but just a blank page.
Here is the code:
function kw_switch(i,c) {
d=document;if (d.getElementById){ d.getElementById(‘kwMain’).src=i;
d.getElementById(‘kw_caption’).innerHTML=unescape(c);}
}
Packers Football
To check myself, I also tried to call the page that works outside of Modx with [!ShowStaticHtmlPages?dir=`assets/docs`&index=`picturegallery.htm`!]
In this case the images appear but no functionality. I also disabled Quick Editor to make sure there were not conflicts there.
If you have any thoughts I would appreciate them. Thank you.
I guess code does not show in a post so I put a link to it here:
http://www.mcleroy.org/maryspad.php
Thank you.
Thomas
AFAIK you don’t need to have the base href in your chunks as long as it’s in the head of your template.
What happens if you just place your javascript directly in the template without using a chunk? Does it work?
mary
Hi Mary, I am just a little slow in responding as I have been to the dark side and back.
After doing a number things from changing templates to putting the javascript in the the template, I started to tear things apart/out one by one. What I found were some serious conflicts with the templates in Wayfinder. Normal content was fine but when I started to include things that had javascript that’s when things would break down. The template calls in the snippet were the conflict–I think–as when I removed them things came together. They were &parentRowTpl=`cssplay_revParentRow` &cssTpl=`cssplay_revFlyOut`. I was only using the “flyout” to one level. But using this code from template to template was causing the problem.
I also found that on a resource if I just had pictures or pictures and just a very small amount of content prior to the picture and javascript, these would come through on the Ditto page and crash the Ditto.
I look at Modx as being an extremely powerful platform, and yet I saw/see these challenges as a barrier that once committed I would struggle with all the time. Simple content all went fine, but I wanted to test a few more things to see how I would handle these.
Also, and though this has more to do with snippets and not sure if technically possible, it would be nice if when creating a resource/document you could choose to turn on or off the Modx API on that particular resource and allow for Inline PHP. That would be powerful. Maybe it is possible now and I am just not aware.
Thank you Mary,
Thomas
Thomas
Regarding Ditto, are you creating chunks with templates controlling what you want to come through on Ditto? I think a tpl for this would solve your problem
For the Wayfinder with Javascript, I have seen quite a few MODx sites using javascript in the Wayfinder menu. I strongly recommend you read through the excellent and free wayfinder ebook and especially read on the &jsTpl parameter 🙂 Here’s the link to the book download page (it’s on the first post: http://modxcms.com/forums/index.php/topic,34176.0.html
I also recommend a visit to the forums. Do some reading and ask some questions. For example:
http://modxcms.com/forums/index.php/topic,12272.msg81622.html#msg81622
I think the Wayfinder ebook will help you a lot
mary
Mmm, I love chunks it really helps to give you a fresh look on the code!
Yes they do! 🙂 And they allow you a lot of freedom when templating and organizing your content.
I am learning MODx now, thank you for your tutorial +_+
I just love your tutorial … its really helpful plus I love your sense of humor … it makes this learning experience so much fun 🙂 … thanks a lot.
freakin perfect.
Just yesterday, I decided to try and find something more scalable and flexible than wordpress…the first couple of hours with MODx was frustrating, to say the least, but long story short: I came across this series last night (3 am actually), skimmed it over, had an epiphany, bookmarked…here I am!
Kudos!
As the April 2, 2010 post, this marks the 1-yr anniversary of this article. And I’m happy to say that it’s well worth a year’s worth of readers. Thanks for the great tips. It seems so easy now, but I’m not sure I would have understood that without this.
Thank you Mark!! 🙂
So far so good! This is very similar to Expression Engine but better because is free!
Thanks so much for these clear and concise tutorials. With your help, I have, in one day, turned a static site into a database-driven dynamo. I’m impressed with MODx and thank you heartily for these super-helpful lessons.
Thanks for the feeback Wesley, you’re most welcome! Glad the tuts have been useful! 🙂
love it, love it, love it!
Exactly the detail needed.
(sure hope you have time to do a tutorial about using ModX to generate XML files!)