Welcome to part 12 of our tutorial on building a website with Drupal 6. Previously we covered:
Part 1: Introduction
Part 2: Installing Drupal 6
Part 3: Configuring your Site
Part 4: Playing with Blocks
Part 5: Playing with Modules
Part 6: Playing with Themes
Part 7: Installing Modules and Themes
Part 8: Pathauto, Content, and Content Types
Part 9: Users, Roles, and Permissions
Part 1o: Reports – Keeping Track
Part 11: Managing Spam and Comments
As we go through this tutorials I am building a Drupal resource site called Learn Drupal. So far our website is shaping up really well, the basics are pretty much taken care of, and we’re now looking to build on content, and start adding on more functionality, depending on the purpose of your website.
In this installment, we’re going to look at how to make formatting your content easier for yourself and your users.
One thing that you may have noticed as you add content to your site is that the text editor is rather plain, and to add any formatting to your content you have to manually insert tags such as <b> for bolding, etc. Now this may be just fine and dandy for some people, but the vast majority of us would prefer to not have to manually enter tags. This is where rich text editors come in, and in this post we’re going to look at installing and enabling a rich text editor on our website so that formatting content becomes a tad easier.
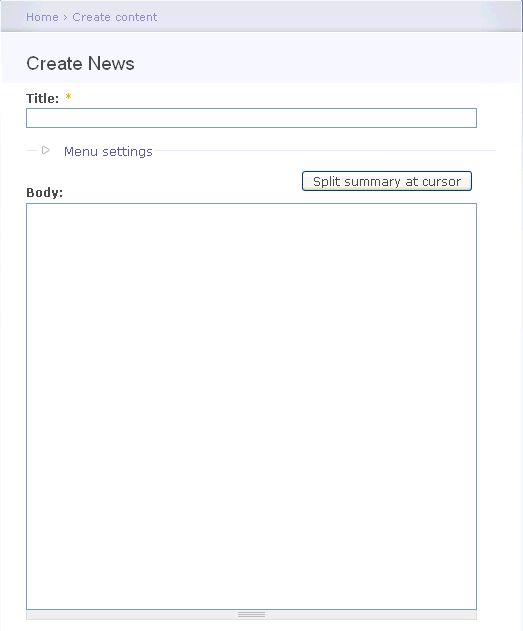
Let’s log into our website and click on Administer -> Create Content. I am going to choose to create some News. This is what my content editor currently looks like:
By the end of this tutorial, we want to have a text formatting palette that will allow us easy access to various formatting tools. To accomplish this, we’re going to use a Module. Searching the Drupal website module page for rich text editors gives you a good number of options. The ones I see mentioned most are TinyMCE and FCKeditor. My personal preference is to use FCKeditor, so that’s what I’m going to cover in this tutorial. If you choose to use another editor, the installation instructions, as always, are usually on the module documentation page and/or on the readme file.
Installing the FCKeditor
One thing that always throws people off about installing the FCKeditor is that you need to download and install two components:
– The FCKeditor Module and
– The FCKeditor itself
The FCKeditor doesn’t come bundled with the module because it’s released under a different license, but both components are free, so yay!
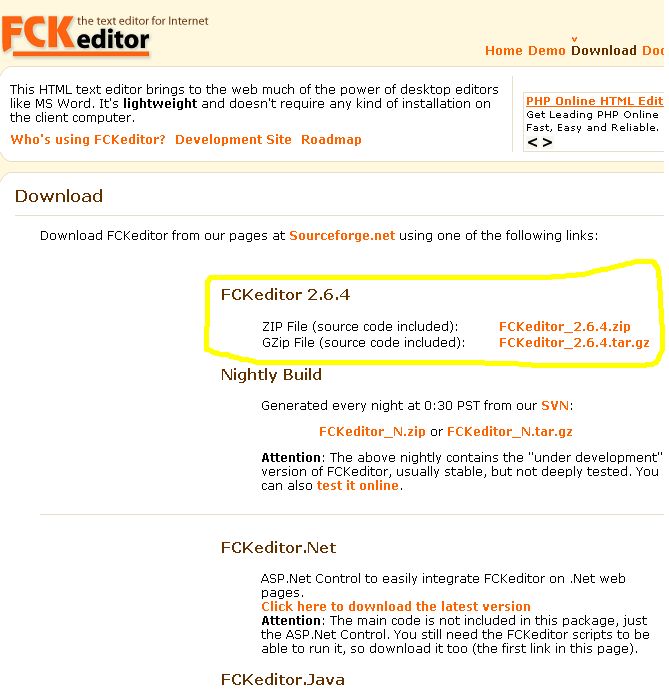
Alright, let’s get to work. Download the FCKeditor from the Drupal website (http://drupal.org/project/fckeditor). Ofcourse you want to make sure you grab the one that’s recommended for Drupal 6.
Next, download the FCKeditor from it’s website (http://www.fckeditor.net/download)
The next steps can be done on your desktop and then uploaded to your server or done directly on your server. I prefer to do them on my desktop and then upload.
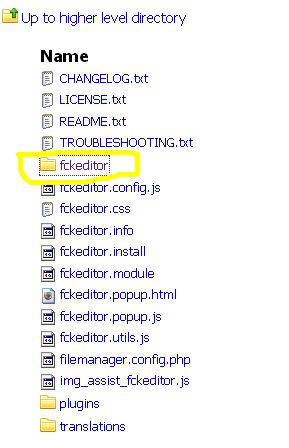
First, unzip the Drupal FCKeditor module onto your desktop. It should unzip itself into a folder called fckeditor. If you now open that folder and look at its file structure, you’ll notice that inside it there’s another folder called fckeditor.
If you open that folder, it consists of single text file COPY_HERE.txt that tells you that this where you need to unzip the fckeditor you downloaded from the fckeditor website. Now because the fckeditor zip file uncompresses itself into yet another folder called fckeditor, things can get a little confusing. My approach is usually to create another folder with a totally different name, like “the actual editor”, and then unzip it into that folder, and copy its contents over into the drupal module folder indicated above. You may find you prefer another method, but this helps me from confusing and overwriting things.
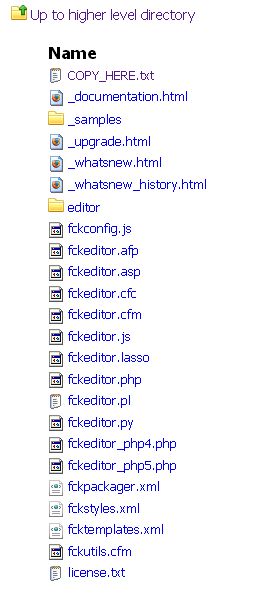
Once you’ve done that, your fckeditor folder inside the drupal module folder that initially had the one COPY_HERE.txt file will now have the other files in it like this:
So to recap, your Drupal module folder that you downloaded is called fckeditor. In it, there is another folder called fckeditor that should now have the structure as above. Hope that is not too confusing 🙂
So the next step is to upload the module folder into your sites/all/modules folder. Incidentally, once I have prepped this module folder and made sure it works, I keep it somewhere safe so that i don’t have to keep redownloading and setting it up each time I need it for a new website.
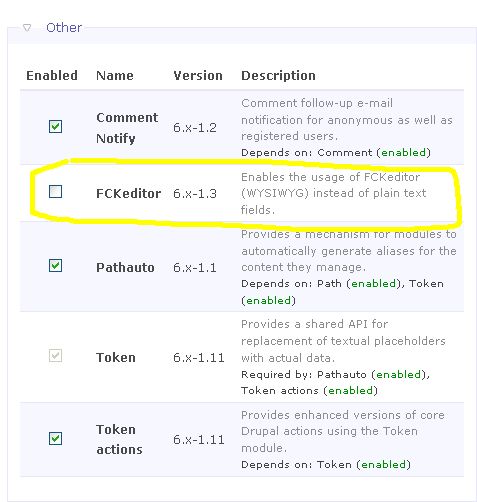
Once you’ve uploaded it, go into Administer -> Site Building -> Modules, and you should now see the FCKeditor module (under Other) ready to be enabled.
Once you’ve enabled it, the next step is, as always when we install a new module or add a new content type, set its permissions. And remember that you have to be logged in as the main admin (user 1) to have the proper privileges for inital configuration and permission setting.
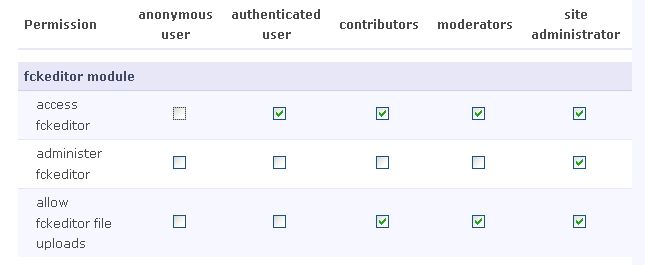
The first thing you want to do is set permissions for who the module. As usual, you do this under Administer -> User Management -> Permissions.
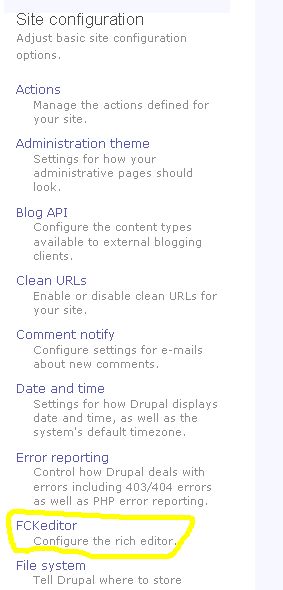
You can set them however you want, this is just for demonstration purposes. Once this is done, you can now look into configuring the editor under Administer -> Site Configuration -> FCKeditor.
Now the FCKeditor is one of those modules that is highly customizable and has a multitude of configuration options. It would take a blog post and more to go over all of them, and you can read all about setting up profiles and all that at the module homepage. Generally, I find that the default settings are good enough to get things started. There is one thing though that I need to change.
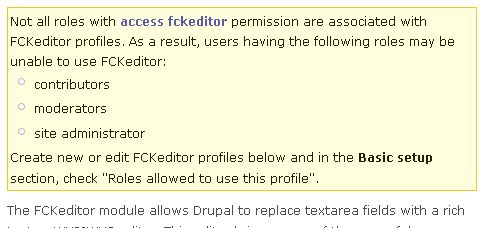
Even though I have allowed authenticated users to access the fckeditor, I need to specifically select all roles and assign them to a profile that can access the module. More details on profiles and configuring can be found at the link I provided above, but for now, under Administer -> Site Configuration -> FCKeditor, I need to assign the roles that I have given permissions to a profile, as you can see from this message at the top of my configuration page.
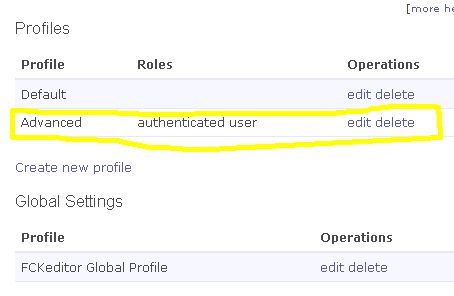
Alright, so scrolling down the page, you can see the profiles. The two that come with the default install are Default, and Advanced, and you can create more. Under Advanced, you can see the only assigned role is Authenticated. This however does not mean that all authenticated users with roles other than authenticated (moderators, editors, etc) can access the editor, which can be a little confusing.
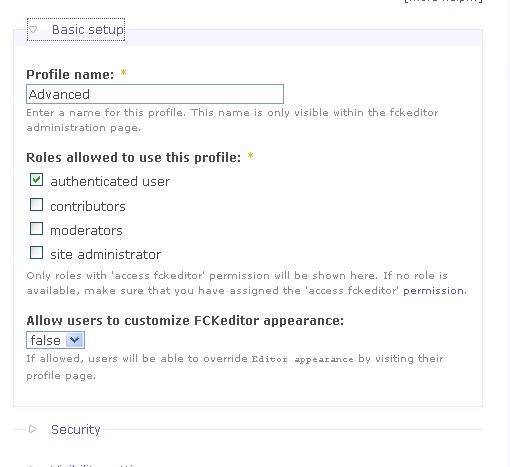
Click on edit to edit for the Advanced profile, and then click on Basic Settings. I am going to work with the Advanced Profile, but you can go ahead and create your own profiles and customize away :).
As you can see, we need to assign the other roles to the profile so that they can use the FCKeditor, otherwise it won’t be accessible to them and they will only see the plain editor when they attempt to create content. So select the other roles and save your profile. Like I mentioned before there’s a lot of other customizations we can do but I won’t attempt to go into that in this post. We may come across them in future posts, but for now we’re good to go.
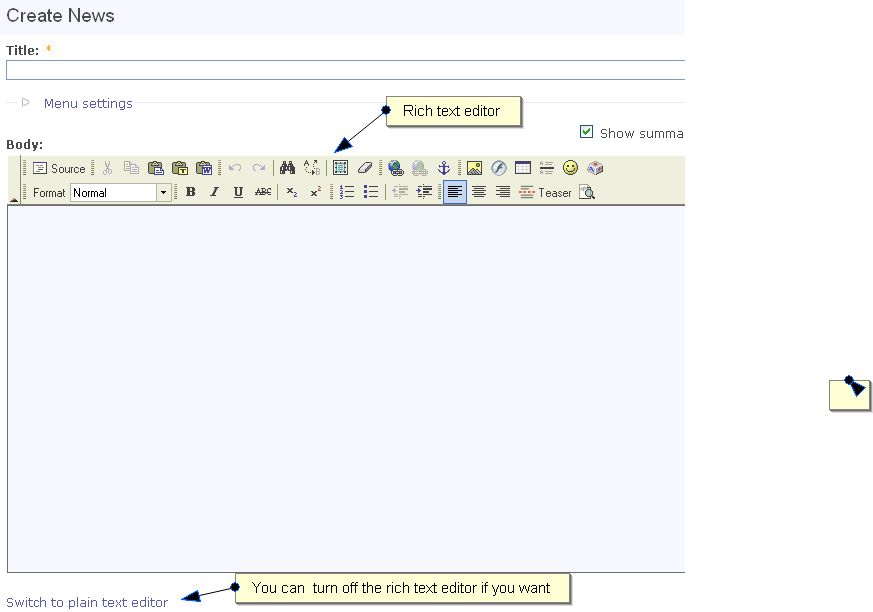
If you now go back to the Create Content screen we started with, you’ll notice a big change. Instead of the plain editor we had, we now have a palette with formatting options, which will make formatting the content we create easier.
We can now simply select a block of text and apply the desired formatting to it by clicking on the relevant button on the palette, which makes creating good looking posts easier to do.
For now, it’s a beautiful Saturday afternoon where I am, the sun is shining, and I have no desire to assign homework :), but you may be interested in reading up more on configuring the FCKeditor, and perhaps you may want to explore other rich text editor modules, you may find one that you like.
As always, don’t hesitate to leave a comment to let me know if you have any questions, or just to say hey!
Cool tutorial. Are there more parts to this on the way, or does this conclude the series?
Harv
thanks for the feedback. I do have a few more installments planned for this series, so stay tuned 🙂
thanks
mary
Wonderful. Are Views coming up? What about image galleries? Thanks.
Kirk
Thanks, yes. I do have a CCK and Views tut planned. I hadn’t thought of one for image galleries, but given time I’m sure I can throw one in there 🙂
Just need to free up the time to sit down and write!
mary
Thanks for the great tutorial series. I was pulling my hair out, trying to get started with Drupal. Your simple, well-written posts are the best I’ve found for a beginner introduction. Much thanks for putting it together.
And like others, I’ll be heading into CCK- Views-land shortly, and am already worried that I won’t find any explanations anywhere near as good as what you’ve put together to get me to this point. 🙁
Thanks again!
thanx for the tutorial so far. I was an absolute beginner and I’ve created my own site;
Wonderful !
Keep me informed about next chapters;
THANX
what a great tutorial here.. ive follow from part 1 to 12.. its a one step ahead to build my own website.. for time being im using localhost installed in my computer with xampp server..
anyway, im waiting for new parts from you.. hope u will make it soon yeah.. you rawks!!
Saiya
Thanks for the feedback, I really appreciate it 🙂
Summer school is keeping real busy, but after finals next week I’ll be able to breathe and get back t0 posting tuts 🙂
hi, its me again.. i have 1 problem regarding story content.. it says
” By default, a story entry is automatically featured on the site’s initial home page, and provides the ability to post comments.”
i hav created many topics like discount or package, i want only 2 latest topic to view at the front page.. so the rest i untick the “Promoted to front page”..
when i create another topic, i just untick the older topic to make sure only 2 at front page..
ok, the problem is, i dont know where is the old topics go. i can see it inside Administer / Content management / Content…
i want to make it as a menu. like “previous discount” or “previous package” or “older stories”..
i hope u can understand my words..
Saiya,
I hope I follow what you’re asking. One way to do is to allow only one item per page, this way there is a next and previous link and the front page only shows the most recent item. Does that make sense?
I will be tackling custom content types and views soon and if I don’t forget I will add an example similar to what you’re trying to accomplish.
If what I said doesn’t make sense, or if I misunderstood your question, just clarify it again and I’ll reply as soon as I can.
hehe.. i think better i give some scatches drawing.. sincemy web is not live on the net yet.. ok u can see it here i upload two drawings..
http://img194.imageshack.us/img194/479/websitec.jpg
http://img403.imageshack.us/img403/7103/website2r.jpg
im using marinelli theme…
as u can see there i put Welcome to our Website as a sticky, so it wont move. that content is Page.
below that is the story content.. i only enable New Story 4 and New Story 5 at front page..
if there is a New Story 6, i will disable New Story 4 from frontpage..
ok here is that what i mean…
in MENU u can see Previous Story.. means, whenever i click Previous Story, i want it to show all the Story or only 3 Stories, and with the next n previos link.. seems i dont figure it out how to make like this..
hi there, any idea how to dothis mary?
Sorry it’s taken me a while. I’ll take a look and get back to you.
hi mary……
it was nice to have ur tutorial…..i have learned a lot.
it is easy to understand n just up to the marks….
plz let me know whenever ur new posts are there.
n may be if u could add where do we write the php n html code if required in our drupal website….
thanks a lot
priyanka
Priyanka
If you subscribe to my rss feed you’ll know when new posts are up.
Thanks Mary… anxiously awaiting the next section. I almost feel confident with it now thanks to you. Well written and very easy to follow.
Hi Mary!
Your tutorials are great! Thanks so much.
I am having some trouble with the FCKeditor. When I get to the step with Administer -> Site Configuration -> FCKeditor to assign roles etc., it does not actually show profiles when I scroll down. Instead, I have a message that says “The FCKeditor component is not installed correctly. Please go to the FCKeditor homepage to download the latest version. After that you must extract the files to modules/fckeditor/fckeditor and make sure that the directory modules/fckeditor/fckeditor/editor and the file modules/fckeditor/fckeditor/fckeditor.js exist. Refer to the readme.txt for more information.”
I have tried reinstalling it and am pretty sure that I am doing it correctly, but to no avail. Any idea what I might be doing wrong?
Thanks!
Yifan
I got a friend to help me out…but I will definitely keep following this blog 🙂
Yifan
Glad you were able to get help. Sorry it took me a while to look at the comments and reply.
Well done, Mary. It may not make you rich, but people will always love your tutorials. I’m sitting watching my RSS feed for the moment you talk about Views, etc.
Wonder if it will tell me enough to let me figure out how to create a secondary menu like this: A-C; D;E-G;H-K;… etc.,
i.e. an Index that lets users search content by first letter of a node title. At the moment, I can use a view with a search box in it – what I want is a menu link that displays results of a pre-coded search.
Mike
🙂 thank you for the comment, glad you like the tutorials. I look forward to creating that tutorial when I have time, which unfortunately has been in short supply for me. My next task in the Drupal series will definitely be CCK and Views.
mary
Thanks so much for the great tutorials. I am a complete noob at Drupal and these tutorials have really Helped. I have recently created a website
http://www.ppss.org.au/main in joomla. But the guys there now want it converted to Drupal, These tutorials are going to be a great help
Nigel,
thanks for the feedback. Good luck with the site conversion, Drupal is a great CMS to work with.
mary
Mary,
Have you got a time lined planned for your following up tutorials? I’ve found them the best anywhere on the web.
If you are planning on doing more can you consider these aspects which I am currently scratching my head about:
1/ Googe search CSE module
2/ File uploading
3/ Scoial networking integration (youtube, twitter, facebook etc…)
4/ Mysql Database integraiton (say to hold files or as an information resource which is ‘stronger’ then blogs/posts).
Many thanks.
Rob
Rob
Thanks for the feedback. I have a long list of tutorial requests, but I will add these to the mix. I generally write tuts based on the projects I’m working on since the tut writing stuff doesn’t pay the bills. I might be doing 3/ soon though, keep your fingers crossed.
I’m not clear about some of your needs though. Could you elaborate on requests 2/ and 4/?
thanks
mary
mary,
i wanted to thank you for the tutorials. the past few days were awesome and i feel like i’ve really got a grasp on things.
very well laid out, which is a skill many in the field lack. thanks again!!!!
nate
nate
thank you for the feedback! Much appreciated 🙂
mary
Mary,
Being able to link further mysql databases and then allow for the representation of the database content?
Also you touched on it in one of your tutorials but in order to get drop down menus, what is best superfish or nice menus? What is the difference between them? I’ve asked in drupal forrums and all replies just send me to the link for the modules saying “see below”.
Im trying to implement drop downs on the basic garland theme from where your tutorial ends but I am having trouble.
Rob
DBs: For linking to more databases, look at http://drupal.org/node/18429
Superfish: I don’t know which would be considered the “best” superfish menus. I honestly haven’t used them much. The times I’ve used superfish menus they were already built into the theme. roopletheme.com themes tend to use superfish menus. If you know how to code CSS and theme and have the time to read themeing docs, you can integrate superfish menus into any theme you want. Here’s a short but quite useful tutorial on this -> http://adaptivethemes.com/add-superfish-drop-menus-to-any-theme-easily.
Sorry to just point you to other links. If I have time I will make a tutorial on this, but like I said before, the time to make custom tutorials is very limited for me. If I end up with a project that needs this, or I have time to spare, I’ll make a tutorial on modifying Garland menus, but I think the link above will give you a great starting point.
mary
Hi Mary
Coming back to my questions, I think a lot of my questions revolve around two particular areas: 1/ CCK and views and 2/ Themeing and CSS.
The first i think you have mentioned you are contemplating a tutorial on, the second I think would be helpful as a module just to give an overview of how the theme and CSS works with Drupal. For instance, in your tutorial drupal system, below the site name but above the content region, you get a hyperlink showing where you are in the page. How would I alter this as it shows the levels when I am navigating through the admin menu but doesn’t show my custom content?
Is this where taxonomy needs to be implementated?
Rob
There’s a module for that! 🙂
Custom breadcrumbs module -> http://drupal.org/project/custom_breadcrumbs
Taxonomy breadcrumb module -> http://drupal.org/project/taxonomy_breadcrumb
Themeing is a big topic, there are a lot of resources out there but getting the gist of it is not trivial. I can’t promise I will do a full themeing tutorial any time soon as that will take a lot of time, but I can try to answer specific code questions when possible.
mary
Mary
Thanks for the response. I am just wondering if you can tell me how I would change the default garland breadcrumbs (which show the navigation links) to show primary links? I’ve used firebug to locate the div function within the garland theme, but I can’t understand where the $breadcrumb parameter gets populated? I’m literally going crazy trying sort what I assume is a simple issue for most useful drupal experts.
I did try the breadcrumb module and that does what I want, but of course the garland inbuilt breadcrumb is still present and I can’t place the new breadcrumb module in the place I want it to be (i.e. over the default garland breadcrumb).
I’m tried the drupal forums also to no avail 🙁
Rob
Drupal’s default behavior is to place the items in the Nav menu as the breadcrumbs. I don’t think there’s a way to change this default behavior without hacking into core, which you really don’t want to do.
This is untested, but you could try this: Comment out $breadcrumb in the code to remove the inbuilt breadcrumb, then place your breadcrumb module where you want it, see if that works.
mary
Hi,
These tutorials are very nice and thanks very much for spending time in creating this tutorial. What is the next in this tutorial and the links for that one please.
Thanks Again,
Narasimha.
Thanks for the feedback. Will be writing more soon.
mary
Great job. Its definitely awesome. A billion thanks.
I want to know if there are special issues with update.php which appears after enabling a new module?
Thanks.
Not sure what you mean by special issues?
Hi,
I have been following your tutorial, and I gotta say, by bar the best tutorials ever. Thank you so much. I do have a question though.
Right now my website’s name is localhost/drupal . I want a personal domain name. What do I need to do for that? Do I have to buy a domain name?
Vishu
Yes, you will need to buy a domain name, and then get a hosting account. This will allow you to build your website on your own domain name and have it accessible online.
mary
i must say , i have read all your tutorials about drupal 6 and helped me to understand a lot of things. I have one question to make …. how can i install different language , and what will be my options if i do this? i mean if i install another language do i have an option to change between them whenever i want? or what? and one more question about CKEditor…i was reading at drupal.org about FCKEditor module and it says “CKEditor module: we received lots of user requests asking for the CKEditor module. CKEditor is the next version of FCKeditor. Just wanted to let you know that the first stable release of the CKEditor module is now available, it is very similar to the 6.x-2.x version of the FCKeditor module.” ….. so which one should i prefer best? is CKEditor better?
Tasos
For different languages, you use the Locale module. You can read more about multilanguage support at http://drupal.org/node/21145. I have never used it so I can’t really comment much about it.
For the RTEs, I use FCKeditor at the moment and will soon switch to CKEditor which as you read is the new version of FCK. I use CKEditor on MODx websites and I like it a fair bit.
I recommend you try both and make your choice based on your own experiences with each.
mary
thanks a lot for drupal tutorial
Great tutorials – fantastic help for someone totally new to process to get started with a very professional site. Steep learning curve though.
Thanks
This (Drupal 6 – Part 12)
appears to be the last tutorial of the series?
Yes, this is the last part of this series. I had intended to do more but time just wasn’t on my side. Now that I’m working more with Drupal 7 I will be doing a series on that. But I think the Drupal 6 series has gone far enough that it should be possible for a beginner to figure out anything else after that by looking at the official docs or just experimenting. Is there something specific you were looking for?
mary
Hi
Thank you very much for your tutorials. I could not go this far without them.
The only problem I have by now is with CFKeditor. I followed the instructions, set permission, configure FCKeditor profile, but still I couldn’t see the a palette with formatting options when create content/page.
Is there any trick?
Thank you