 Welcome to Part 5 of the MODx Revolution for Complete Beginners series. In the last installment, we started looking at how to work with templates in MODx Revolution. We begun with a static HTML/CSS template and ported it into our MODx Revolution install, changed the paths to the assets, and started learning the MODx Revolution tag syntax and how to use it. In this installment, we’re going to continue working on our template and explore the concept of chunks.
Catch up:
Part 1: Introduction
Part 2: Installation
Part 3: Basic Configuration and Installing Extras
Part 4: Working with Templates
As we work through this series we’re building a resource website for learning MODx Revolution. If you join this series later, I am adding plenty of screenshots as I go to ensure that you have something to compare your own progress with. Additionally, I am using the 7-in-1 Business Success Site template that can be purchased from Themeforest. If you’re working along using a template that you’ve created or downloaded from elsewhere you should be just fine, the concepts are the same no matter what template you use, and if something doesn’t work like it should feel free to leave a comment with your code snippets and what’s looking different and myself or others will try to assist you.
So let’s get hands on! 🙂 So far our website looks exactly like the template that we downloaded because we have all the paths to the css, js and image files pointing to the appropriate place. So let’s talk about chunks.
What is a Chunk?
Chunks are pieces of HTML code or text. The important thing to note about chunks is that they’re purely HTML or text, not logic. You cannot have PHP code in a chunk, it simply won’t execute. PHP code needs to be placed in a snippet (which we will explore in a later post). This snippet can then be called within a chunk. However, chunks in and of themselves cannot contain raw PHP code.
Why use Chunks?
You can use chunks for various purposes. Some examples include organizing your template into manageable pieces, storing HTML or text that will be used again and again in your site, and storing mini-templates for your menus, etc. This may be as clear as mud right now but it will become more obvious as we continue.
In this tutorial, I am going to be using chunks to organize my template into more manageable pieces. As I mentioned at the beginning of the series, these tutorials will reflect how I like to do things, which is not by any means the only or best way to do things. So feel free to skip this or to just read it to understand chunks and to become familiar with their syntax, and then organize your template (or not) how you want it.
If we look at the template code that we’re working with, you can see that it’s a long page of code, and I find that when I need to find or edit some part of it I easily and quickly get lost and frustrated. To avoid this, I like to look at the code and break it into logical sections, and then store those in separate places as chunks that I can then call into the main template.
We can see that this template is divided into three distinct sections, the head, the footer and the stuff inbetween, as are most templates out there. This immediately tells us that we can split our template into these three parts. That’s a good start, after which we can then dissect these further and see if there are more things we could divide out. So the first thing we’re going to do is to create two new chunks which we call 7in1-header and 7in1-footer.
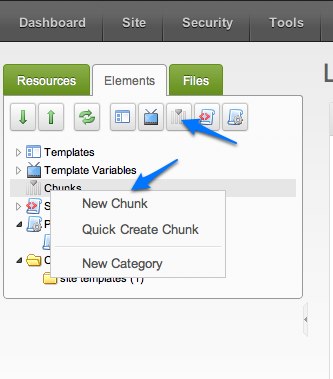
To create a new chunk, we go into the manager and in the left side tree, go into the Elements tab. We can create a new chunk in one of two ways: either right-click on Chunk and select “New Chunk” or use the Chunk shortcut icon.
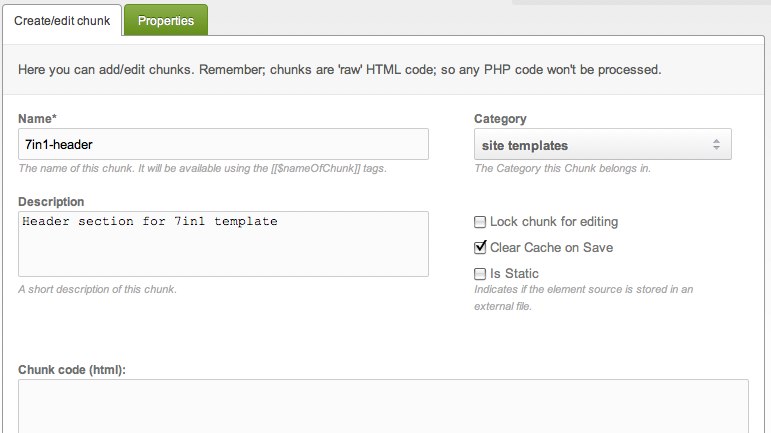
 In the screen that appears when we do this, we then enter the information requested – the name of the chunk, a description, and a category if you so desire.
Save this chunk for now, we will insert the code shortly. Go ahead and do the same for the footer chunk.
If we now look at the resource tree, we can see our two new chunks under the chunks section.
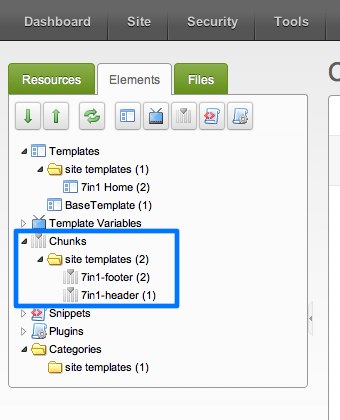 So we now have our chunks ready for use. All we need to do is cut the relevant sections of code from our template and place them in the chunks. In my case, I will open the 7in1 Home template that we created in the last installment and cut all the code that’s between the opening and closing <head> tags. I will then paste this into the 7in1-header chunk that I just created and save that.
If we were to preview the site now we would notice that it no longer looks like it should.
What’s happening is that the site no longer sees the css files and js files since we’ve cut all that information out of the main template. But since it’s now stored in a chunk, all what we simply need to do is call that chunk into the head of the template.
How to Call a Chunk in MODx Revolution
The tag syntax for chunks in MODx Revolution is simply:
[[$chunkName]]
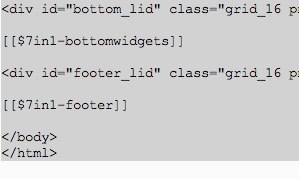
So in our case, we’re simply going to go to our template and place the call to our 7in1-header chunk in the space where we removed the header code. Therefore the top part of our template code will now look like this:
[[$7in1-header]]</pre>
<div id="wrapper-1" class="pngfix">
<div id="wrapper-2" class="pngfix">

Thanks for the insights Mary.
Blazing a trail through the wilderness known as MODx Revo, great stuff!
Crssp, thanks for the feedback 🙂 Glad you’re enjoying the series
mary
I don’t even have a template running and I am still following these Revo lessons just fine.
I am not a MODx newby but I find the documentation for Rev more lacking & frustrating than Evo.
Mary, your tutorials are a breath of fresh air! Really. So much of the wording/help with MODx components are long geeky developer-speak lists of parameter options. Your focus is on how to get basic things done: using the features that give new users the trill of actually achieving results!
I love MODx. I have over 800 posts on the forums. I have built all kinds of sites with the system. But I am still mystified with the level of language that explains the system. Its just so poor and counter productive in my opinion. Your voice is like a beacon in the wilderness. Please keep up the good work!
Max
Hi Max
Thank you so much for the feedback. I really appreciate it. Like you I’ve often found the docs to sometimes be more confusing than helpful. While I am a developer I am completely self taught and still picking things up as I go, so the tech talk confounds me too. I’ve had to figure things out by trial and error and I’m happy to share what I learn with others who might find themselves in the same predicament as I often do.
Thanks again for the positive feedback. It has definitely energized and encouraged me to continue 🙂
mary
I would like to try doing a video tutorial from a designer’s perspective. I was ready to do this with Evo but then Revo hit the streets. While I think I will still lean on Evo I want to learn Revo some more.
The main documentation, while thorough, is sort of overwhelming for many. Sometimes documentation of this sort focus more on providing every technical detail and parameter but misses giving what most new users want: achieving success!
Instead of hundreds of pages of technical manual most users prefer a “want that – then do this” series of step by step tasks, all written in basic english.
I undertand some of this quite well, but am still missing on other areas. But its interesting to approach these tasks from the new user’s point of view. If a new user has managed to install the Revo system, set up a CSS system and added a functioning template – then what comes next? Say Mr. Jones wants to add a dynamic menu, blog system, RSS feed, and have aggregated article summaries appear on his home page – what combination of snippets and plugins does he choose? He might look at getPage, getResources, Ditto, Archivest, Wayfinder, UltimateParent, Quip etc. But how does he decide to prioritize these options? Does he need all of them? He might suspect that some of these snippets work together, but how & which ones? I think a tutorial on charting these waters – building a road map, might be very useful for folks wanting to achieve results on getting a dynamic site up and running. Each of these snippets require its own custom snippet calls and templates etc. How all this fits together it really the crux of this whole MODx venture, no?
Anyways, we are all looking forward to seeing more tutorials Mary…
Mary,
Once again a great help. I started looking at MODx last year, and decided to learn Revo rather than Evo. To my dismay I was unable to get started – documentation aimed at those who knew Evo, and no useful tutorials.
Then your tutorials came along, and I followed the first 3 – then nothing!!!
Imaging my delight when 4 and 5 came along close together. Now I am at the stage where I can begin a little experimentation on my own while I wait for the next instalment.
Thank you.
Regards, David
David
Excellent, good to hear. Best of luck with your experimentation and glad to hear that you’re finding the tutorials helpful. Thank you for the feedback 🙂
mary
A thank you from Amsterdam, too..!
Thank you Frederik!! Greetings to you!! 🙂
mary
I am following your tutorial step by step and so far everything is working perfectly…
Thank you so much.. Can’t wait to finish all of them…
Oh, and I was wondering if I could ask which pgorram you’re using to do your tutorials. I’ve been meaning for ages to do some for the MODx site that I maintain (about 200-odd users, I guess, so I really should do it), and have finally got around to usnig Camstudio, but I like the way that your pgorram can zoom in and out of areas on the screen, which that one can’t.But it looks like you might be on a Mac, eh :~ Or is it Linux? I’m trying to move over to Linux bit by bit, but very used to Windows.
I don’t understand, why the footer-hook is placed after the closing footer div and not before . This is illogical.
Joe, not sure what you mean by footer hook? Are you referring to the chunk or?
I think, that the last code example should look like this:
[[$7in1-bottomwidgets]]


[[$7in1-footer]]
2) second attempt 🙂
I think that the last code example should look like this:
3) third attempt 🙂
I think that the last code example should look like this:
http://joenet.eu/verlinkt/code.png
That’s the beauty of templating in MODX, you can split your chunks up however you want and in whichever way makes the most sense to you. That’s just how I did it for the tutorials. The idea is to learn the concepts, not necessarily to adhere to any one way of doing things 🙂
mary
Yes, if you do this correctly. What is the content of chunks (code)?
[[$7in1-bottomwidgets]] = ? (Code)
[[$7in1-footer]] = ? (Code)
Joe
Depends on what you mean by “correctly”. I can’t answer this question for you as I am not the one dividing your template. The content of the chunks will depend on how YOU divide your template. You will be cutting the section of code out, pasting it in your chunk, and then replacing that code with the name of your chunk. Does this make sense?
Thank you for these excellent tutorials Mary. I’m just getting to grips with modx revo. Are chunks really just for the header and footer? It seems you can’t use them for content because TinyMCE doesn’t work with them, meaning they are useless for customers to edit from? Have I got something wrong?
Martin
For content that you want customers/users to edit, you would use template variables (TVs) rather than chunks. You can make TVs into rich text areas that use TinyMCE.
Chunks are normally used for repeatable HTML code, code that you will reuse on different templates or parts of your template, or just to break your template up. You can call snippets in chunks but you can’t put PHP code in them.
So for your content areas use TVs. Hope this helps 🙂
mary
Thanks Mary, that helps a lot. I was trying to get my head around how I would do my sidebar which the client wants to be able to change. Is that how you do yours?
Thanks for very good tutorial!
I wonder if the following kode in your example:
_________________________________
8
9
10 [[$7in1-footer]]
11
12
13
….should look like this insted…
8
9 [[$7in1-footer]]
10
11
12
13
…so that the chunk is in between the tags?
//Peter
Can’t input the code! 🙁
I think that the [[$7in1-footer]] should be between the div tags
//Peter
You’re realy great. Thank you very much for your clear explanations
May I ask how do you put a sub folder under chunks?
“If we now look at the resource tree, we can see our two new chunks under the chunks section.”
What looks like a folder there is actually a category. You can group your chunks, templates, template variables etc. into categories to keep them organized.
To create a new category just right click on Categories in the element tree and create new category
Hope this answers your question
mary
Thnkns, I just figured it out soon after posting my question.
Mary, very informative tutorials, thanks.
may I ask an advice?
As I said I am a beginner to modx and after reading a bunch of tuts. I becam somewhat lost in them.
May I ask what method would be best for a small comany website, particularly for the portfolio section.
In that I would like to have sub categories like webdesign, print desing etc. Each would have the completed projects in them (with some text and photos for each) one after another. But only one photo displaying (shadowbox).
Now I have all this working already but with a pure php +html form and no cms.
What I would like is to be able to recreate this so that it would be easier to maintain with modx.
Is there a way I can manage for example the portfolio part with ease with modx?
Many thanks
There are many ways to do this. If it’s an image heavy portfolio then I would recommend using something like Gallery. But for the most part if you have your template in place you can easily implement the kind of portfolio you’re talking about by creating a container for each category, creating a resource within each container per portfolio item, and then using getResources to aggregate them on a main portfolio page. This is the approach I would take
mary
What do you mean by “creating a container for each category?
Do you suggest to make as many pages under resources as many portfolio items I want?
My purpose is to make it easier to manage it? Would It allow me to do that? I mean I still have to upload photos via ftp and make them the exact sizes, right?
Sorry I am really a beginner.
Creating a container means you create a new resource with the name of your big category e.g. web design, then you add the relevant resources under that resource, so that it’s a container holding these resources. I did that in my getResources tutorial. The other option of course if to just use tagging for your categories.
Thanks Mary,
Someone else suggested I may use migx but now I totally puzzled. What my problem is I do not see the big picture only the small details on how certain methods are working.
I think I somewhat understand your suggestion, but my initial idea was to transfer my site to mdy to make it easier to maintain. And that is what I do not see happening. But I may be wrong.
Hey awesome tutorials. Modx documentation aren’t very newbie friendly, so your Modx tutorial series helped me so much.
HI thanks, just realized it, it was a bit misleading.
Another question I have is: if I consider building a responsive website would I install foundation from zurb or html boilerplate?
I am a bit confused.
MODX doesn’t dictate what you do with your HTML, that’s entirely up to you, so it’s your preference and what you feel more comfortable working with. I honestly don’t know anything about foundation, but as long as you know how to work with templates in MODX there are no restrictions as to what HTML template or boilerplate you can port into MODX.
mary
Hi again Mary,
I beginning to understand more about modx thanks.
REgarding your previous answer about building a portfolio section you mentioned: “f you have your template in place you can easily implement the kind of portfolio you’re talking about by creating a container for each category, creating a resource within each container per portfolio item, and then using getResources to aggregate them on a main portfolio page.”
Now I understand what you suggest, however I have 2 concerns or questions:
1, how would I go about to create an easy way of imputing the data, images for each portfolio? Let’s say I have 3-4 images at hand and I would just upload them and set the appropriate dimensions before, and modx would make the images the right size? Same way with the text, I do not want to deal with the positioning of each…
2, what do I do if I do not want to create a separate resource for each portfolio item? Does that have to be a special plugin?
I think you know what I mean? I am looking at this from an end user point of view.
Is there for example a good book to guide the beginner with examples?
Many thanks for reading and answering all this