 Welcome to part 8 of the MODx Revolution for Complete Beginners series. As we work through these tuts we’re building a resource site for learning MODx Revolution. We’re using the 7 in 1 Business Success Site Template from Themeforest, although you can follow along with any template that you choose. In the last installment we introduced the concept of Snippets, which are pieces of PHP code that allow us to add functionality to our MODx website. In this installment, we’re going to start looking at one specific snippet – Wayfinder, and we’ll use it to add a dynamic menu/navigation to our website.
Catch Up:
Part 1: Introduction
Part 2: Installation
Part 3: Basic Configuration and Installing Extras
Part 4: Working with Templates
Part 5: Working with Chunks
Part 6: Working with Template Variables (TVs)
Part 7: Working with Snippets
What is a Wayfinder?
Wayfinder is a snippet that outputs an unordered list of links to resources in your site tree that meet specific criteria as specified by the snippet call and its parameters. What this basically means is that when you place a Wayfinder call in your template, it goes in and looks for resources that match what you have specified and then returns a list of links to those resources formatted either in a default unordered list or using a format that you specify. If this sounds like mumbo jumbo just read on, it will make sense when we delve into the example 🙂
Why Use Wayfinder?
The most common use for the Wayfinder snippet is for creating dynamic site navigation/menus. Because most HTML templates use unordered lists to create menus, Wayfinder is ideal for this purpose. When creating a website you can hard code the urls into your navigation as you would in a static HTML site. However, this means that every time you create or delete a page you would need to go back into your code and change the urls so that your menu doesn’t break. Using Wayfinder to dynamically generate your menus throws this problem out the window since Wayfinder will automatically detect your changes and adjust your menu items accordingly.
Wayfinder gives you lots of flexibility, it allows you to specify what resources you want to include or exclude from your menu, how to template your menu, how deep into your site tree heirarchy to go, etc. The limits you run into will often lie in your HTML/CSS code.
How do we Use Wayfinder?
As we mentioned in the last installment, all snippets are called using the syntax:
[[!snippetName]]
However, we also mentioned that for some snippets, this basic call is not enough and we have to specify properties for the snippet to work with. In the case of Wayfinder, at the very minimum we have to specify where in the resource tree Wayfinder should start listing resources. Therefore the very minimum Wayfinder call needs at least one parameter – the starting ID. A basic Wayfinder call for example will look like this:
[[!Wayfinder? &startId=`0` ]]
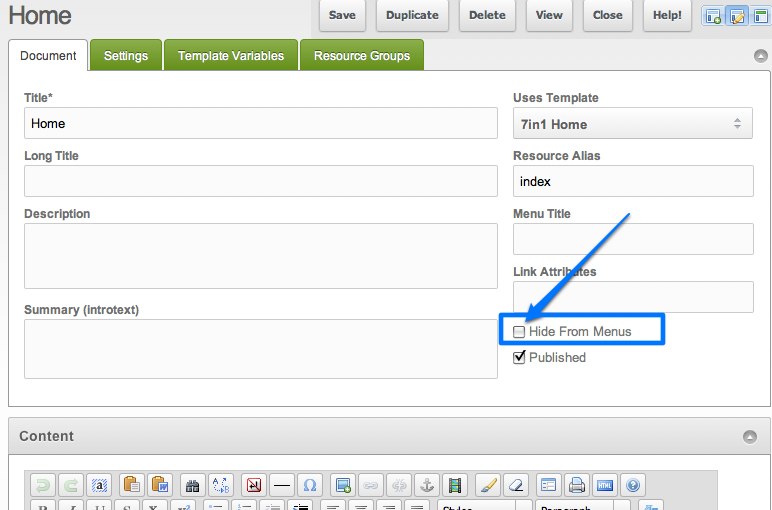
This call tells Wayfinder to start at the root of the tree (the ID 0 denotes the site root) and show all the resources that are published and do not have the Hide from Menus box checked.
OK, so all this theory stuff is all good and dandy, but the best way to learn, as always, is hands on! So let’s get started 🙂
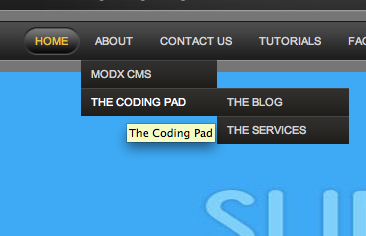
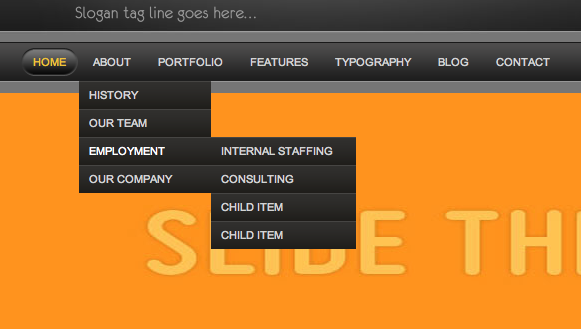
If we look at the template we’re using, you can see the menu up top has several items, and also has dropdowns.
Let’s look at the template and see the code that’s generating this menu:
<div class="clear"></div>
<div id="dropdown-holder" class="grid_16">
<div class="nav_bg pngfix">

<ul class="sf-menu">
  <li class="current_page_item"><a href="index.html"><span>Home</span></a></li>
  <li><a href="about.html"><span>About</span></a>
       <ul>
	  <li><a href="#"><span>History</span></a></li>
	  <li><a href="#"><span>Our Team</span></a></li>
	  <li><a href="#"><span>Employment</span></a>
	      <ul>
                <li><a href="#"><span>Internal Staffing</span></a></li>
                <li><a href="#"><span>Consulting</span></a></li>
                <li><a href="#"><span>Child Item</span></a></li>
                <li><a href="#"><span>Child Item</span></a></li>
             </ul>
	  </li>
          <li><a href="#"><span>Our Company</span></a></li>
       </ul>
     </li>
  <li><a href="portfolio.html"><span>Portfolio</span></a></li>
  <li><a href="features.html"><span>Features</span></a>
      <ul>
	 <li><a href="preset-styles.html"><span>Preset Styles</span></a></li>
	 <li><a href="full-width.html"><span>Full-width Page</span></a></li>
	<li><a href="help-prettyPhoto.html"><span>Help with prettyPhoto</span></a></li>
     </ul>
    </li>
 <li><a href="typography.html"><span>Typography</span></a></li>
 <li><a href="blog.html"><span>Blog</span></a></li>
 <li><a href="contact.php"><span>Contact</span></a></li>
</ul>

</div>
</div>
<!-- end dropdown-holder -->
<div class="clear"></div>
As you can see, this is a nested unordered list. Let’s replace this code with a basic Wayfinder call to see what we get. Delete the code above from the template and replace it with
[[!Wayfinder? &startId=`0` ]]
If you’re using the same template as I am in this series, that section of your template now looks something like this:
<div class="clear"></div>
<div id="dropdown-holder" class="grid_16">
<div class="nav_bg pngfix">

[[!Wayfinder?
  &startId=`0` ]]

</div>
</div>
<!-- end dropdown-holder -->
<div class="clear"></div>
Save the template and look at the home page and it should look something like this:
That’s fantastic! You can see that our previous static menu that had several items on it has been replaced by a simple menu with just one item on it – Home. What this tells us is that Wayfinder is working as we want it to since it’s picking up the one page we have on our site and displaying it on the navigation bar 🙂
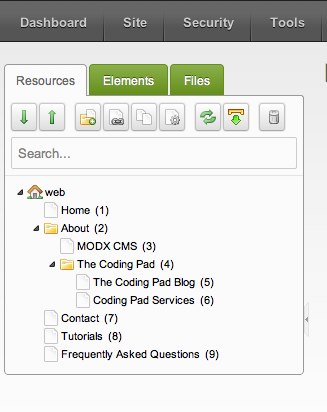
Let’s now go ahead and create a few more resources. I am going to add an About page with three child pages (MODx, Coding Pad (which will have some child pages)), a Tutorials page, a Contact Page, and a FAQ page). You can create whatever resources or pages you want for your site. The purpose of this exercise is to generate a number of resources for Wayfinder to display.
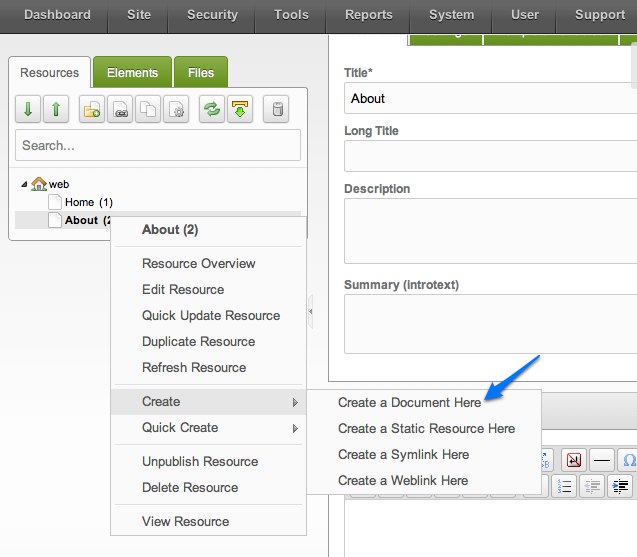
Hint: To create a resource as a child of another resource, one quick way is to right click on the resource you want to use as a parent and then select Create Document Here.
Once I’m done with this process of creating pages, my site tree looks like this:
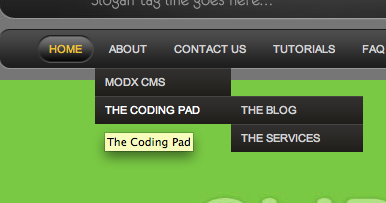
 Now that we have a bunch of pages, let’s see what our Wayfinder call is outputting on the front end (you can click on the images for a larger view):
So the good news is that all our pages are showing up on the menu, and clicking on each menu item takes you to the corresponding page. (To test this, just add a little text on each page, e.g. on the About page you can add “This is the About page” and that should display when you open the page. Remember that we will need to specify a template for each of these pages to use, but I’m not going to worry about that right this moment).
The bad news is that the formatting of the menu is completely off 🙁 But we can fix this. If you right click on the web page and view source (or use firebug or your tool of choice), you will see that right now the HTML code that Wayfinder is producing looks like this:
<ul>
<li class="first active"><a href="http://learnmodxrevolution.maryspad.com/" title="Home">Home</a></li>
<li><a href="index.php?id=2" title="About">About</a>
  <ul>
   <li class="first"><a href="index.php?id=3" title="MODx CMS">MODx CMS</a></li>
   <li class="last"><a href="index.php?id=4" title="The Coding Pad">The Coding Pad</a>
     <ul>
       <li class="first"><a href="index.php?id=5" title="The Coding Pad Blog">The Blog</a></li>
       <li class="last"><a href="index.php?id=6" title="Coding Pad Services">The Services</a></li>
    </ul>
   </li>
  </ul>
</li><li><a href="index.php?id=7" title="Contact">Contact Us</a></li>
<li><a href="index.php?id=8" title="Tutorials">Tutorials</a></li>
<li class="last"><a href="index.php?id=9" title="Frequently Asked Questions">FAQ</a></li>
</ul>
As you can see this looks very similar to our initial static code with some exceptions. First, our Wayfinder generated <ul> item is missing the class of sf-menu that was applied to the static code. The template needs this class to be there for the CSS formatting to work. You also notice that the <li> items have a span applied to the link text element in the original static code that isn’t there in our Wayfinder generated code. Additionally, our static HTML code has a current-page-item class that is not present in our Wayfinder code. All these missing pieces are causing our menu to look nothing like we want it to be.
How to Style the Wayfinder Output
Seeing as our Wayfinder code is dynamically generated, how do we add these missing bits and pieces to make it output what we want it to? Well, it’s easy enough, we use template chunks to add formatting to our Wayfinder output. Remember I said we would run into Chunks again? Well, I wasn’t lying 🙂
Wayfinder gives you great flexibility in determining what its output will look like by the use of parameters. Some are general parameters and allow you for example to specify how deep in your site hierarchy you want to go, what documents you want to exclude from the menu, etc. Others are templating parameters that let you specify html template codes for your menu, etc. These are all listed and explained quite clearly in the official documentation – http://rtfm.modx.com/display/ADDON/Wayfinder.
Note that some Wayfinder parameters have a default value and so if you don’t specifically call those parameters into your Wayfinder call and give them a value then the default value will be applied. This explains why, for example, our Wayfinder generated menu gives the Home page menu item the classes “first active”. These are default classes, but we can override them by specifying our own classes in our template chunks.
We’re only going to use some of the Wayfinder parameters in this tutorial, but I encourage you to explore them all and play with them as much as possible to get an idea of just what is possible. Because the Wayfinder parameters are thoroughly documented in the official site, it would be redundant of me to go over each of them here, so please refer to the official docs for the full list and default values. We will use more and more of them in upcoming tutorials as we work with different menus.
To start templating our menu, we’re going to create several mini templates and save them in chunks. You will see that in these chunks we’re using HTML code but replacing the dynamic elements with placeholders whose syntax is [[+placeholdername]]. The placeholders we’re using here are very specific to Wayfinder and their definitions are rather obvious from their names, but you will also find them described in the MODx documentation. Here’s a snapshot for a quick reference:
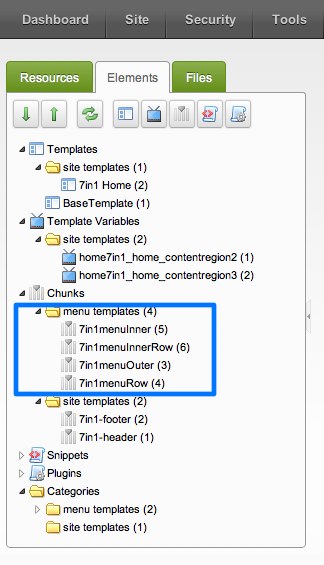
Here are the chunks I am creating for my template:
7in1menuOuter – this will hold the HTML code for our outer ul container.
<ul class="sf-menu">[[+wf.wrapper]]</ul>
You can see that I have added the class to the outer ul. An alternative way to do this is to us the wf.classes placeholder and then add the name of the class to the actual wayfinder call using the outerClass parameter. But for simplicity, let’s use this approach for now. Either one works 🙂
7in1menuRow – this will hold the HTML code for the row items at the first level
<li [[+wf.classes]]><a href="[[+wf.link]]" title="[[+wf.title]]" [[+wf.attributes]]><span>[[+wf.linktext]]</span></a>[[+wf.wrapper]]</li>
The main thing here is that I have added the <span> tag to the menu link text as in the original static HTML code. I have also included the wf.classes placeholder and this will allow me to specify a class for the current page, which will override the default “active” class.
7in1menuInner – this will hold the HTML code the inner ul containers
<ul>[[+wf.wrapper]]</ul>
7in1menuInnerRow – this will hold the HTML code for the row items at the inner levels
<li [[+wf.classes]]><a href="[[+wf.link]]" title="[[+wf.title]]" [[+wf.attributes]]><span>[[+wf.linktext]]</span></a>[[+wf.wrapper]]</li>
Again I add the <span> tag and include the wf.classes placeholder.
OK, so now our templating chunks are in place as you can see (just to be organized I’ve placed them in their own category:
 We will now modify our Wayfinder call so that we can apply these mini-templates to our Wayfinder output. If you look at the list of templating parameters (it would be helpful to have http://rtfm.modx.com/display/ADDON/Wayfinder open in a different window or printed out and next to your screen 🙂 ), you can see that I have named my chunks to closely match their corresponding parameter calls. That’s just my way of doing it, but it helps me keep track of what’s what when I start constructing my call. So let’s add the parameters and call our chunks. My Wayfinder call will now look like this:
[[!Wayfinder?
  &startId=`0`
  &outerTpl=`7in1menuOuter`
  &rowTpl=`7in1menuRow`
  &innerTpl=`7in1menuInner`
  &innerRowTpl=`7in1ImenunnerRow`
  &hereClass=`current_page_item`
  &firstClass=``
  &lastClass =`` ]]
IMPORTANT: Note that the parameter values are placed inside back ticks (`), not single quotation marks (‘).
OK, let’s took a look at this call. You can see that we’re using the templating parameters to call our chunks in so that Wayfinder outputs the HTML that we want, with the correct classes applied. I have defined the called the hereClass parameter and given it the value of current_page_item so as to match the static HTML template. You will also notice that I have called and set the firstClass and lastClass parameters to empty. The reason for this is that my HTML template doesn’t set a class for the first or last item in the menu, so to override the default Wayfinder values and prevent any confusion, I have set them as empty strings.
Go ahead and save the modified Wayfinder call call and refresh the home page to see what the menu looks like:
You can see now that our menu is back to looking like we want it to! 🙂 . The correct styling is being applied and our dropdowns are working as they should. If you view the page source, you can see the HTML code being generated by Wayfinder has now changed significantly:
<ul class="sf-menu">
  <li class="current_page_item"><a href="http://learnmodxrevolution.maryspad.com/" title="Home"><span>Home</span></a></li>
  <li><a href="index.php?id=2" title="About"><span>About</span></a>
    <ul>
      <li><a href="index.php?id=3" title="MODx CMS"><span>MODx CMS</span></a></li>
      <li><a href="index.php?id=4" title="The Coding Pad"><span>The Coding Pad</span></a>
        <ul>
          <li><a href="index.php?id=5" title="The Coding Pad Blog"><span>The Blog</span></a></li>
          <li><a href="index.php?id=6" title="Coding Pad Services"><span>The Services</span></a></li>
       </ul>
     </li>
    </ul>
  </li>
  <li><a href="index.php?id=7" title="Contact"><span>Contact Us</span></a></li>
  <li><a href="index.php?id=8" title="Tutorials"><span>Tutorials</span></a></li>
  <li><a href="index.php?id=9" title="Frequently Asked Questions"><span>FAQ</span></a></li>
</ul>
This HTML code matches what the original static code looked like but it’s dynamically generated by the Wayfinder call 🙂
There are many other parameters that you can use with Wayfinder to do more with your menus. In future tutorials we’re going to look at more complex menus and how to integrate them into Wayfinder. For now, our site is shaping up and we have a functional dynamic navigation.
Homework aka FUN STUFF:
My challenge to you is to take what you’ve learned so far and work on getting the inner pages of this site templated. If you’re using the 7 in 1 Business Success Site Template that I’m using, then go ahead and pick one of the inner html pages from the package and use it to create an inner template that you’ll use for the other pages we just created. If you’re using another template, then feel free to do the same. This will give you a good opportunity to practice what we’ve learned so far.
Hint: Remember that most templates will have parts that are the same throughout the site, e.g. the header, the navigation, the footer, etc. Ideally, you’ll have separated these out of your home template and into chunks, and you can then simply call these chunks into your inner templates, saving you lots of time :). Don’t reinvent the wheel 🙂
More Reading:
Wayfinder – Official Documentation
Go to Part 9: Using FormIt to Create a Contact Form in MODX Revolution



Though, there’s nothing new about this for me personally(because I have a lot of experience with Evo and now migrating to Revo) I really appreciate that You have been doing here. Because MODx is a system that stands aside from others systems with thier nasty themplating. I mean CMS(and CMF) must be like MODx: easy in integrating style, in administrating, and you might keep your programming skills in apropriate condition.Thank you and keep doing! I’m with you. Sorry for my English.
Mary, as always, an excellent tuts. I was waiting for this tuts on wayfinder since ages. Many thanks for this. keep up the hard work.
Buddhi
Thanks Mary, you’ve been very helpful to me…Now i can make sense of the harder stuff when i go back to them.
Well done.
I am sort of following along, but I am not using that fancy template. That template has a ton of moving parts with very complicated CSS. I built a super simple test site with my own built-it-as-needed CSS. I find that the CSS will always engage with the markup and the MODx system so knowing exactly what the CSS is doing is very important.
I get the single drop down menu to work (top link shows child pages on hover). But I can’t get a second level working? If the top link as two child documents, but one of them is a container document with its own child documents all show as single drop down links from the top level link instead of showing the second level of child links to the side?
I know I need more CSS, but do I need extra Wayfinder parameters or chunks as well?
Thanks!
Max
If your menu works well in plain HTML/CSS, then all you need to do is make sure that your Wayfinder call spits out the same HTML. It’s hard to tell if you will need more parameters without actually seeing your HTML code. Depending on how you structure your HTML and CSS you may need more or fewer tpls, and perhaps some of the css parameters. Does this make sense?
If you get it working the way you want outside MODx, you can post the HTML here or email me and we’ll get it into a WF call.
mary
Hi Mary
i really want to appreciate your taking time out to teach and lead in the area of IT … May God bless you more and more …
Please can you do a tutorial on how to install and / or migrate a modx website to remote site online i have been trying to do a few and i have not succeeded.
{Please note that my website is not live, i set it up for testing purposes with subdiretories}
Thanks for yo usual and prompt helping follow ups
Thanks
Yours
Seun
Seun
Glad you’re finding the tuts helpful. That one is on my list, time permitting
mary
Magic!! I had been really struggling with wayfinder, and now it all makes sense.
Keep up the good work.
Regards
David
thanks a million for al the tuts. i was struggling to learn revo since 2 mnths frm th official modx revo site .. bt i found ur tuts to be extremely lucid and easy to understand … u rock !!! god bless you !!!
Mary,
I managed to get it done with using CSS. I now have a menu that will drop down immediately below the top link. If these child links are containers with their own children then they(2nd level links) pop out to the side. I need to test this in more browsers but all is looking good so far…
Hi,
Thnx for tuts; I have different request than the titled tutorial. In Modx Revo- I want to display thumbnail for each document created with link to open the thumbnail. How could we do that.
Thnx
Sintl
Not entirely sure I understand your question. Do you mean you want to use images for your navigation? Can you provide an example of what you’re trying to accomplish?
mary
I have no exact example to share but I will try explain which is similar to portfolio tab as on 7in1 Template
http://themeforest.net/item/7-in-1-business-success-site-theme/full_screen_preview/90570
Page I mean Web Resource/Document.
Let say you have Main Product Page, then you have 10 number of Child Pages or ~n # of child pages of Main Product Page
What I want to do is create a Showcase page where I could assign a thumbnail image for child page, then get all child pages in gallery fashion, with a Page title and button as read more. One who likes a image of child page he clicks (either image, Title or readmore button) and it opens a child page.
Like Template portfolio tab, where you click image and it opens in lightbox kind of effect. To get to page you click read more.
If this could be automated grab from product page and its child page. Then whenever a new product child page is created it gets listed in showcase
I hope this is something achievable via modx revo
Thnx
Sintl
Sintl
To do this you would need to use a different snippet, most likely the getResources snippet, which I will be covering in an upcoming tutorial
mary
Dear Mary,
I am totallly new to both CSS and MODX. I have been following this series from day one using the same template. I would like to thank you for making it so simple. There is one thing I am totally missing is the integration of the bottom part of the 7-1 B I do not seems to have that in the main index.html. Could it be that I missed something? This is the black portion of the website Latest Post, Disclaimer and so on.
Could you or anyone explain what I need to do to get that activate?
Many Thanks,
Marcos
Marcos
If you go back to Part 5 – Working with Chunks (https://codingpad.maryspad.com/2011/01/30/modx-revolution-for-complete-beginners-part-5-working-with-chunks/), make sure you have the 7in1-bottomwidgets chunk that we created and that the code for that section of the page is in that chunk and that the chunk name is spelt correctly.
Hope this helps
mary
Dear Mary,
You are so rigth. I totally forgot about the chunk. Found it and I am now working to sub set it.
Thanks again for sharing your knowledge.
Regards,
Marcos
Look forward to your tutorial.
Thanks again
Sintl
Dear Mary,
the name of your inner row Template in your wayfinder call should be &innerRowTpl=`7in1menuInnerRow`.
I like your tutorial and the way you introduce modx revolution. I guess I’ve saved a lot of time thanks to your tutorial.
Keep up the good work.
Best wishes
Michael
Michael
Thanks for the sharp eyes – corrected 🙂
mary
Mary,
Your tutorials are amazing! I followed them for Evolution and now Revolution. I had never really understood wayfinder until now and I can not believe how easy it is.
I am excited to see what you do next for Revolution. Maybe a full blog with archives and comments 🙂
Thanks so much for taking the time to do these tutorials.
Celeste
Thanks for your comment and feedback, and for your wonderful generosity, it IS much appreciated 🙂
I have many tut ideas running around in my head, and time permitting I’ll get them all written 🙂 I’m going to cover more snippets and some case uses, as well as other stuff as it comes up. I will definitely write one about creating a blog, but there’s also a pretty detailed tut in the official docs about building a blog with MODx Revo, you should take a look at it if you haven’t already – http://rtfm.modx.com/display/revolution20/Creating+a+Blog+in+MODx+Revolution
thanks again 🙂
mary
Thank you very much for this Mary!
There are those of us out there who are new to CMS systems in general who have chosen MODx for usage and there is a serious lack of documentation in the form of tuts for Revolution.
You might have the only thoroughly explained Wayfinder tutorial out there right now, at least that I’ve come across, and this is very much appreciated for us MODx nubs.
I have seen your name mentioned in other informative sites recently and I can see why you are considered a guru in this arena.
Thanks Again 😀
Thanks for the feedback and encouragement Eric 🙂 Much appreciated
mary
After many weeks of trying to get a handle on wayfinder, I’ve finally reached success! Hallelujah!
Thank you for all your continued support and resources. I couldn’t have done it without you. Now on to FormIt!
Your tutorials truly are fan-Tastic! This really helps me out, as I am now creating a website for my girlfriend’s mom.
I just can’t get this wayfinder to work correctly. I’ve like triple-checked everything and have tried to find what is going wrong in the coding, but nothing seems to be causing any problems. The only ‘problem’ here is that my menus still look a little out of shape. They don’t arrange vertically as they should and dropdown-menus don’t work.
I’ll try to work this out 🙂 Anyways, keep up the good work! This has been helping me out A LOT!
Thank you for that.
Matti
Thanks for the feedback. Are you using the same template I am?
mary
Oh yeah, forgot to tell that I am not.
I’m just the type of person who likes to do everything a little different. I guess it helps a bit to learn. So I’m using a template I got here
http://www.freecsstemplates.org/preview/shadowed/
I’ve discussed it a bit with my brother and understand that it can be quite complicated to use. However I like the outfit of the template and I plan to overcome the complicity 😀
So, any tips how to make those menus work?
Matti
The template you’ve linked to doesn’t seem to have dropdown menu styling coded into it, which is probably why your menus look out of whack. Your basic top level items should look fine since this is simple unordered list with the only class being to style the current item.
This template is styled to support only one level of navigation, if you want to add dropdown items you would need to code the CSS to style it yourself. Does this make sense?
mary
Hmmh, yeah. It actually does. I just thought that copying some defined codes from your coding would actually make those dropdown menus. I’ll keep searching tuts for that 🙂
Thanks a lot, again!
I like!
Is there also a horizontal dropout version available?
Hi,
thx for tutorials. I found them very usefull but I met problem i can not get past through.
At Ur picture https://codingpad.maryspad.com/wp-content/uploads/2011/02/wayfinder6.jpg Ur Home, About, MODx etc r in horizontal line.
I am using my own layout and those “items” r all below each other.
How did U do that they r in line?
Im using my index and css: http://www.sendspace.com/file/0ox2tm
I have it on server where U have to write to host file: 81.31.45.94 test.intericad.info
If Ull find time and find out why why it doesnt work I would really appriciate it. Mayby there is missing somethin in css but as beginner I dont know what. Besides at Ur picture it looks in good way so i am confused.
Thx
Pie
Mystery solved,
the problem for me as beginner was that [[+wf.classes]] creates his own and stuff, so by with a bit playing with that finally everything works.
I can not pass my final code here as it is not showed up here
For for Ur time, who tried to solve that!
Hi,
I started to work with Revolution, and your tutorials are the best for beginners. It is so simple when you go step by step and after that you go into details for yourself.
BUT one thing:
you forgot the Tags on this article 😉
Regards
DC
Tags added! Thanks for letting me know, and for your feedback 🙂
homework complete, check it out 🙂
🙂 Looking good!! You’re getting the hang of it! Good job 🙂
Thanks Mary, only with the assistance of yourself and these wonderful tuts am I able to keep up :).
Keep them coming.
Guys,
I am back from a long trip to Africa and I am working on my internal web site. So I decided to start from scratch and so far all is well but when I create a new page under a submenu and I add content to that page, the content is acatually capture on the template variables for Zone 1 to 3. I was wondering what I am doing wrong so I can get the content of the new page to output correctly?
Marcos
I don’t quite get your question, can you explain more? What template are you using, and what do you mean by creating a new page under a submenu?
mary
Hi Mary,
My apologies for the late reply. This is what is happening. When I create a page under one of the selection on the main menu, add content to it, then click on the new page, instead of the page opening with the content, the content is capture on Chunkc Zone 1 on the main web page. I know that there is something else going wrong because if I remove the TV. I am still not able to open the new page. I am not sure if I am explaining myself well enough.
Many Thanks for the help.
M
Hello Mary,
First Merry Christmas.
Thanks for the great tips and tutorials; I am totally new to Modx, so, I am following your guide to kick-start.
I have a problem, I can’t download a snippet, wayfinder or any other, and that is either from the dashboard or from the modx site. I get this message when clicking on download on the revolution add-ons page “Uh oh…
Someone broke in and stole our content. Reward offered for info leading to its return.”
and when downloading from the dashboard, I get this “Error; Could not download package at: http://modx.com/extras/download/?id=4eaecb20f24554127d0000b8”
I kindly need your advice and help.
Thank you.
Khaled,
Sorry for the delay in responding, I was away for the holidays 🙂 I think the repository may have been down when you checked. It seems to be working for me now
best
mary
Mary, thank you very much for taking the time and effort to create these wonderful turorials. They are easy to read, funny and very educational. As someone else commented before, you can write very well! (you could do more with your writing skills!)
Hi Mary!
Happy new year 2012 from the UK!!
…I’m diving right into modx revo 2 here and freestyling down the fast lane pretty damn well…
…I’m trying to fathom out dropdown with more that 2 levels! I’ve hunted through the modx forum and found some posts but have confusion, I’m not suggesting you provide full answer…but is it correct that you have to use another wayfinder call (with more tpl chunks) in addition to the initial wayfinder call?
Many thanks!
Andrew
(UK)
Thanks for these tutorials! I’m not sure if its a specific issue caused by me using a different template, but I created my sample resource tree by duplicating one document and then found that Wayfinder was only listing the original resource.
It turns out that duplicates are not set to ‘Published’ so checking this on each page in the tree gave the correct results from Wayfinder.
Keith,
This has nothing to do with the template. By default all new MODX Revo documents are set to not be published by default. If you want them to be published by default without you having to check the box, just go into System->System Settings, filter by area to “Site”, and change that setting.
hope this helps
mary
Mary,
Great tutorials!! I need to create two separate WayFinder menus. One will go at the very top of the template, and the other one will be placed immediately below the Flash header. The topmost menu is just a subset of top-level pages. How do I define that specific subset?
Also, how do I arrange Wayfinder menus horizontally instead of vertically?
Thanks,
Sid
Sid
To define the top level menu, you just need to use the appropriate parameters in your Wayfinder call, for example if these are all top level pages then you set &startId=`0` and &level=`1`. If you only want to show specific pages you can use &excludeDocs to exclude the ones you don’t want, or else just check the “Hide from Menu” box for those docs.
Arranging the menus horizontally or vertically is all done in the CSS, not in MODX. So you just need to edit your css accordingly, using the classes and ids you’ve set in your tpl chunks.
hope this helps
mary
Hi Mary
I am new to modx, got the modx: The Official Guide late last year and not really a site builder but have designed and built my own website which works .. now I am trying to put it on modx revo 2.2
I was stuck and confused about a few things when reading the Bob Ray book and then I found your site, what a life saver you are…
I learned more from your tuts while working my way through the modx guide. Great work on your tuts, just hope I will be able to help others as you have to date.
I have a small problem with wayfinder that is totally confusing me, been on it for a few days now and still no way near to solving it.
I have a horizontal menu with six headings all work all the way down over 3 levels, my issue is on the top level I have two headings that are just that (headings) and are not required to link to any page just to a submenu and I have one on the next level down doing the same,
Trying to set this up so that if anyone trys to click on them nothing happens, as on the current site.
Mary, Am I missing something, I have been on all the forums I could find relating to modx revo 2.2 and wayfinder about this issue and no one else seems to have this problem, any clues?
Keep up the good work .
Sorry for the delay in responding. You should be able to set this up so the links aren’t clickable using your tpl chunks. That said, it does depend on if you have other similar items that do need to be clickable. To understand your problem clearly and be able to advise you I would need to look at your site. Do you have a link?
mary
Hello from Holland.
This is fantastic stuff. I’m using Typo3 since 2004, and I am simply fed up in the meantime. A friend of mine recommended modx – I started last Friday and thanks to your tut modx will be my preferred CMS in future.
Just a remark: there seams to be a typing error in your Wayfinder Call. It says on line 6:
&innerRowTpl=`7in1ImenunnerRow`
It should be
&innerRowTpl=`7in1menuInnerRow`
Of course, I assume that you did this intentionally to see if your reader only copy&paste or think themselves!
Again, thanks.
Norbert
Thanks for the tutorial. Beware of using &level.
I had started trying to get my menu to work using examples from The (almost) Complete Guide to Creating Menus in MODx Using Wayfinder book. Realising that this was written for Evolution back in 2009, I switched to this tutorial but had kept &level=’2′ from an example in the book. I then spent ages trying to figure out why the menu only showed ‘Home’ . Once I removed &level it was fine.
Mary I have been trying to get Wayfinder to work way to long now I could use a little more help.
I am using the andreas01 that is in Modx when you install it the simple Wayfinder syntax call is all ready there and I like the look of it but I can’t use your tutorial because nothing works. If I get the code from files that doesn’t have the call in ti and use it for my template I can make simple changes but the structure stays the same with bullets still there I don’t know if using the code from the files is the right thing to do. Or should I find another template. I have been at this for weeks! Please Help
Thanks
Rocky
Rocky
I’m somewhat familiar with the Andreas01 template. Are you trying to implement a particular type of menu? Do you have the HTML code for the menu already in place? You don’t have to be using the same template as me to follow the tuts, what i want you to learn is the principles.
Can you post the code for the menu and tell me where you’re running into troubles?
thanks
Hi Mary this is where I am now I worked on my site all weekend and this is were I am now. I went to the Andreas Viklund web site and found that he has more then one andreas01 he has 02 and 03. 01 suited my need much better so I downloaded it. It seems to make more sense to me getting it that way then from Modx respiratory but I don’t know why. Anyway I worked on it all weekend and I have my straight down menu working but I think it is working because of wayfinder default. Here is the menu from adreas02 from my down.
Menu:
Main layout
2-column layout A
2-column layout B
Subpage demo
Subpage 1
Subpage 2
Print stylesheet
Here is what is in my chunk: it is called (menuContainer)
[[+wf.wrapper]]
Here is my call:
[[Wayfinder? &startld=`0` &outerTpl=`menuContainer` &outerClass=`leftside`]] the outerClass in the tutorial is (navigation) but I put the (leftside) because of the above I am not sure if that is right?
Here is the way my menu is in Resources
Denali Window Cleaning (this one has the yellow folder in front of it the rest are white)
Home
Residential
Commercial
Construction Cleaning (this one has the yellow folder in front of it the rest are white)
Finished Projects
Estimates
Contact
The menu comes up just how I typed it here but again I think I am just going to default thanks again for all the help. I hope this is the more difficult thing to learn in Modx.
Rocky
sorry here is the chunk
[[+wf.wrapper]]
I am not sure what happened to the menu from the adreas02 it doesn’t show up in the post.
the chunk doesn’t show up ether is there another way to send it to you.
I will try to send the last half: >[[+wf.wrapper]]
Rocky
<ul[[+wf.classes]] this is the first half
Hi Mary
You never answered back so I must not understand what you wanted me to Post. It was definitely a mess in the comments. Let me know if you can help or not or where I might look for instructions.
Thanks
Rocky
Hello Mary,
I wanted to thank you for these amazing tutorials!
Sadly, I’ve run into an issue and I’d like your assistance.
I’m using this template for this tutoral – http://www.css3templates.co.uk/templates/CSS3_four/index.html
Before that, I was using a different one and Wayfinder seemed to work just right, yet I can’t make it work with this one.
Basically, instead of getting original layout and formating, at first, it displayed 2 menus instead of 1. Like 2 copies of it. After messing around with Wayfinder and chunks, I managed to make it show one, but formating was nonexistent and when I took a look at source there were 2 menus, while it displayed only one. ( I need only a single menu)
I assume I might be making a error due to my poor knowledge of HTML.
Should I post my WF call and chunks?
Karlis
Karlis
Sorry for the delay in responding. Yes, please post your code, including the original static code for the menu. You can use something like pastebin.com, as WP tends to mangle code if you post it in the comments.
Hi mate,
Just wanted to drop in to say a massive thanks for putting this together.
Oliver
Hi there.
I have used Modx Evo and Revo, but never used Wayfinder before… but I might give it a try.
Just a questions… If my website is divided in TWO different sections, with two different navigation menus, would it still be possible to make work for both sections??
For any comments, many thanks.
L.
Absolutely.
Wow, Wayfinder sure seems complicated. This is where I am stuck. Can’t get any CSS to work for Resource categories. I’ve spent a week converting a static site to ModX and I’m getting nowhere fast. This just doesn’t cut it in the corporate world.
Can you post the HTML code for the menu on pastebin.com and share the link here so we can look at it?
Ignore my previous posts. I see I still have lots to learn. I thought Wayfinder took care of some of the menu functionality like drop downs, but it still lies in the CSS.
Hi Mary
I’m afraid I’m rather stupid when it comes to this stuff.
I’ve completely read this tutorial and although I partly understand it, I don’t know how to apply it!!
I use Artisteer to design my templates and there is an option to output it in Modx format. That part’s fine and the site works, almost.
I’ve generated several pages and Wayfinder successfully finds them and their sub pages.
There are two menus, bul-hmenu and bul-vmenu. Currently all pages appear in both menus. I want some pages on the vertical menu and some on the horizontal menu.
I’ve pasted the area of html that generates the two menus here http://pastebin.com/ycQwJFnT and the website is http://www.bulgallery.bg
Would you be kind enough to have a look and tell me what I have to do to make the pages either left menu or horiz menu.
Many, many thanks.
Keith
Hi Thanks for the beginners guide. As a beginner – I can tell: yeah! It helped me!!! thanks! Greetings from germany!
I love your all your Tuts and its obvious that we all enjoy them because your blog is nothing but great appraisals from your readers.
Nonetheless and unfortunately, i did not understand your wayfinder Tut!
There are a few things that are just not clear to me:
1) How do you come up with the number of chunks that you created?
2) After reviewing the wayfinder documentation, how do you write that html code inside the chunks? is that a fixed code for all cases? How would i use it on my specific site? Can you break it down to explain it a bit more, what each piece does?
3) Where do you get the wayfinder parameter call from? Also, the word “&rowTpl”, what does the symbol ‘&’ means and what does ‘Tpl’ means as well?
I love your Tuts
and keep up with this amazing work.
Thank you,
David
Thanks for your feedback, I’m glad to hear you’re finding the tutorials useful.
The number of chunks you create will depend on how your menu is structured, for example how many layers deep it goes. You need to template the outer container of the unordered list and then each list item, and if you have inner levels then each of these need to be templated too. The chunks are all mini-templates for this various elements of the menu.
The wayfinder parameters are listed and explained in the documentation http://rtfm.modx.com/display/ADDON/Wayfinder
I’m not sure how much simpler I can make it. Perhaps if you share the HTML code for your particular case we can go through it and construct a wayfinder call?
You can post it in pastebin and share the link here.
mary
the navigation menu doesn’t appear?
I found a solution to my question: I use the field “description” of the page and add it to the menuRow chunk.
Very helpful tutorial, thank you Mary..!
Kind regards from Amsterdam
Greetings Frederik, thank you for the feedback. I’ve been to Amsterdam once in my life but only for a very short time, I hope to return again one day for a longer visit 🙂
This is by far THE best Wayfinder tutorial on the net.
Thank you – this helped me to sort out the issues I was having after looking at several other tutorials & info.
For others – The best place to see HTML dropdowns working & look at the code & script is still Suckerfish website. (Yes it is still there!!)
There are single & multi-level horizontal & vertical examples.
http://htmldog.com/articles/suckerfish/dropdowns/
———-
If like me & others commenting above when following Mary’s Wayfinder tutorial the Level 3 menu does not fly out – but the correct links comes in –
Check the last line in “superfish.css”
.js_on #dropdown-holder ul ul ul {
padding: 0 0 0 0;
}
The last padding digit – (for left setting) – should be set to a number to force the menu offset flyout. For my file it was –
padding: 0 0 0 141;
to match the width written in the entry above –
#dropdown-holder ul ul ul {
padding: 0 0 0 141px;
}
NOTE – If the menu pulls in the correct page links – but doesn’t sit in the right location eg flyouts not work – the Wayfinder coding works. (Because it is locating & pulling in the resource names properly)
The location of the flyout/menu – is controlled by the CSS. Often it is in the nested ul ul tags – to make sure there are enough settings to cover all the nested lists.
Thanks again. And good luck to anyone else.
Thanks again for the feedback Jan, rock on! 🙂
3 years later and still an invaluable tutorial. Thanks heaps, this has been fantastic to help me learn Modx