 Welcome to part 11 of the MODx Revolution for Complete Beginners series. Apologies for the delay in the series, I’ve been pretty buried in work and such. In this installment we’re going to continue exploring how to create a page that aggregates content from several different pages using the getResources snippet, such as you would find in a magazine style website, or a blog, or a news website, etc. The aspect we will look at today is how to add pagination to the pages holding our aggregated content, and for this purpose we will be using the getPage snippet. We will continue working on the resource site for learning MODx Revolution that we’ve been building through this series. We’re using the 7 in 1 Business Success Site Template from Themeforest, although you can follow along with any template that you choose. Let’s get started 🙂
Catch Up:
Part 1: Introduction
Part 2: Installation
Part 3: Basic Configuration and Installing Extras
Part 4: Working with Templates
Part 5: Working with Chunks
Part 6: Working with Template Variables (TVs)
Part 7: Working with Snippets
Part 8: Using Wayfinder to Create Menus
Part 9: Using FormIt to Create a Contact Form
Part 10: Using getResources to Aggregate Content
What is getPage?
getPage is a MODx Revolution snippet that enables you to add pagination to site elements that can be paginated. According to the official docs, getPage is…
A general purpose snippet for presenting, navigating, and optionally caching, multi-page views from any Element that accepts a limit and offset properties for limiting a data set, and sets a placeholder which getPage can use to retrieve the total number of items to page over.
getPage Gotchas!
Before we get rolling, I want to mention a couple of things about getPage that are important to know if you’re to make sense of the snippet call.
- getPage is a wrapper snippet. It cannot in and of itself do anything. It needs another snippet to produce the output which it then paginates. In other words, you have to have another snippet producing the output you want to paginate, and then have getPage do the paginating for you. In our case, the snippet producing the output is getResources, and so we’ll be wrapping our existing getResources call with getPage 🙂
Assuming I haven’t confused you, let’s continue.
- Following from the first point above, note that your snippet call will need to include both the properties of your wrapped snippet (getResources in our cases) and the properties of getPage itself.
- Don’t call getPage cached. It needs to be uncached, even if you cache the rest of the resource.
With that out of the way, let’s get working on the site.
First and foremost, ensure that you have downloaded and installed the getPage snippet to your site, using the usual steps for installing extras 🙂
If you recall in the last installment we used getResources to create a news page where we aggregated a bunch of dummy news items that we’d created. Right now our call looks like this:
[[!getResources?
  &showHidden=`1`
  &tpl=`newsTpl`
  &limit=`10`
  &includeContent=`1`
  &includeTVs=`1`
  &processTVs=`1`
  &parents=`[[*id]]`
  &hideContainers=`1`]]
The site currently only has 9 news items, so right now they’re all viewable, making for a really long page. Let’s start by changing our call to only show 3 items:
[[!getResources?
  &showHidden=`1`
  &tpl=`newsTpl`
  &limit=`3`
  &includeContent=`1`
  &includeTVs=`1`
  &processTVs=`1`
  &parents=`[[*id]]`
  &hideContainers=`1`]]
So now your page will only show the latest three news items with no way to navigate to the others. This is where getPage comes into the picture.
How do you Use getPage?
As I mentioned above, getPage simply wraps the call that’s producing the output, so we call getPage and specify what element we’re wrapping. Basically, we need to replace our getResources call above with one that’s wrapped inside a getPage call.
Our getPage call will simply look like this:
[[!getPage?
  &elementClass=`modSnippet`
  &element=`getResources`
  &showHidden=`1`
  &tpl=`newsTpl`
  &limit=`3`
  &includeContent=`1`
  &includeTVs=`1`
  &processTVs=`1`
  &parents=`[[*id]]`
  &hideContainers=`1`]]
If you look at this carefully you’ll note that starting from line 4, we have the exact same content as our getResources call. So we’re calling the same properties as we did when using the plain getResources call, and all we’ve done is wrap these properties into a getPage call and then told getPage that we’re wrapping a snippet (elementClass=`modSnippet`) and that the specific snippet we’re wrapping is getResources (element=`getResources`). Make sense?
NB: To be exact, we don’t really need to specify elementClass here, since it has a default value of modSnippet, which is why you may not always see it in examples. But I added it for completeness and learning purposes.
If we look at the page now we don’t see any pagination controls yet. This is because we need to set two properties for our getPage call. These are:
- pageLimit – this sets the maximum number of page links to display in the controls before adding the next button. It defaults to 5.
- pageNavVar – this sets the placeholder for the paging navigation controls. It defaults to page.nav.
getPage has other properties that you should check out and use depending on your needs, look them up on the official documentation, linked to at the end of this post.
Alright, for completeness, we’ll add the two properties above to our call, and we’ll call the placeholder to show the pagination controls.
[[!getPage?
  &elementClass=`modSnippet`
  &element=`getResources`
  &showHidden=`1`
  &tpl=`newsTpl`
  &limit=`3`
  &includeContent=`1`
  &includeTVs=`1`
  &processTVs=`1`
  &parents=`[[*id]]`
  &hideContainers=`1`
  &pageLimit=`5`
  &pageNavVar=`page.nav`
]]
[[!+page.nav]]
Note that we’ve added the placeholder ([[+page.nav]]) uncached. This is what is recommended in the official docs.
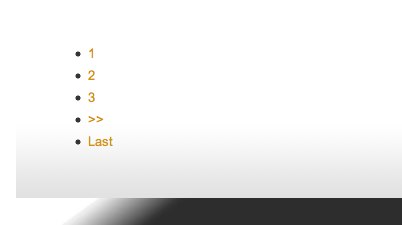
Save your changes and view the page, and at the bottom of the three news items you should see the paging controls, which in my case look like this:
Cool, so our paging controls are now showing up, and in my case they work just fine and navigate well within the pages.
This is good. We have functionality. Now we need to take care of templating, to make our navigation controls look nicer.
Templating the getPage Output
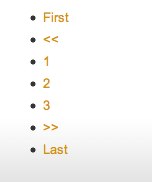
If we look at the blog template for the 7 in 1 Business Success Site Template that we’re using, we see that this is what we want our pagination controls to look like:
OK, so how do we get from our unordered list in the first image to this beautiful layout?
The getPage snippet has several page navigation template properties which are explained in the documentation page linked to at the end of this post. You would think that you can set these directly in the snippet call as you would any other properties. However, according to the official docs, you should NOT do this. Instead, you should use a property set to define your template.
What is a Property Set?
Just in case you’re feeling too lazy to look this up in the official docs, here you go:
Property Sets are user-defined collections of properties for an Element. They can be attached to one, or more, Elements via that Element’s editing page. Those property sets, once attached, then can be called in their Element’s call syntax like such:
[[ElementName@PropertySetName]]
That’s about it, best way to understand it is by actually setting one up and using it, so let’s get to it.
If we view source for our page, this is what our getPage call is outputting:
<p><li><a class="active" href="index.php?id=12&page=1">1</a></li> <li><a href="index.php?id=12&page=2">2</a></li> <li><a href="index.php?id=12&page=3">3</a></li> <li class="control"><a href="index.php?id=12&page=2">>></a></li> <li class="control"><a href="index.php?id=12&page=3">Last</a></li></p>
If you look at this code and compare it to the defaults in the templating properties on the getPage documentation page, we can see that they’re aligning exactly. What we’re after is the code in our HTML template, and that looks like this:
<div class="wp-pagenavi">
<span class="pages">Page 1 of 3</span>
<span class="current">1</span>
<a href="#" class="page" title="2">2</a>
<a href="#" class="page" title="3">3</a>
<a href="#">»</a>
</div>
Before we create the property set, you should note that there’s at least a couple of things we can do to get closer to our goal without too much trouble. We can set the enclosing div tags as well as the span element that says Page 1 of x.
Let’s modify our placeholder to look like this, matching our template code:
<div class="wp-pagenavi">
[[!+page.nav]]
</div>
Easy enough. Then, for the span class, we will employ two properties: page, which returns what page we’re on, and pageCount, which returns the total number of pages. We will employ the placeholders related to these properties using the usual syntax for placeholders as below, again matching our template code:
<div class="wp-pagenavi">
<span class="pages">Page [[+page]] of [[+pageCount]]</span>
[[!+page.nav]]
</div>
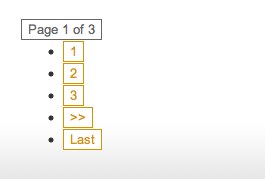
With just those changes, we can see that our output is starting to look a bit similar to our template:
So let’s create the property set and get the correct HTML code in there to override the defaults.
Creating the Property Set
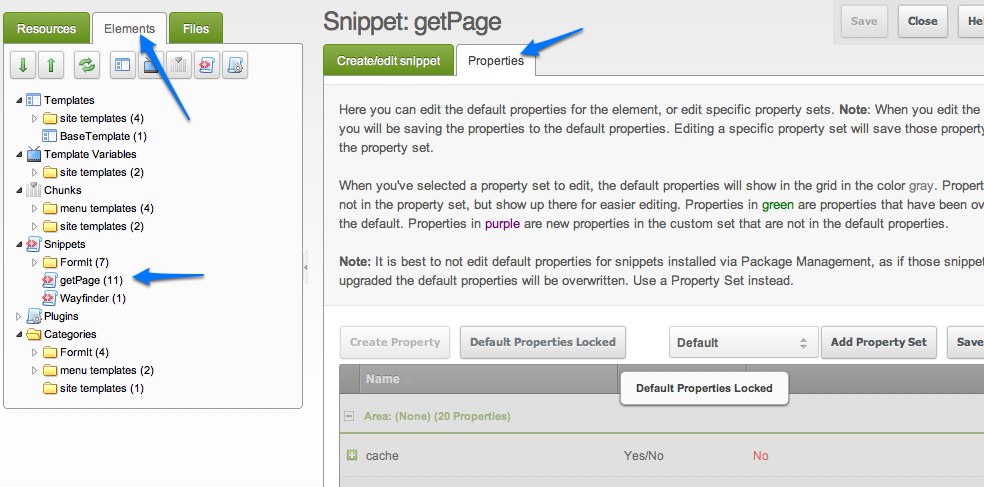
Go into the site tree, open the Elements tab, and under Snippets, click to open the getPage snippet. Then click on the Properties tab to open the properties page. (You can click on the image for a larger view)
Once you’re in there, you’ll notice that you have a list of all those properties we see listed on the getPage documentation page. However, they’re grayed out and we can’t edit them, and we have a message that says “Default Properties Locked”. This is fine, because we DON’T want to edit the defaults. If we do, then our changes will be overwritten the next time we update the getPage snippet, undoing all our wonderful templating work.
Instead, we want to create our own property set, and any values we set on our custom property set will override those in the default for whatever call we attach our custom set to. And the best part is our custom property sets will remain intact whenever we update getPage.
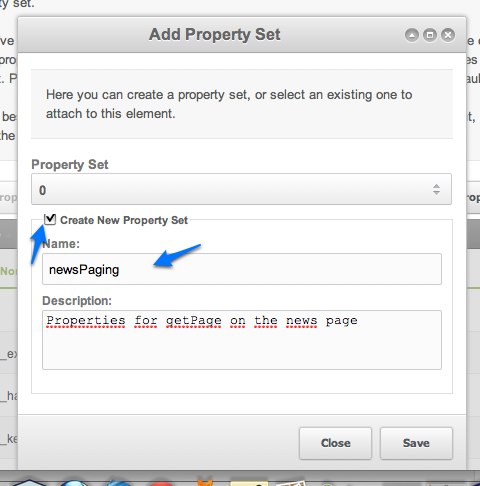
Let’s see this in action. Click to add a new property set:
You’ll get a dialog in which you start entering the details for your new set. Click on the “Create New Property Set” checkbox to get the fields for name and description that you then fill out, as I have done:
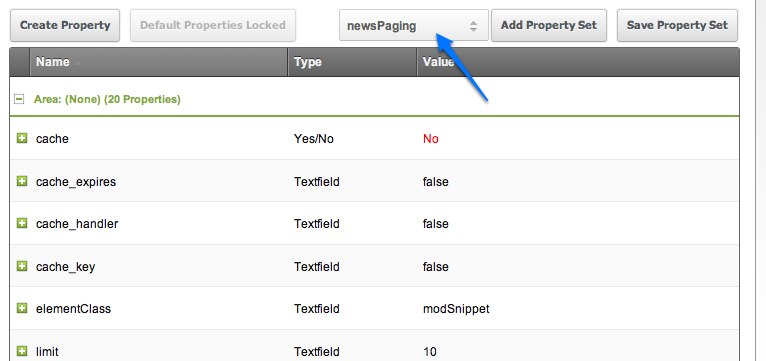
Once you click the Save button, you’re presented with the property set you’ve just created, with all the default values in it. And you can tell it’s the one you just created because the name appears in the top. We can now edit this custom set to our heart’s content without worrying about it being overwritten in future upgrades.
We now start editing the templating properties to match our HTML from the template. Remember that if you’re not sure what the property represents, you can click on the little + sign to get a description.
To change the value of the property, just doubleclick in the value field and it will become editable.
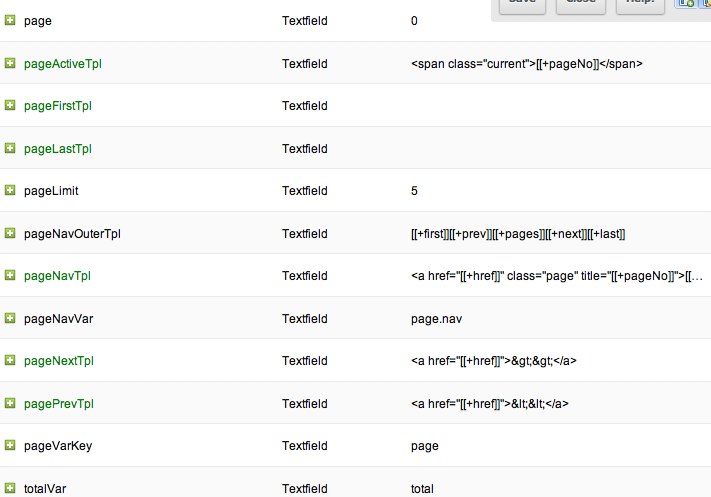
So for my property set, these are the changes I will make to match the HTML code from my template. I replace the existing values with the values listed below:
pageNavTpl:
<a href="[[+href]]" class="page" title="[[+pageNo]]">[[+pageNo]]</a>
pageActiveTpl:
<span class="current">[[+pageNo]]</span>
pageFirstTpl and pageLastTpl:
Our template doesn’t employ any first or last page controls, so we need to blank these out. However, if you just leave them blank, the defaults will be used, so what I do is just enter one space character into each field.
pagePrevTpl:
<a href="[[+href]]"><<</a>
pageNextTpl:
<a href="[[+href]]">>></a>
Look over the values above carefully comparing them to the HTML for the pagination on the blog page of the 7 in 1 Business Success Site Template that we’re using, and you’ll see how the code matches. For the placeholders such as [[+href]] and [[+pageNo]], you can get these just by looking at the default values that you’re replacing and in the documentation.
Make sure you hit the save button to save the changes to your property set. Mine looks like this now:
The green color indicates that these are properties that exist in the default property set that have now been overridden in this custom set. If we were to add a new property to this set that wasn’t part of the default property set, it would be purple 🙂
OK, so we have our new property set, but how does our getPage call know to use it?
Attaching the Property Set to getPage
We need to let our getPage call know that it should not use its default property values but should instead get them from our custom property set. To do this we bind our custom property set to our getPage call adhering to the following syntax:
[[ElementName@PropertySetName]]
So in my case, my getPage call will now look like this:
[[!getPage@newsPaging?
  &elementClass=`modSnippet`
  &element=`getResources`
  &showHidden=`1`
  &tpl=`newsTpl`
  &limit=`3`
  &includeContent=`1`
  &includeTVs=`1`
  &processTVs=`1`
  &parents=`[[*id]]`
  &hideContainers=`1`
  &pageLimit=`5`
  &pageNavVar=`page.nav`
]]
<div class="wp-pagenavi">
<span class="pages">Page [[+page]] of [[+pageCount]]</span>
[[!+page.nav]]
</div>
If we now look at our news page, we see that the navigation now looks exactly like we want it to:
And it functions exactly as we expect it to too as we navigate through the different pages:
Pretty neat huh? 🙂
Conclusion
This brings us to the end of this post on the basics of using getPage to create a pagination system for an aggregation page that’s using getResources to pull content, such as you would have in a blog. We’ve looked at how to structure the getPage call and use it to wrap our getResources element. We’ve also learnt a bit about Property Sets and how to create and call one into our getPage call to template its output.
I look forward to your comments, feedback and any questions/corrections, etc. Or just a note saying hey! 🙂
More Reading:
getPage – MODx Official Documentation
Properties and Property Sets – MODx Official Documentation





Good tut, will try to give it a spin on my current project. Thanks Mary for thinking on us, beginners, appreciate it!
Does getPage work with own packages, too?
I do a lot of db-query stuff and created a package for xPDO usage. Now I need to paginate the results.
Strochli,
I haven’t tried it but I imagine it should work
mary
Yes, you can. Please have a look at this: http://rtfm.modx.com/display/ADDON/getPage
Has the series finished now? There doesn’t seem to be anything after this one posted in July, although there is a video in August.
Hi David
No the series is not finished, just been quite busy 🙂 Will be continuing it soon
mary
Nearly two years and still no updates. 🙁
I can only do this when time permits, and unfortunately i haven’t had much time recently 🙁
Hi! Could you tell please where the classes used (wp-pagenavi, pages, etc) are defined? I’ve done everything according to your example, everything’s OK, except that I do not have any design with pagination, I mean all these boxes around, so it looks quite unattractive. Thanks!
Sergio
Did you follow the tutorial all the way through to setting up the property set? This is where the templating styles are applied, in the property set that we create.
Make sure you follow this getPage tutorial all the way to the end.
mary
Yes I did. I’m not sure if you understand me right. What I mean to say is WHERE we DEFINE the classes, not where we apply the properties! In other words, why page numbers are boxed and are of gray and orange color and not, for example, circled and dyed green or blue? This must be specified somewhere in CSS or something.
I see what you mean. They are specified in the CSS file “styles/common-css/pagenavi-css.css”
mary
Yeah, that’s it! Could you please place the description of “wp-pagenavi” and “pages” classes in the lesson? I can’t read the file with downloading the page 🙁
What do you mean by “place the description in the lesson”? It’s just CSS code in the file. I didn’t do the CSS coding, it came with the template. All we do is transfer the templating to MODX using the property set. If you want to see the code just open the CSS file. You can use the FF web developer plugins.
mary
Sorry for my fuzzy explanations 🙂
By “place the description in the lesson” I meant that it would be nice if you copied the description of “wp-pagenavi” and “pages” classes from CSS file into this article so people could straightly see how they can define the styles of page navigation. It would be convenient for those who appear in your site exactly to learn page navigation as I did 🙂 I suppose somewhere in previous lessons (perhaps, in those concerning templates) you showed the CSS file in question or at least wrote where to find it but I can’t find it quickly, so I’ll have to read all your articles from end to end just to know how I can define the styles of pagination. I think it would be more convenient and logical to place the description of appropriate classes in this article, it also would make the lesson more complete 🙂
Your articles are great, I’ve been reading them about a year and this is just a first time when I have a question so hope I do not annoy you much, I just try to understand how to restyle pagination 🙂 I could get an answer if you’d say how and where can I see pagenavi-css.css 🙂
cool, exactly what i needed.
thanks man
Thanks for sharing!!!!!!!!!!!!!!!!!!!
very useful for me………..:D
Nuevamente gracias. He terminado con éxito y gracias a ti he aprendido mucho.
Saludos y gracias nuevamente
Hello, thanks for helpful topic!
But how i can make the case, when if i am on first page, i see “<<" button but without link opportunity.
need see:
<>
Anyway, if i am on the first page.
How it could be done?
Thanks
Hello,
How i could see the “<" and "<<" buttons, anyway, if i am on the first page. BUt they are without link possibility, only usual text.
<< >>
See always, but if i am on the first page, i dont get the link on the “<" button. How i could make it?
Thanks
how to make the content of website dynamic?