Guest post: Excel add-ins tutorial

First, I would like to thank Mary for giving me this opportunity to introduce my first Excel add-in on her website. It is an excellent programming resource.

My purpose in this blog entry is to describe the Data Filter Tool, an add-in I created for Microsoft Excel, as well as discuss some steps you can take to make sure your Excel add-in works properly.

This add-in does one thing: it filters a table of data and copies or moves matchingrows to a new workbook. For example, if you have a list of addresses in Excel, this add-in lets you filter by state and copy (or move) all the rows matching a specific state to a newly created workbook. Headers are always copied, even if you select the Move option, to preserve headers in the original data. It preserves formatting of the original data (bold, italic, etc) but copies values, not any underlying formulas. So I don’t recommend you use this tool if your data contains formulas; it’s mostly for tabular data like addresses, contact information, etc.

The dialog box is devastatingly simple: you just select the range to be filtered, the column and unique data item to base the filter on, select what option you want (Copy or Move) and then click ‘Apply’.

Let’s peek under the hood to see how the add-in operates, and hopefully that will give you some idea of how to create your own add-ins.

The first thing we do is some start-up checks to make sure we are in the right environment. Please note that some of the code I will demonstrate actually comes from “Microsoft Excel 2000 Power Programming with VBA”, written by John Walkenbach, ISBN 0764532634. We check the OperatingSystem Property of the Application Object to make sure we are in a version of Windows.

Function WindowsOS() As Boolean

If Application.OperatingSystem Like “*Win*” Then
WindowsOS = True
Else
WindowsOS = False
End If

End Function

Notice that even though the default value of a Boolean variable is False, I never assume that this will work properly so I always explicitly give a variable a value. We use this code in the Workbook_Open() event of the ThisWorkbook module as such.

If WindowsOS = False Then
MsgBox “This add-in is for Windows OS only.”, vbCritical
ThisWorkbook.Close False
Exit Sub
End If

This will close the add-in if someone tries to open it in a non-Windows setting. If your code is only intended for Excel 2000 or later, test for version compatibility with this code:

If Val(Application.Version) < 9 Then
MsgBox “This add-in will only work in Excel 2000 or later.”, vbOKOnly
ThisWorkbook.Close False
Exit Sub
End If

Before adding a menu item to the Data>Filter Menu, we always try to delete the menu, in case Excel did not close properly and the Workbook_BeforeClose Event was not able to run. I set an object reference to the Filter Menu like this:

Dim cb As CommandBarControl
Set cb = Application.CommandBars(“Data”).FindControl(ID:=30031)

Then we delete the menu, using an ‘On Error’ Statement to skip any errors, in case themenu item doesn’t exist, which is exactly what we want.

On Error Resume Next
cb.Controls(“Data Filter Tool”).Delete
On Error GoTo 0

If we passed all our startup checks, the add-in is installed and allowed to run.

In this post I showed you my new add-in and demonstrated some techniques for securing your own code. Hopefully you can use some of these techniques in your own add-ins.

To download the Data Filter Tool, visit http://www.codeforexcelandoutlook.com/DataFilterTool.zip
and of course check out my site at http://www.codeforexcelandoutlook.com/.

Enjoy,
JP

Building a Website with Drupal for Newbies – Building Your Site

This is the fourth in a series of posts on how to build a Drupal website from scratch. My apologies for the delay in getting this installment out, a lot has been happening on the home and work front that sort of slowed me down, but here we are.

In the first segment we introduced Drupal, and went over what we would need to work with Drupal. In the second part, we went over how to install Drupal, and finally, in the third section we set up the Drupal site, changed configurations, and did some other cool stuff. If you have followed the tutorials this far, you should have your website all set up, with your desired settings and names, headers, logos, etc in place. As you know, I am creating a website in tandem with this tutorial, and everything that I do on that site I will describe here in this series and also in future Drupal related posts. The website is http://drupalpad.maryspad.com, and you can check it out to see how far things have progressed and compare it to your site.

Now that you have your site configured, and all the basics in place, the next step is to start building your site. At this stage, our site is still very basic looking, with the Drupal front page introducing the site. For now, let’s leave that as it is. Soon I will show you how to put something else there when we delve into content creation and content management. For now, let’s add some important components.

Continue reading “Building a Website with Drupal for Newbies – Building Your Site”

Care for some Java?

Then you need to visit Another Random Developer Blog.  This is a Java development blog with some great tutorials and practical code tips, tricks, and snippets that you can actually use.  Even though I am not a Java developer I’ve been following the tutorials on this blog keenly,  and I know anyone who’s even remotely interested in Java will enjoy them too.   So there’s another useful resource for all developers (and aspiring developers) out there.

As an aside, the fourth part of the Drupal tutorial series will be posted soon, but be sure to check out Another Random Developer Blog.

Building a Website with Drupal for Newbies – Setting up your Site

This is the third in a series of tutorials on how to build a Drupal website. In the first segment we introduced Drupal, and went over what we would need to work with Drupal. In the second part, we went over how to install Drupal, either using a script installer such as Fantastico, or manually. If you have followed the tutorials this far, you should have a clean Drupal install in its raw form, ready to go.

In this third installment, we are now going to start setting up our website, looking at and modifying some Drupal settings, and generally getting it to look more like a unique website. As I create this tutorial, I am going to be building a Drupal website, and putting the screenshots here so that you can follow along and see the website evolve as we go. Since the website will be evolving as the tutorials evolve, if you are reading this tutorial long after this post was written, the website may look nothing like the screenshots, but you will be able to see what we have done so far. Everything I do on the sample website I will describe here. The sample website that I am building to accompany these tutorials can be found at http://drupalpad.maryspad.com.

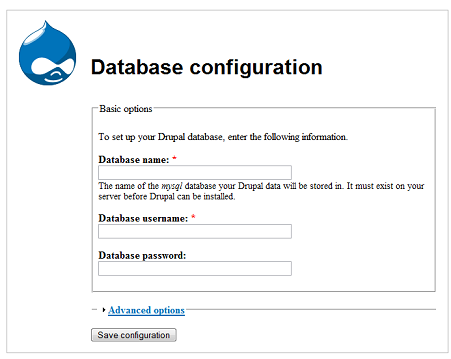
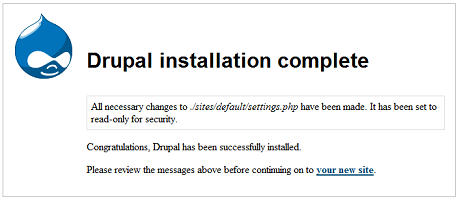
Assuming you successfully completed the install process as we described it, you can now log in using the user account that you created, which is the super user account, and start to build out your site. Remember that if you used a script installer to do your installation, the account was created automatically based on the information you gave. If you installed manually, then you need to create a user account, which will automatically be designated as a super user account. Log into your new website using this account, and let us start setting up our website.

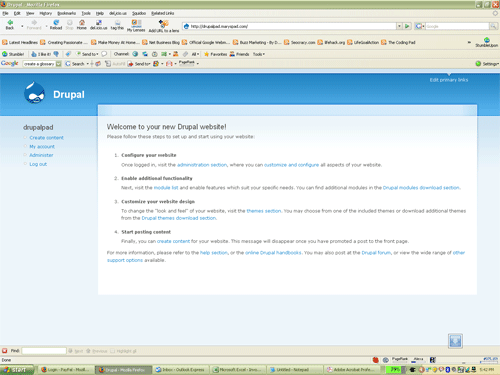
I will outline here the steps I usually follow in the order I follow them. At this point, your website should be looking something like this:

Drupal fresh site look

Site Configuration – this is usually my first stop. This involves setting up my site name, creating clean urls, and setting up other things.

a: Setting up Site Information

To set up your site information, click on Administer, on the left hand side panel. Click on “Site Configuration”, and then “Site Information”. Here you can enter your site name as you want it to appear at the very top, enter a slogan and mission if you want to, and footer information for your website. The site slogan and mission information are really optional, and if you enter it, you have the option to enable whether or not this information will be shown using the theme configuration, which we will go into later. In my example site, I will call the site The Drupal Pad.

In the footer section, you can enter information that will appear all the way at the bottom of every page of your website. This is an excellent place to put any copyright information and link to any other other websites you want to. One really cool thing is that you can use HTML in your footer. In my example, I want to mention that this website is part of the Coding Pad, and also enter some copyright information, so I enter this information there like so:

©2008 The Drupal Pad in partnership with <a href=”https://codingpad.maryspad.com”>The Coding Pad</a>

Then because I want to credit Drupal for this excellent CMS, I also enter the text “Proudly powered by Drupal” with a link to the Drupal website.

You can also set how you want to have Anonymous users designated should they post a comment or such, if you enable anonymous posting. I usually change this from the default “Anonymous” to “Guest”, because I think Guest sounds much friendlier.

b: Set up Clean URLs.

The next step that I do is to set up clean urls. These are much friendlier for SEO purposes, and more importantly, they allow you to change how urls will appear in the browser bar. So instead of the url looking like http://mywebsitehasdirtyurls.com/?qnode134 it will be a lot cleaner, like so http://mywebsitehascleanurls/node/1. You can go a step further, as we will in setting up this website, to change the urls so they are directly related to the title of the page, which will involve enabling the path module, and entering aliases for each of our pages. The end result will be our urls looking like so: http://mywebsitehasurlsthatrock/drupal-tutorial. This is so much more user friendly isn’t it?

We will go into how to do all this in a while, and will need to enable a module for this, but for now go ahead and enable clean urls. Drupal will first check to see if your server supports clean urls, so when you first click Clean URLs under Site Configuration, you will see the two radio buttons to enable or disable the clean urls, and then this message:

Clean URLs:
This option makes Drupal emit “clean” URLs (i.e. without ?q= in the URL.) Before enabling clean URLs, you must perform a test to determine if your server is properly configured. If you are able to see this page again after clicking the “Run the clean URL test” link, the test has succeeded and the radio buttons above will be available. If instead you are directed to a “Page not found” error, you will need to change the configuration of your server. The handbook page on Clean URLs has additional troubleshooting information. Run the clean URL test.

Click on the link to run the test, after which, if the test is successful, the radio buttons will be enabled and you can select “Enabled” and then save configuration.

There are many other settings that you can play with under Site Configuration, but these will do for now. I usually leave the rest at their default settings when I am first setting up a website, and then I go back in and change them as needed. Once you’ve become a Drupal guru you can decide what you went to change early and do it, but for now we will start with these two.

One more note, if you are expecting to have traffic while building up your site, you can temporarily take your site offline and leave a message to let your visitors know that the website is under maintenance and will return. This is particularly useful if you’re migrating your site and Drupal and don’t want visitors to be met with your new empty default install. You can still work on your site while it is offline and put it back online as soon as you’re satisfied that it’s ready for general viewing. If it’s a brand spanking new site and you expect to be done in a short while then it’s not necessary to do this.

To take your site offline or put it back online, go under “Site Configuration, and click on “Site maintenance.”

If you do take your site offline, please remember to get it back online when you’re ready. It’s easy to forget to do this since as the admin logged in you can see it, and you may forget that your visitors can’t see it.

You can see the progress so far with the site name and footer on my sample site here. Your site and mine still look pretty raw and have the Drupal content on the front, and besides the site title and the footer, there’s not much else there to make it look like a website, but in the next part we’re going to change all that… patience is the key.

In the next segment of this tutorial, we are going to start building our site. We will enable modules, and add content, and make some more changes to the settings that will make our website begin to look more unique and to have some substance to it, all pretty exciting stuff!!

Building a Website with Drupal for Newbies – Installing Drupal

There are many resources out there on how to install Drupal, so I am going to go over this in brief in this post.

If your webhost provides you with control panel that has a script installer, check if Drupal is listed. An example of a script installer is Fantastico, which comes with cPanel. Using a script installer makes the process pretty painless. Make sure though that you have the latest version of any scripts you may install using a script installer such as Fantastico. Otherwise, you may want to visit the homepage and download the updates.

In our case, we want to install Drupal 5.7. Even though there’s a new version out (6.0), as of this posting a lot of the modules have not yet been updated to work with 6.0. So we’ll go with 5.7.

If you don’t have a script installer like Fantastico, or you just want to do the install manually, the process is a little lengthier but not too complicated. There are install directions at Drupal webisite, but I’ll break them down here for you:

1. Create a database and user, and assign the user to that database. Make note of the database name and username and password as you’ll need them.
2. Extract the drupal archive that you downloaded into a folder on your hard drive.
3. Using your ftp program, upload the files in this folder into your domain folder where you wish to install Drupal.
4. In your browser, type the name of your website where your drupal folder is sitting, and you will be prompted to enter your database information:

Drupal Install

5. Enter the database configuration information from step 1, and then click on “Save Configuration.” If all is well, you will see this screen.

Drupal Install Complete

6. After this you will need to create a user account for yourself. This very first account that you create is designated by Drupal as the admin account and is a superuser account.

Your website is now installed and you’re ready to set it up, which we will cover in the next tutorial.

You can find more detailed installation instructions at the Drupal website (http://drupal.org/getting-started/5/install). If you have any problems doing this install you can post them here and we will discuss them, or you can also check the Drupal forums to see if there is a solution there.

In the next installment, we will walk through the process of setting up your new website.