 Welcome to part 9 of the MODx Revolution for Complete Beginners series. In this installment we’re going to look at how to create a simple contact form on our website using the FormIt snippet. As we work through this series of tutorials we’re building a resource site for learning MODx Revolution. We’re using the 7 in 1 Business Success Site Template from Themeforest, although you can follow along with any template that you choose. At the end of the last installment I encouraged you to apply what we’ve learned so far and port in the inner pages for your template. We’re going to start with the HTML code for the contact page that comes with the template we’re using, and transform that into a dynamic contact form using the FomIt snippet.
Catch Up:
Part 1: Introduction
Part 2: Installation
Part 3: Basic Configuration and Installing Extras
Part 4: Working with Templates
Part 5: Working with Chunks
Part 6: Working with Template Variables (TVs)
Part 7: Working with Snippets
Part 8: Using Wayfinder to Create Menus
What is FormIt?
FormIt is a snippet that gives you the ability to process dynamic forms within MODx Revolution. If you’ve used MODx Evolution, you may have used eForm for generating and processing your forms. FormIt is the MODx Revolution equivalent of eForm, but it is a completely different snippet.
Why Use FormIt?
There are many reasons to use forms on your website, the primary one that’s used across almost all websites being to create a contact interface. Other uses include lead capture, information entry, etc. You can probably use FormIt for any and all of these purposes, but so far I have only used it for creating contact forms, and this is what I will be covering in this installment. As I explore other possible uses I will post tutorials on those. If you can think of any uses of FormIt that would be interesting to you please feel free to leave a message in the comments and I will explore it, time permitting. But for now, let’s explore how to create a contact form for our MODx site.
Download and Install FormIt
This is of course the very first step. We’ve already gone over how to install snippets in MODx Revolution so go ahead and install FormIt.
Preparing the Template
I hope that by now you have used what we’ve learnt so far and ported your inner page templates into your MODx site. An important note here is that if you’re using the same template that I am, you will notice that the contact page is actually a php page, with PHP scripting in it. If you were using this template to build a static site then that would come in handy, since you would use just use the existing PHP code to do your form processing. However, since we’re porting this into MODx, we don’t need that PHP code as MODx will handle all our form processing. All we need is the form HTML code and then we will use FormIt to do the rest 🙂
Looking at the static Contact page that comes with the template, this is what we have:
Our mission is to port this into MODx and have the contact form retain its look and layout but be processed completely by MODx, so let’s dive in 🙂
The first thing we need to do is grab the HTML/CSS off the page and port it into MODx, if you haven’t done so already. Since my contact page is actually a PHP script, what I did was open the page in my browser, and then I right-clicked to view source. This allowed me to only see the outputted HTML with no PHP code. I then copied this code and pasted it into MODx, using that to form my contact form template. I have then gone ahead and using what we learned before, used several chunks to simplify things 🙂 Here’s my template code so far for your reference 🙂
<!DOCTYPE html PUBLIC "-//W3C//DTD XHTML 1.0 Transitional//EN"
"http://www.w3.org/TR/xhtml1/DTD/xhtml1-transitional.dtd">
<html xmlns="http://www.w3.org/1999/xhtml" dir="ltr" lang="en-US">
<head profile="http://gmpg.org/xfn/11">

[[$7in1-header]]

</head>
<body>

[[$7in1-logo-nav-search-bar]]

<div id="page_container" class="grid_16">
<div id="container_bkgnd_btm" class="grid_16 alpha omega pngfix">
<div id="page_content" class="grid_11 push_4 lelfPadding20">
<div class="post" id="post-29">

<h2>[[*pagetitle]]</h2>

<div class="entry">
<p>Donec pede justo, fringilla vel, aliquet nec, vulputate eget, arcu. In enijusto, rhoncus ut, imperdiet a, venenatis vitae, justo. Nullam dictum felis eu pedemollis pretium. Integer tincidunt. Cras dapibus. Vivamus elementum semper nisi.Aenean vulputate eleifend tellus.</p>									</div>
</div>
<br />
<div class="clear"></div>
<div id="contactInfo">
<div class="grid_2 contactFieldDesc">Address:</div>
<div class="grid_8 contactFieldValue">123 Street Name, Suite #</div>
<div class="clear"></div>
<div class="grid_2 contactFieldDesc"></div>
<div class="grid_8 contactFieldValue">City, State 12345, Country</div>
<div class="clear"></div>
<div class="grid_2 contactFieldDesc">Phone:</div>
<div class="grid_8 contactFieldValue">(123) 123-4567</div>
<div class="clear"></div>
<div class="grid_2 contactFieldDesc">Fax:</div>
<div class="grid_8 contactFieldValue">(123) 123-4567</div>
<div class="clear"></div>
<div class="grid_2 contactFieldDesc">Toll Free:</div>
<div class="grid_8 contactFieldValue">(800) 123-4567</div>
<div class="clear"></div>
</div>
<div class="clear"></div>
<div id="contact-wrapper">

[[*content]]

</div><!-- end contact-wrapper -->
</div>
<!-- end page_content -->
<div id="sidebar" class="grid_4 pull_11">

[[$7in1-contact-sidebar]]

<!-- end sidebar -->
</div>
<!-- end container_bkgnd_btm -->
</div>
<!-- end page_container -->
<div class="clear"></div>
<div id="bottom_lid" class="grid_16 pngfix"> </div>

[[$7in1-bottomwidgets]]

<div id="footer_lid" class="grid_16 pngfix"> </div>

[[$7in1-footer]]

</body>
</html>
I have saved this as a template that I call 7in1-contact and applied it to my contact page.
You’ll recognize some of the chunks (the header and footer) from our previous installments, and you’ll also notice a few new ones. I’ll leave it for you to examine them and figure them out if you’re using the same template as I am. One cool thing to notice here is that I have replaced the Contact text in the h2 tags with [[*pagetitle]], which again should jog your memory from previous installments – all part of making our template dynamic 🙂
I should break this template out more and get the text and physical address information out of there and into either the main content area or into TVs (remember those?), and also get the sidebar info into editable areas (TVs anyone?), but since the focus of this installment is the form, I will leave them in the template for now and deal with them later. Should be a good exercise for you to undertake too 🙂 Also, don’t be too concerned about the login form in the sidebar, we will tackle that in a later installment when we talk about the Login snippet, for now it remains purely static dummy content.
OK, so let’s get to the form! What I’ve done is taken out the HTML code for the form which was wrapped inside the “contact-wrapper” div tags, and replaced it with the [[*content]] tag. This means of course that anything I place in the main content field of my contact page will appear here. So at the moment, the contact page looks like this:
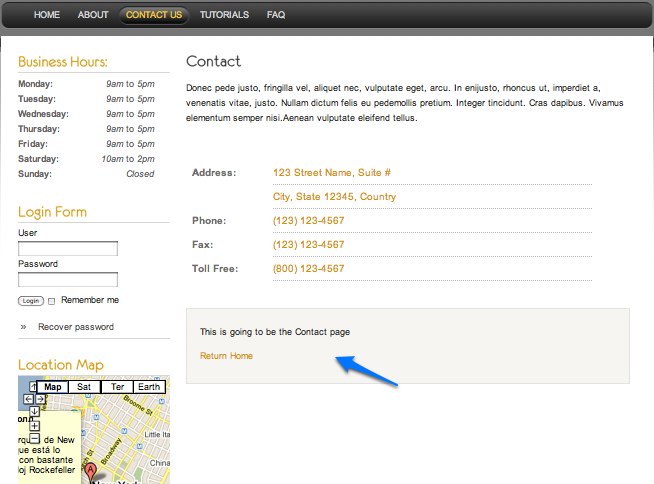
As you can see, where the form should be there’s just some text, which is what I typed into the content area of the contact page when I created it. But as you can see it’s wrapped in the light beige container as specified in the template.
How to Use the FormIt Snippet
Now the way FormIt works is that you have to place the snippet call AND the HTML form code into the place where you want the contact form to appear. If you used eForm in MODx Evolution you may be expecting to create a tpl for your form and then call it into the snippet, but with FormIt you don’t call the form into the snippet, instead, you place the form after the snippet call.
So let’s first look at the snippet call. The FormIt documentation on the official MODx site has a nice example of a contact form, and we’re going to use that, but we’re going to break it down and modify it to create our form, and hopefully in the process understand it better. To avoid redundancy I will avoid recap-ing stuff that’s in the documentation, so I hope you have the documentation page (http://rtfm.modx.com/display/ADDON/FormIt) open so you can reference as we go 🙂
The first thing you’ll see when you look at the documentation is that you need to specify hooks for your FormIt call. Hooks are scripts that will run when your snippet is called. You can chain them together, but the important thing to note is that they will run sequentially, and if the one fails the next one will not be executed. There are prehooks and normal hooks, but the only hooks we’re going to be concerned with here are the normal hooks that run after the form is validated and process the form. You can create custom hooks, but we’ll keep it simple and use the existing hooks.
The first hook we need, which is the one that actually sends the emails out, is email, and it has several properties listed and described here (http://rtfm.modx.com/display/ADDON/FormIt.Hooks.email). Take a look at these and see which ones you want to use for your contact form. So let’s start forming the snippet call:
[[!FormIt?
&hooks=`email`
&emailTpl=`sentEmailTpl`
&emailSubject=`Message from Learn MODx Revo Website`
&emailTo=`me@myemailaddress.com`
]]
As you can see, we have called the snippet with one hook – email, and then specified three properties &emailTpl, &emailSubject, and &emailTo. Make sure that the email address you’ve put into the &emailTo parameter in the call is your actual email address so that you can receive the email from the form.
The emailTpl specifies the chunk that holds the template for the message that will be sent from the form. Before we can create this chunk, we need to add the form that the user will fill. As we said before we’re going to use the HTML code for the form that came with our template and modify it to work with our FormIt call. The raw code looks like this:
<form id="contactForm" class="cmxform" method="post" action="#contact-wrapper">
<strong>Please use the form below to send us an email:</strong>
<div>
<label for="contact_name">Name </label><em>(required, at least 2 characters)</em><br />
<input id="contact_name" name="contact_name" size="30" class="required" minlength="2" value="" />
</div>
<div>
<label for="contact_email">E-Mail </label><em>(required)</em><br />
<input id="contact_email" name="contact_email" size="30"  class="required email" value="" />
</div>
<div>
<label for="contact_phone">Phone </label><em>(optional)</em><br />
<input id="contact_phone_NA_format" name="contact_phone_NA_format" size="14" class="phone" value="" maxlength="14" />
<label for="contact_ext">ext. </label>
<input id="contact_ext_NA_format" name="contact_ext_NA_format" size="5" class="ext" value="" maxlength="5" />
</div>
<div>
<label for="contact_message">Your comment </label><em>(required)</em><br />
<textarea id="contact_message" name="contact_message" cols="70" rows="7" class="required"></textarea>
</div>
<div>
<input name="submit" class="submit" type="submit" value="Submit"/>
</div>
</form>
We need to modify this form so that FormIt can process it, and the first thing we need to do is change the action to point to the current page, since that’s where the FormIt call resides. We references the current page using the url syntax for MODx Revo: [[~[[*id]]]]. If you look at this closely you’ll recognize that the inner piece is simply a tag for the ID field: [[*id]] and the outer part is the tag for referencing a url e.g. [[~123]]
The other part of modifying this form is simply putting in the relevant dynamic FormIt placeholders in the value attribute of each field element to replace the static bits. The result looks like this:
<form id="contactForm" class="cmxform" method="post" action="[[~[[*id]]]]"> <strong>Please use the form below to send us an email:</strong> <div> <label for="contact_name">Name </label><em>(required, at least 2 characters)</em><br /> <input id="contact_name" name="contact_name" size="30" class="required" minlength="2" value="[[!+fi.contact_name]]" /> </div> <div> <label for="contact_email">E-Mail </label><em>(required)</em><br /> <input id="contact_email" name="contact_email" size="30" class="required email" value="[[!+fi.contact_email]]" /> </div> <div> <label for="contact_phone">Phone </label><em>(optional)</em><br /> <input id="contact_phone_NA_format" name="contact_phone_NA_format" size="14" class="phone" value="[[!+fi.contact_phone_NA_format]]" maxlength="14" /> <label for="contact_ext">ext. </label> <input id="contact_ext_NA_format" name="contact_ext_NA_format" size="5" class="ext" value="[[!+fi.contact_ext_NA_format]]" maxlength="5" /> </div> <div> <label for="contact_message">Your comment </label><em>(required)</em><br /> <textarea id="contact_message" name="contact_message" cols="70" rows="7" class="required">[[!+fi.contact_message]]</textarea> </div> <div> <input name="submit" class="submit" type="submit" value="Submit"/> </div> </form>
A quick way to do this is to compare your contact form with the one given in the FormIt documentation as that will get you a long way to where you want to be. You could also start with the form in the documentation and then just change the relevant classes and ids to match your form 🙂
Go ahead and post the snippet call we constructed in the content area of your Contact page, and then paste your form code after the snippet call. So the content area of your contact page should contain:
[[!FormIt? &hooks=`email` &emailTpl=`sentEmailTpl` &emailSubject=`Message from Learn MODx Revo Website` &emailTo=`me@myemailaddress.com` ]] <form id="contactForm" class="cmxform" method="post" action="[[~[[*id]]]]"> <strong>Please use the form below to send us an email:</strong> <div> <label for="contact_name">Name </label><em>(required, at least 2 characters)</em><br /> <input id="contact_name" name="contact_name" size="30" class="required" minlength="2" value="[[!+fi.contact_name]]" /> </div> <div> <label for="contact_email">E-Mail </label><em>(required)</em><br /> <input id="contact_email" name="contact_email" size="30" class="required email" value="[[!+fi.contact_email]]" /> </div> <div> <label for="contact_phone">Phone </label><em>(optional)</em><br /> <input id="contact_phone_NA_format" name="contact_phone_NA_format" size="14" class="phone" value="[[!+fi.contact_phone_NA_format]]" maxlength="14" /> <label for="contact_ext">ext. </label> <input id="contact_ext_NA_format" name="contact_ext_NA_format" size="5" class="ext" value="[[!+fi.contact_ext_NA_format]]" maxlength="5" /> </div> <div> <label for="contact_message">Your comment </label><em>(required)</em><br /> <textarea id="contact_message" name="contact_message" cols="70" rows="7" class="required">[[!+fi.contact_message]]</textarea> </div> <div> <input name="submit" class="submit" type="submit" value="Submit"/> </div> </form>
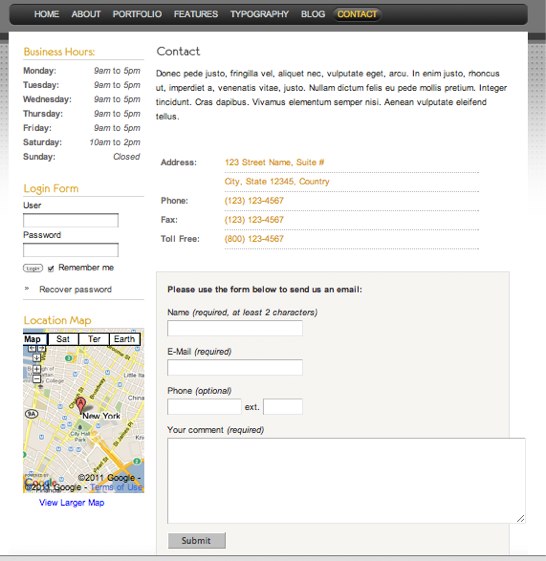
Once I save the page and preview it looks like this:
So my form looks fine, just like the original thing. But we need to test to see if it works with MODx doing all the processing. Before we test it, let’s create the message that will be sent to the recipient from the website. This is the emailTpl chunk we specified in our FormIt call.
We use placeholders to send as much information as we want from the form, and we reference these by using the names of the fields we want. In my case I want to know all the details and contact info entered into the form. So I create the chunk sentEmailTpl and add the following to it:
[[+contact_name]] left you the message below on the Learn MODx Revolution website: <br /> <strong>[[+contact_message]]</strong><br /> You can respond to [[+contact_name]] by email at <a href="mailto:[[+contact_email]]">[[+contact_email]]</a> or by phone at [[+contact_phone_NA_format]] (ext[[+contact_ext_NA_format]]
From what we’ve learned so far you can deduce what will happen. FormIt and the MODx parser will pick up the values from the contact form and insert them into the placeholders in the email that I receive.
Now that we have all that in place, let’s test the contact form.
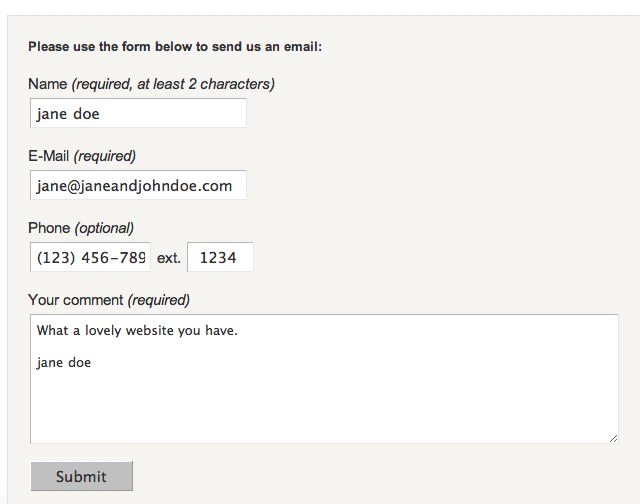
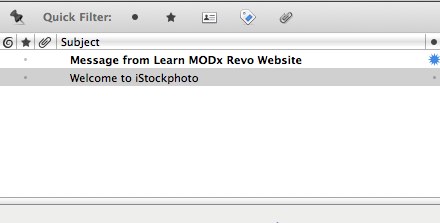
Checking my email, the message from the form has been successfully received:
You can see that the text we entered into the subject parameter of the FormIt call appears as our subject line.
Let’s open the message and see if the placeholders have been correctly replaced with the actual contents of the form:
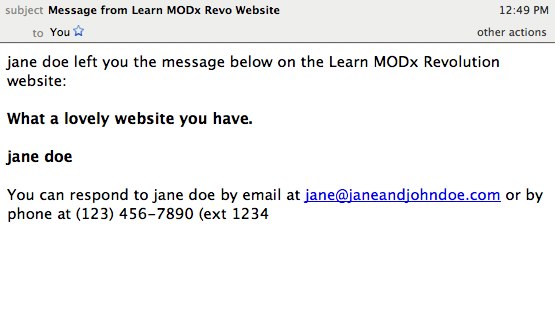 The only thing I did notice is that I forgot to add the closing parenthesis after (ext in my tpl 🙂 Other than that it looks like the form is working great so far.
Adding Validation
Now the next thing you’ll notice is that this form has certain fields that are supposed to be “required” fields, namely the name, email, and comment fields. Additionally, the name needs to be at least two characters long.
We add validation to our form using the &validate property (see link at the bottom of the post). There are several inbuilt validators and we’re going to apply those to our call. One thing to note is that validators can be chained, so if you need to validate several things on one field, e.g. the name being required AND being more than two characters, then you can chain those together. So for the name field, the first step would be to require the name:
&validate=`contact_name:required`
Now we add the second part, which is that it should be at least two characters:
&validate=`contact_name:required:minLength=`2` `
An important thing to note here is that in a case like this, where you end up with two backticks next to each other (at the end), separate them with a space.
NB: Just a quick add here: Shaun McCormick (developer of the FormIt snippet and one of the core MODx developers) just taught me something new in the comments section. Instead of worrying about placing a space between the two backticks, you can use the ^ character instead:
…on nested validators that pass parameters, you can do this:
&validate=`contact_name:required:minLength=^2^`
Note the ^ instead of the inner `; this prevents collisions with the outer `.
Thanks for that Shaun 🙂
OK, with this bit of knowledge in place, let’s go on and add validation to our FormIt call.
[[!FormIt?
&hooks=`email`
&emailTpl=`sentEmailTpl`
&emailSubject=`Message from Learn MODx Revo Website`
&emailTo=`me@myemailaddress.com`
&validate=`contact_name:required:minLength=`2`,
      contact_email:email:required,
      contact_message:required`
]]
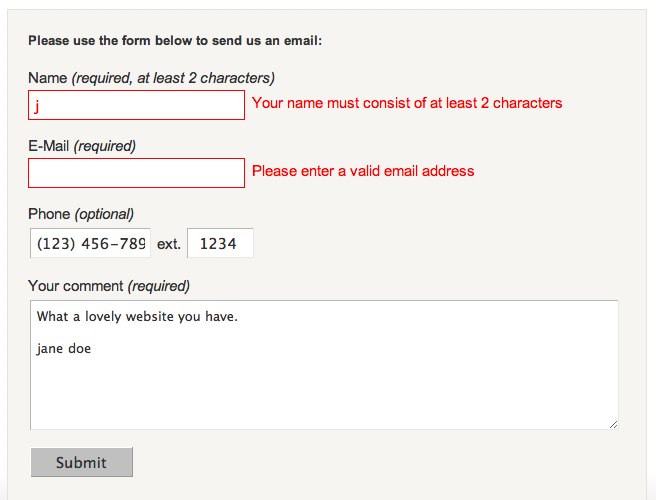
So if jane doe was now to try to send a message through our form with only her first initial and no email address, the form would not submit and would instead have some clear error messages displayed:
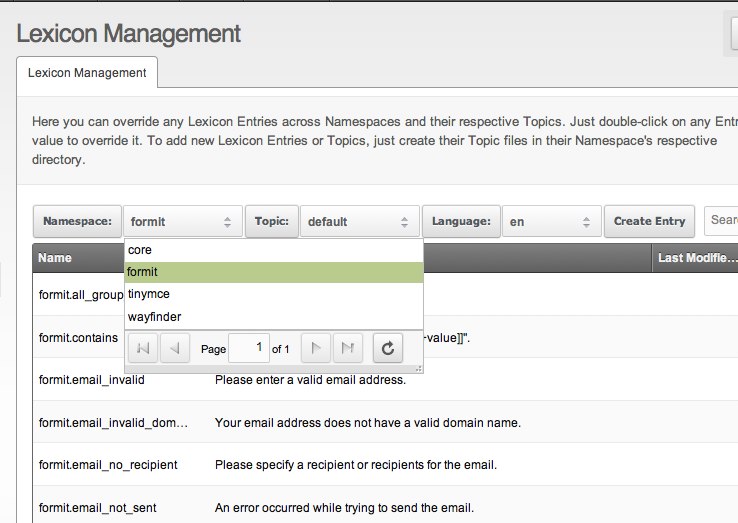
If you’re wondering where these error messages come from, they’re set in the Lexicon under formit. Go into System->Lexicon Management, and then change the Namespace from the default “core” to “formit” and you will see them all listed there. If you want to you can change them or even add your own.
We could go on and create a custom validator for the phone number field but that is a topic for another tutorial 🙂
Handling Spam Attempts
So now we know our form is working, we’re receiving messages, and the field validation is working, we need to consider how to deal with bots attempting to send spam through our form. FormIt has two inbuilt ways of handling this. One is the spam hook, and the other is the reCaptcha hook.
What the spam hook basically does is to check the fields you specify against a spam filter via http://www.stopforumspam.com/. If it matches then an error is displayed against the field(s) and the message is not sent. You can read more about it here: http://rtfm.modx.com/display/ADDON/FormIt.Hooks.spam. We will use the default values of the spam hook which check against the email address field.
So in our FormIt hook parameter let’s add the spam hook:
&hooks=`spam,email`
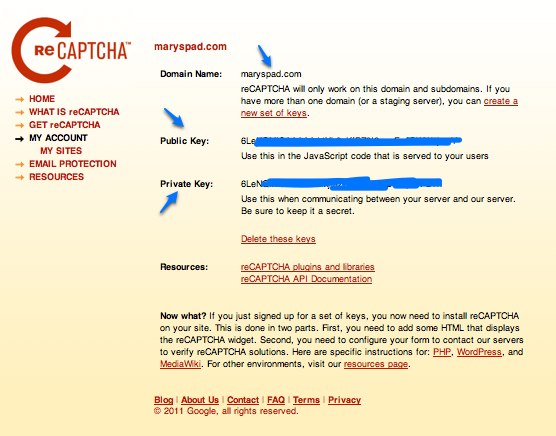
The reCaptcha hook works with the reCaptcha service to provide reCaptcha support to your form. To use reCaptcha, you first need to have a free account at http://www.google.com/recaptcha. Once you create an account, add your site domain and you will be provided with two keys, a private key and a public key. You can use these keys on the domain you specified and any of its subdomains. If you chose to create a global key then you can use it across multiple domains.
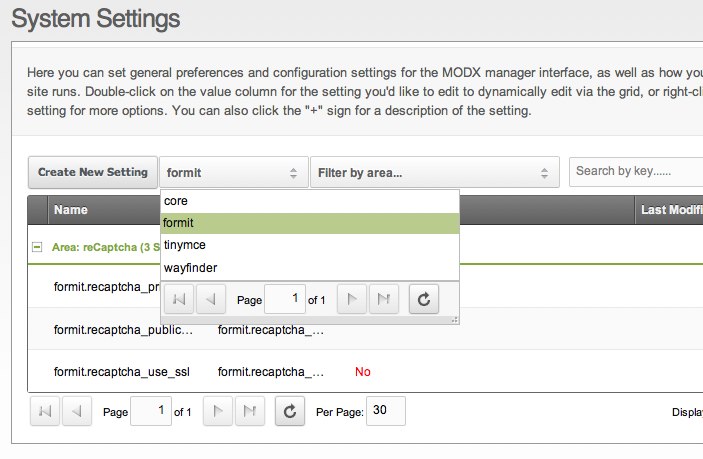
We now need to enter these two keys into the System settings for formit. Go into System->System Settings, and switch from the default core to formit.
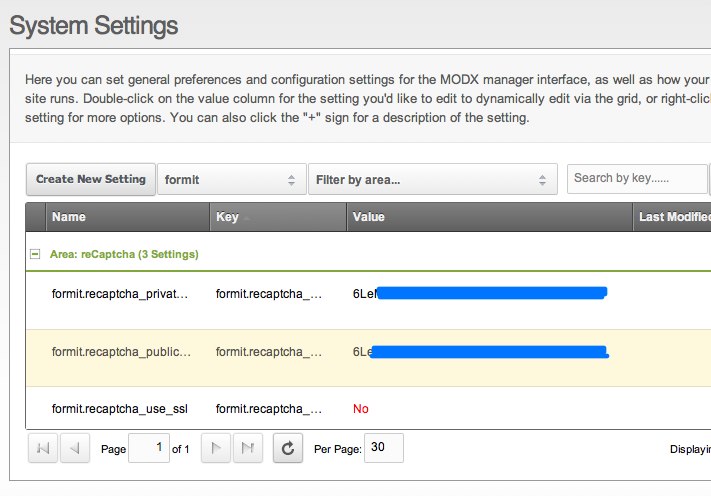
You will then be presented with three fields, one for the private key, one for the public key, and one that asks if you want to use SSL. Enter the keys from reCaptcha into the two fields:
OK, now with this in place, we can add the recaptcha hook to our FormIt call:
&hooks=`recaptcha,spam,email`
Note that the order in which we are placing these hooks is important. Remember we stated before that hooks are executed sequentially, and if one hooks fails the subsequent ones won’t execute. Therefore it’s crucial that the spam hooks come before the email hook.
For the reCaptcha to show on our form, we need to add the placeholders for it into our form code. So let’s go into the contact page and add the following placeholders where you want the recaptcha to appear:
[[+formit.recaptcha_html]]
[[!+fi.error.recaptcha]]
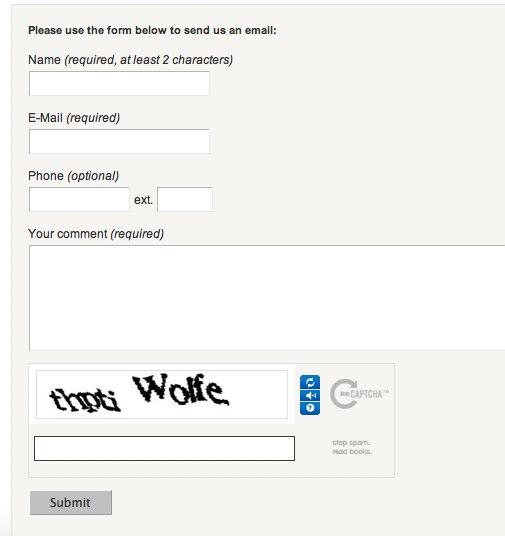
My form now looks like this:
Redirecting to a Success Page
As the form is now, once the message is successfully sent, the user is brought back to the blank contact form. We can change that so that the user is sent to a page that states that the message was sent successfully. To do this we use the redirect hook. We need to then specify what page the user should be redirected to by using the redirectTo parameter, and adding something like &redirectTo=`123`, where 123 is the page ID of the page to go to. I therefore simply add the hook (to the very end of the list of hooks) and add the redirectTo parameter:
[[!FormIt?
&hooks=`recaptcha,spam,email,redirect`
&emailTpl=`sentEmailTpl`
&emailSubject=`Message from Learn MODx Revo Website`
&emailTo=`me@myemailaddress.com`
&validate=`contact_name:required:minLength=`2`,
      contact_email:email:required,
      contact_message:required`
&redirectTo=`10`
]]
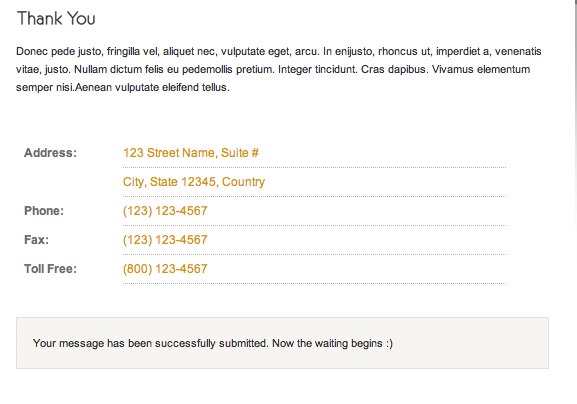
Now when the form is successfully submitted, the site visitor will be sent to the page with an ID of 10, which is a thank you page that I have created and hidden from menus.
The last hook we’re going to tackle in this post is the FormItAutoResponder hook, and what this does is send an autoresponse to the form submitter. This hook has several properties (http://rtfm.modx.com/display/ADDON/FormIt.Hooks.FormItAutoResponder) but we’re only going to use a few of them for our form.
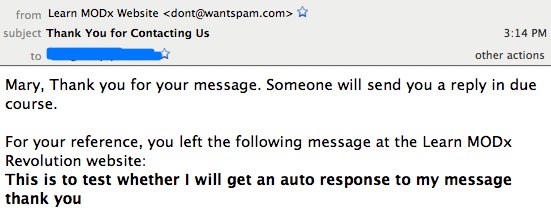
The first thing we need to do is create a tpl containing the email to be sent back. This is the only required property. I create a chunk called autoResponseTpl and add the following to it:
[[+contact_name]], Thank you for your message.  Someone will send you a reply in due course.<br />
<br />
For your reference, you left the following message at the Learn MODx Revolution website: <br />
<strong>[[+contact_message]]</strong><br />
As you can see, I have once again used placeholders like I did in the sentEmailTpl. Now I need to add the FormItAutoResponder hook and its properties to my FormIt call as below:
[[!FormIt?
&hooks=`recaptcha,spam,email,redirect,FormItAutoResponder`
&emailTpl=`sentEmailTpl`
&emailSubject=`Message from Learn MODx Revo Website`
&emailTo=`me@myemailaddress.com`
&validate=`contact_name:required:minLength=`2`,
      contact_email:email:required,
      contact_message:required`
&redirectTo=`10`
&fiarTpl=`autoResponseTpl`
&fiarSubject=`Thank You for Contacting Us`
&fiarToField=`contact_email`
&fiarFromName=`Learn MODx Website`
]]
You can see from the call above that I have added not just the required properties but also some of the optional ones. The important one to note is the &fiarToField which I have set to contact_email. This is important because if you don’t set it it defaults to “email” but your email field may have a different name, as is the case with mine.
I will test this form by sending a message through the form using one of my email addresses. When I check that email address I see that I have received an autoresponse from the form with the subject line as I specified in the &fiarSubject property and the send from name as in the &fiarFromName property:
And as you can see on opening the email the message matches what we placed in our autoResponseTpl chunk:
Conclusion
In this installment, we have learned how to use the FormIt snippet to process a contact form in our MODx Revolution website. We have explored the different hooks and the basics on how to use them. We now have a functioning form, being processed entirely by MODx but matching in look and feel to our template 🙂 There is a lot more you can do with FormIt and we will be exploring it in more detail in future tutorials.
Need something to do before the next tutorial? Explore the FormIt Retriever snippet and see if you can integrate it into your contact form 🙂
I look forward to your feedback, comments, and questions.
More Reading:
FormIt official Documentation
FormIt Hooks
FormIt Validators
FormIt Tutorials and Examples
Adding an Attachment Field to a FormIt Form
Go to Part 10: Using getResources to Aggregate Content in MODX Revolution

Mary, great tutorial! Always look forward to these. And glad to see FormIt getting some love.
By the way, on nested validators that pass parameters, you can do this:
&validate=`contact_name:required:minLength=^2^`
Note the ^ instead of the inner `; this prevents collisions with the outer `.
Thanks again!
Hi Shaun
Thanks for the feedback! It means a lot coming from you 🙂
I didn’t know you could use the ^ character there. Will add that to the post 🙂
thanks again
mary
Thanks for very detailed tutorial Mary! 🙂
Thanks Zi, appreciate the feedback 🙂
Great tutorial! Will be on my development guides on my company, for everyone to follow!
Thanks for the feedback Daniel, glad the tutorial is helpful 🙂
mary
Great stuff.
The one thing that does not work for me is the validation.
My call:
[[!FormIt?
&hooks=`email,redirect`
&emailTpl=`sentEmailTpl`
&emailSubject=`Message from the Melatonin Cream website`
&emailTo=`name@email.com`
&validate=`contact_name:required:minLength=`2`,
contact_email:email:required,
contact_message:required`
&redirectTo=`6`
]]
Max
What happens when you leave the required fields blank, does the form still submit?
One thing to make sure of is that you’re using the correct field names. Make sure your form’s name field has the name “contact_name”, etc. If they don’t, replace those values in your call with the actual names of your fields. I think I recall you saying you were using a different template, so your fields may have different names.
Let me know if this is the issue
mary
This is the whole call and form. Everything works, even the catcha, but the validation function does nothing…
[[!FormIt?
&hooks=`recaptcha,spam,email,redirect`
&emailTpl=`sentEmailTpl`
&emailSubject=`Message from the Melatonin Cream website`
&emailTo=`name@email.com`
&validate=`contact_name:required:minLength=`2`,
contact_email:email:required,
contact_message:required`
&redirectTo=`6`
]]
Please use the form below to send us an email:
Name (required, at least 2 characters)
E-Mail (required)
Phone (optional)
ext.
Your comment (required)
[[!+fi.text]]
[[+formit.recaptcha_html]]
[[!+fi.error.recaptcha]]
Max,
Not sure what could be going on here. Can you give me a link? You can shoot it to me via email or on the forum PM if you want and I’ll have a look-see
mary
I am making progress:
See this thread on the MODx forums:
http://modxcms.com/forums/index.php/topic,62066.0.html
Max, yeah I was just reading that thread and left a question for Shaun. I’ve never actually needed to use &submitVars, my FormIt calls seem to work fine without that property… LOL. I also realized the error with the [[!+fi.name]] etc placeholders after Peter commended that his fields were not remembering their values if he entered the wrong captcha. But even with those placeholders not in place the form was working and validating fine, so not sure what’s different between your setup and mine.
Anyhow, glad you’re making progress 🙂 Let me know if you get it all sorted.
mary
Thanks Mary,
After Shaun posted that one error I clicked with what needed to be done elsewhere. The form is working fine now. Little strange to wrap your head around at first.
I like how many CSS classes the form uses: lots of custom styling is easy to do as a result.
What I really dislike has nothing to do with FormIt or MODx, but rather with the recaptcha system itself. While testing my form (countless times) I found that I needed to reload the recaptcha two or three times before I could read it clearly. Its usually so visually garbled and hard to read…
Max
Yeah, the reCaptcha can be a pain. I think that there are different themes and you can specify which one you want, but I’m not entirely sure if that’s helpful
mary
Currently, I faced the same issue. The thing is validation is working but not displaying. To fix this you need to use [[!+fi.error.attribute_name]] in your Contact form.
Always read manuals =)
http://rtfm.modx.com/display/ADDON/FormIt.Examples.Simple+Contact+Page
HI nice tutorial, i wonder if there is a way to add and attachment…. thanks
Martin
Yes it’s possible, I will post a quick tutorial on that soon
mary
Thanks i will appreciated, in the meantime, i will use an inline frame running a php form, thanks
Martin
The tutorial is up 🙂
https://codingpad.maryspad.com/2011/03/09/modx-revolution-adding-an-attachment-field-to-a-formit-form/
mary
Hi Mary!
Great tutorial! Just one question about the lexicon manager. I need the error messages to be german. Since version 1.4.1 there should be a localization via the &language parameter. I set it to &language=`de` but it did not work.
As I read in an other forum there must be the core/components/formit/lexicon/de/default.inc.php file wich is there and correctly translated.
What I am doing wrong?
Thanks! Peter
Not too sure about this since I don’t have any experience doing multilingual stuff in MODx. Might be a good idea to look on some of the international forums.
Hi Peter,
I have the same problem for my Dutch site. Did you already find the solution to the problem?
Kind regards,
Joost
– Does your core/components/formit/lexicon/nl/default.inc.php file exist?
– Are you using back ticks instead of apostrophes in your call? (&language=`nl`)
– Try clearing your site cache as well, that helps sometimes 🙂
Default.inc.php is available
I’ve have already cleared the cache.
The code for the contact-page is over here:
http://forums.modx.com/thread/76242/changing-formit-error-language-doesn-t-work#dis-post-421944
I found this thread at the forums, see if it helps out.
http://forums.modx.com/thread/?thread=47564&page=1
If not, can you paste your full formit call to see if I can spot anything out of the ordinary?
Hi Diego,
couldn’t answer directly to your last reply.
The full code is in de pdf.link below the article
http://forums.modx.com/thread/76242/changing-formit-error-language-doesn-t-work#dis-post-421944
Good evening,
is there anyone who has a working formit-page with the &language-tag? Mine is still not working fine.
Thanks!
Hi Peter,
It looks that you have the default setting in Systemsettings for cultureKey set to ‘en’. Just change this value to your language ‘de’ and all messages in FormIt wil appear in your language.
No need for &language in your FormIt-call
The cultureKey is a systemwide setting which other extras will also use so it’s important to set this key always to the right language!
Hi Mary
If I misstype the reCAPTCHA key, all my entries in the fields are gone and I have to retype them. Is there a way, just to reload the reCAPTCHA not the whole form?
thanks,
Peter
Peter
Ah, this was an omission on my part. What I forgot to mention is that you need to set what’s in the “value” attribute of each field to match the field name. So for example in my case, for the “name” field, I need to have the placeholder be [[!+fi.contact_name]] instead of [[!+fi.name]] as I mistakenly had it.
I have edited the post to reflect this change.
Sorry about that
mary
Thank you Mary! Its now working perfectly.
Peter
Hi, Mary!
After Formit9 screenshot instead of
“one for the private key, one for the private key”
put “one for the private key, one for the public key”
Viktor
ThanksViktor, that’s what I get for typing too fast. Corrected 🙂
mary
In screen Formit14-2 you hide you e-mail but in previous chunk I can read it 😉
Hi Mary!
Because you are doing such a great job in explaining and and giving tutorials, I would like to ask you, if there is a gallery/galleriffic tutorial in developmet 🙂
I know, it has nothing todo with forms, but that would be really great!
br
Peter
Peter
Time is my only constraint. Blogging doesn’t pay my bills, so I only do it in my ever diminishing free time. But it’s on my list and when time permits I will write one.
mary
Yet another awesome tutorial, Mary. Thanks for making an easy-to-use CMF (MODX.com) even easier!
Thanks for the tutorial , it’s not that confusing like others:) great work 😉
Nice tutorial Mary!
Just wondering… the FormIt snippet itself should be uncached right? And the placeholders in the form, the input values and the error messages… can they be cached?
Martijn
That’s a good question, but I’m not entirely sure what the correct answer is. I haven’t tried to call the placeholders cached, but I suspect you may get some errors on the users end. Someone else may have some insight into this…
mary
Hi Mary, your tuts are the best, they’ve made the learning curve so much smoother since I found them. I’m wondering if you can help me with Formit.
I’ve been banging my head against the wall for some time now, I just can’t understand what I’m doing wrong. I can’t get two formit forms to work on the same page, they work fine separately.
In the manual it says to “set the &submitVar property on your Snippet call to a name of a form element within the form”
So I’ve created a hidden input element:
Code:
input type=”hidden” name=”message”
And I’ve added the following to my formit call:
Code:
&submitVar=`message`
I did that on both forms (obviously with different names), Am I missing something?
Please help I’m stumped
I just occurred to me that &submitVar would reffer to an element within the submit type input tag, duh! But still nothing 🙁
Here’s my call:
[[!FormIt?
&emailTpl=`send_mail`
&emailTo=`example@example.com`
&emailFrom=`Site`
&emailSubject=`Contact message from website`
&redirectTo=`9`
&submitVar=`message`
&validate=`email:required`
]]
And my submit button:
So I have two different forms, with different names and submitVar calls
I’ve probably looked at it for too long, can anyone catch what I’m doing wrong?
Thanks again.
Hey Mary,
I kind find it silly to ask you because I do something (probably small) wrong. I’ve configured my mail-settings. Formit snippet-call sends an email BUT. The contents of the recieved email is just the raw sentEmailTpl! Basically the mailform is not get processed! What did I do wrong?
myradon
What’s in your sentEmailTpl chunk? Can you post it here?
mary
Okay mary this is my sentEmailTpl;
[[+contact_name]] left you the message below on the Learn MODx Revolution website:
[[+contact_message]]
You can respond to [[+contact_name]] by email at [[+contact_email]]
Had it first in a TV and later put the code in main template. The result is the same.
This code is in my main template;
[[!FormIt?
&hooks=`email`
&emailTpl=`sentEmailTpl`
&emailSubject=`Message from Learn MODx Revo Website`
&emailTo=`raymond@xy.z`
]]
[[$webform]]
OK, what’s in your webform chunk? The one thing I can think of that would cause this behavior is that your field names aren’t matching your placeholders. Since the form is sending, I suspect the issue isn’t your FormIt call itself
mary
I double checked these placeholders. It’s minus the fn.-part and no no-caching. The same as your tutorial.
Okay [[$webform]];
Name
Email
Your Message
[[!+fi.contact_message]]
Okay try it again without html code-element
chunk;
Name
Email
Your Message
[[!+fi.contact_message]]
The comment form is weird about code. Try putting spaces between the < and the tag so that the comment form doesn't parse it.
The form-it snippet-call is in the main-template;
[[!FormIt?
&hooks=`email`
&emailTpl=`sentEmailTpl`
&emailSubject=`Message webform with subject: [[+contact_subject]]`
&emailTo=`raymond@xy.z`
]]
[[$webform]]
————————————————————————————————————————–
The webform chunk;
Name
Email
Subject
Your Message
[[!+fi.contact_message]]
————————————————————————————————————————–
The sentEmailTpl chunk;
[[+contact_name]] left you the message below on the Learn MODx Revolution website:
[[+contact_message]]
You can respond to [[+contact_name]] by email at [[+contact_email]]
Looks like nothin’ is getting parsed. the contact_subject placeholder in the FormIt-property emailSubject is just showing just as [[+contact_subject]] in the subject of the email.
Okay spacing doesn’t work! I’ve put an pdf on my webserver; url is http://www.myradon.nl/uploads/formit.pdf
Ah I think I see the problem. You need to change the names of your form fields to match your placeholders, or vice versa. Try using this: (remove the spaces inside the tags)
The webform chunk;
< form id="contactform" method="post" action="[[~[[*id]]]]" >
< p >< label for="name" >Name< /label >< /p>
< input type="text" name="contact_name" id="name" placeholder="First and last name" required tabindex="1" value="[[!+fi.contact_name]]" />
< p >< label for="email">Email< /label >< /p>
< input type="text" id=email name="contact_email" placeholder="your mailaddress" required tabindex="2" value="[[!+fi.contact_email]]" / >
< p >< label form="subject">Subject
Hope that makes sense. The names of your fields need to match your placeholders
mary
for some strange reason I couldn.’t reply for a few days. It worked thanx
Great Tutorial … as always .. a great companion to the official documentation.
The Email Form works fine here, and i am trying to take it a step further. Currently i am building an omnipresent popup email-form (with jquery tools’ overlay), i would like to avoid ‘redirect’ to another page. Any clues on redirecting to the same page with a confirmation message that the email has been sent? Or better displaying a ‘succes message’ without leaving the email-form ?
Optiki
I’m pretty sure this can be done, but I don’t have the jQuery chops to tell you how 🙁 May be a good qn for the forums, or someone else here may have some ideas for you.
mary
I’m kinda new to MODx and so i need this confirmation message as well. The client wants it bad. 😀
Like other forms how about a simple javascript that displays the message after the form data passes the validation. Well, like I said, “I’m new to MODx” and I’m a bit scared to actually dig in and scratch the source code cos I’ve already upload the files on the server. Help!! 🙂
P.S. Tutorial’s great.
I took a sneak peak at the MODx forum and I found this.
[[+fi.success:if=`[[+fi.success]]`:eq=`1`:then=`Your message here`]]
The above code displays “Your message here” when the form is submitted. Just put it where you want the message to appear.
Now, below does the same thing, except that it’s a javascript(jquery) alert. Now I hope someone else might find this useful.
[[+fi.success:if=`[[+fi.success]]`:eq=`1`:then=`$(document).ready(function(){ alert(‘Thanks you’);});`]]
The script tags have been stripped out. 🙂
[[+fi.success:if=`[[+fi.success]]`:eq=`1`:then=`<script type=”text/javscript”>$(document).ready(function(){ alert(‘Thanks you’);});</script>`]]
Thanx Mary &Nghaka
I missed that one in the forums. Looking forward to testing it and posting a succes message.
Mary your great. The problem was the names not corresponding.
Hi Mary, Am new to MODX and your tutorials have been really helpful – thanks. I’m having trouble getting my contact form to work using FormIt however, any chance you could give me a couple of pointers? At the moment it appears to be doing nothing and there are no errors in my error log. I have the FormIt snippet tag in my template, a chunk containing the contact form itself, some text in the content and then of course the template chunk.
I have the following in my contact form template:
[[!FormIt?
&hooks=`email`
&emailTpl=`sentEmailTpl`
&emailSubject=`Message from Little Elves Pre School Website`
&emailTo=`my.email.address`
&validate=`contact_name:required:minLength=`2`, contact_email:email:required, contact_message:required`
&redirectTo=`1` ]]
[[*content]]
[[$contactform]]
and the following in my contactform chunk(only first line as it is quite a long file):
Your name:
Sent email template:
[[+contact_name]] left you the message below on the website: [[+contact_message]] You can respond to [[+contact_name]] by email at [[+contact_email]] or by phone at [[+contact_number]]
Is there anything i need to configure on my server? Any help or pointers greatfully received 🙂
Many thanks
Emily
So sorry for the delay in responding, not sure how I missed this comment 🙁 . I hope that by now you’ve solved this but if not, ping me back here in the comments and we’ll try to troubleshoot it for you. One good place to start may be to look at your error logs to see what messages are coming through.
mary
hi mary, just to note, on the instructions above indicating to validate entries
[[!FormIt?
&hooks=`email`
&emailTpl=`sentEmailTpl`
&emailSubject=`Message from Learn MODx Revo Website`
&emailTo=`me@myemailaddress.com`
&validate=`contact_name:required:minLength=`2`,
contact_email:email:required,
contact_message:required`
]]
this information is already included in the HTML code that is placed after the FormIt call in my content section. so without adding the above code, my contact form already displays these validating messages, i.e.:
[[!FormIt? &hooks=`email` &emailTpl=`sentEmailTpl` &emailSubject=`Message from Meritsharp Business Solutions` &emailTo=`info@meritsharp.com` ]]
Please use the form below to send us an email:
Name (required, at least 2 characters)
E-Mail (required)
Phone (optional) ext.
Your comment (required) [[!+fi.contact_message]]
ironchip, what the &validate=`contact_name:required:minLength=`2`, line does is to make sure that if the user enters less than 2 characters the message doesn’t go through and they get an error. Having that message in the HTML (“required, at least 2 characters”) is informative for the user but doesn’t actually enforce that requirement in the backend. Does this make sense?
Also, the same messages displayed in your post are displayed when I try to submit without including the “required” entries.
Just want to be sure I’m not doing anything double here.
By the way, love your posts, all of them. 🙂
ironchip
Not sure I follow what you mean here. Can you give a specific example?
oops, my bad, I thought I did. okay for example above in your instructions you have:
OK, with this bit of knowledge in place, let’s go on and add validation to our FormIt call.
[[!FormIt?
&hooks=`email`
&emailTpl=`sentEmailTpl`
&emailSubject=`Message from Learn MODx Revo Website`
&emailTo=`me@myemailaddress.com`
&validate=`contact_name:required:minLength=`2`,
contact_email:email:required,
contact_message:required`
]]
So if jane doe was now to try to send a message through our form with only her first initial and no email address, the form would not submit and would instead have some clear error messages displayed:
now when I initially setup my FormIt, and my Form html code, the validations were already contained in the from html code, for example, here’s my FormIt code:
[[!FormIt?
&hooks=`recaptcha,spam,email`
&emailTpl=`sentEmailTpl`
&emailSubject=`Message from Meritsharp Business Solutions`
&emailTo=`info@meritsharp.com`
&redirectTo=`10`
]]
and here’s my actual from html code:
Please use the form below to send us an email:
Name (required, at least 2 characters)
E-Mail (required)
Phone (optional) ext.
Your comment (required) [[!+fi.contact_message]]
[[+formit.recaptcha_html]]
[[!+fi.error.recaptcha]]
if you will notice in the form html code, the same validations you are saying to put in the FormIT code are already in place in the contact form’s html code. and the default error messages show up the same in both instances when a required field isn’t completed.
oops, i pasted the html code for the contact form, so lets try this again, here’s the contact form’s html code in plainn text as I constructed it:
don’t get me wrong, there’s nothing wrong with your instructions, it just threw me off a little when I got to the validating section, and my contact_form already had the validations in place from the beginning of this tutorial
see, here’s the code from the biginning of the tut, as you can see, the validators are already in place, so shouldn’t be a need to add them to the FormIt code, i was thinking
so if u got to my site, the form works exactly as you’ve outlined above, with the validators inserted in the initial contact_form html code, and not in the FormIt code itself….
am I beginning to ramble here? I’ll stop for now 🙁
Hi Mary, can you tell me where i can find FormIt Retriever snippet? Been looking all over, even in Package Management.
Trying to finish up this section before moving to next 🙂
ironchip,
that’s strange, I can’t find it either. Will ask around and see if I can find itNever mind, it’s actually part of the FormIt package, no need to install anything else.
cheers
mary
still no luck finding FormItRetriever? well, i’m on to the next section 🙂
I haven’t used it in a while so I forgot it’s actually part of the FormIt package, so you don’t need to install anything else. Once you install FormIt you have FormItRetriever, you just need to use it.
mary
I had a lot of difficulty figuring out how to email checkbox values in the form Tpl. That is the template that is used to send the form’s data to whomever it is supposed to be sent.
I messed around with the emailMultiWrapper and emailMultiSeparator hooks for a while. They did nothing that I could see, so I dropped them.
In the main part of the form you will need the email hook.
For example:
[[!FormIt?
&hooks=`email`
&emailTpl=`FormTpl`
…
and the form’s check boxes are defined like:
< input type="checkbox" name="product[]" value="qgps" /> < span >Q-GPS (CRM/Lead Management)< /span >
< input type="checkbox" name="product[]" value="qmenus" /> < span >Q-Menus (menu software)
…
(make sure you remove the extra spaces in the input and span tags)
The FormTpl can reference multiple check boxes and put their values comma separated on a single line like this:
Products:
[[+product.0:isnot=“:then=`[[+product.0]], `:else=“]]
[[+product.1:isnot=“:then=`[[+product.1]], `:else=“]]
[[+product.2:isnot=“:then=`[[+product.2]], `:else=“]]
…
Hope this helps.
Thanks for that Terry 🙂
thanks mary, i’ll hook it up
Aha, nailed it! (FormIt Retriever) Now on to the next tut 🙂
Hi Mary,
I tired to post a message here yesterday, but I’m not sure it worked?
Ah ha it didn’t work, let’s try again.
Mary,
Firstly, let me congratulate you on an awesome tutorial, which I have been following avidly and without hitch until now.
I’ve been struggling with getting validation to work. Perhaps it’s my rooky understanding, but frustration and sleep deprivation have lead me to post.
I have followed your instructions using the same template, but I have also been developing another site.
On the 7in1 template, validation works but not as I expected. It seems to rely on script.js for the field validatation rather than Validation in formit. Or am I missing some here?
I have used the following code as in your tutorial.
But if I change minlength, nothing changes.
Also, on the other website I’ve been creating (http://www.orcinusdesign.com/princegardens/index.php?id=13) validation is not working at all.
Please can you help?
Ok, so I have got a little further using the example on the MODX RFTM.
http://rtfm.modx.com/display/ADDON/FormIt.Examples.Simple+Contact+Page
But it’s still not quite there, I need to figure out how to format the error message and make it display if you click away from the form, rather than on submit.
More time to play this weekend.
Hi mary I’ve been dealing with this for several days. This example: http://rtfm.modx.com/display/ADDON/FormIt.Examples.Simple+Contact+Page has a form with check boxes ad radios. Well, at the bottom of the page we have:
This is the Formit Email Chunk.
[[+name]] ([[+email]]) Wrote:
[[+text]]
This is referencing only the name, email and text.
If you type [[+name]] you get ‘name’ but what about the check boxes and radios. E.g. mine is called [[+color]] where you have to pick red, blue or green. When I get the email with the results I get [[+color]]
So, my question is, how do you reference check boxes and radios? Any help? Thanks.
Done! I was testing FormIt with the MODx Sample Site 1.1.0-pl and it looks like the FormIt version shipped with it has some kind of problem. So, I just installed the latest version of FormIt and now everything is fine. Thanks.
Alex
Sorry it took me a while to respond, been buried in work recently. Glad you got it sorted. Thanks for sharing your solution.
cheers
mary
Thanks Mary for great tutorials and I appreciate that you spend your free time to support us and make modx easy ,
now I have got FormIt how it works, thank you again. My question is about ‘add comment’ to the page I’m asking if you can cover it in the near time , as you know it’s important part on the net.
I’ve followed your tut exactly but i do not get the red error messages when fields are left empty. I can locate the-
“If you’re wondering where these error messages come from, they’re set in the Lexicon under formit. Go into System->Lexicon Management, and then change the Namespace from the default “core” to “formit” and you will see them all listed there. If you want to you can change them or even add your own.”
…but once i locate these what am i supposed to do with them? Like i say, the red error messages do not appear at all
I’ve also just noticed on completing the last part of your tutorial, setting up an autoresponder to the website form user, that the message lands in the junk folder.. Any suggestions or pointers on how to minimise the possibility of this happening?
Is it also possible to give a thank you message on the page itself instead of redirecting to another page?
Hi Mary, thank you for the excellent MODx tutorials. I followed this Formit tutorial,
copied the html form into a chunk called [[$ContactForm]], created a chunk called [[$sentEmailTpl]], added the hook to the Contact page
so the contact page looks like this:
[[!FormIt?
&hooks=`recaptcha,spam,email,redirect`
&emailTpl=`sentEmailTpl`
&emailTo=`myemail@email.com`
&validate=`name:required,
email:email:required,
subject:required,
text:required:stripTags,
]]
[[$ContactForm]]
when I click Submit, the page does nothing, no message, its like theres no processing. I double chcked my Formit package its up to date. I think I missed a step somewhere.
Have you checked the error log?
Beware of the spam hook: when you enter an e-mail in your formfield which is the same e-mail as defined in the emailTo property, the submit won’t do anything. Just to prevent spamming.
Nice tutorial. 🙂 One thing I don’t get is what are the placeholders for in the input value fields? Also, is there a way to show a success message and hide the form after it has been sent? I’ve managed to get the success message to show, but so far I have no clue how to hide the form.
Hello Marry,
Great tutorial… I’ve almost troubleshooted my errors with these messages, but there is one more issue, and I can’t figure it out…
Everything is working exception made of the SentEmailTpl chunk not replacing the placeholder. I get the message, but it’s looking like this :
Bonjour ! “[[contact_name]]” vient de vous envoyer un message à partir du formulaire de contact du site RomeoRecords. Ce message peut être très important. Merci de le considérer de la plus haute importance. Ceci n’est pas un spam.
[[+contact_message]]
Vous pouvez répondre à [[+contact_name]] par mail à l’adresse [[+contact_email]] ou par téléphone au numéro [[+contact_phone_NA_format]].
Merci de ne pas répondre à ce message. Il est généré automatiquement à partir du site web.
This following is the content of the SentEmailTpl chunk :
Bonjour !
[[contact_name]] vient de vous envoyer un message à partir du formulaire de contact du site RomeoRecords. Ce message peut être très important. Merci de le considérer de la plus haute importance. Ceci n’est pas un spam.
[[+contact_message]]
Vous pouvez répondre à [[+contact_name]] par mail à l’adresse [[+contact_email]] ou par téléphone au numéro [[+contact_phone_NA_format]].
Merci de ne pas répondre à ce message. Il est généré automatiquement à partir du site web.
And this one is the form I’m using :
[[$header]]
[[$latest_news]]
Formulaire de contact
[[*content]]
[[!FormIt?
&hooks=`email`
&emailTpl=`sentEmailTpl`
&emailSubject=`Message envoyé depuis votre site internet RomeoRecords.be`
&emailTo=`webmaster@romeorecords.be`
]]
Votre nom:
Votre email:
Votre numéro de téléphone:
Votre message:
[[!+fi.contact_message]]
<!–Envoyer votre message !
–>
[[$footer]]
Do you see anything that could explain why it is not replacing the placeholders ?
Thanks for your support 🙂
I believe that the first placeholder is missing the leading +.
Bonjour ! “[[contact_name]]”
Maybe this one is blocking rest of generating the rest of the placeholders.
Yes indeed I had the plus sign forgotten. Now it is corected, but it still not change any placeholder. :s ouch…
Found it ! I totally forgot to put a name value in my fields. I have now added a name=”contact_name” value and now it’s working nicely 🙂
I cannot seem to get my validation to fire if someone tries to submit something that doesn’t meet the requirements. Can anyone see something that I’m forgetting?
Thanks in advance!
[[!FormIt?
&hooks=`recaptcha,spam,email`
&emailTpl=`sentEmailTpl`
&emailSubject=`New Prayer Request from Website`
&emailTo=`example@example.com`
&validate=`contact_name:required:minLength=^2^ ,
contact_email:email:required,
contact_message:required,
prayer_alert:required`]]
Please use the form below to submit a prayer request:
Your Name (required, at least 2 characters):
E-Mail (required):
Phone (optional): ext.
Include in the Weekly Prayer Alert?
[[!+fi.error.prayeralert]]
(Please select ONE)
Yes
No
Your Prayer Request (required): [[!+fi.contact_message]]
[[+formit.recaptcha_html]]
[[!+fi.error.recaptcha]]
Hello Mary,
May I ask something?
For the sake of simplicity I just copied the contact form you have along with the sentemailtpl chunk.
It can send email but I can not get the Redirecting to a Success Page to work. I have set up a page thank_you_email with id=8.
Do you have any idea what might be wrong? I skipped the validation part.
[[!FormIt?
&hooks=`email`
&emailTpl=`sentEmailTpl`
&emailSubject=`Message from test Website`
&emailTo=`email@test.com`
&redirectTo=`8`
]]
hello again,
my bad, I just found the error: I did not list the name of the hook in the &hooks= section.
hi im new in modx your tuts was great but im getting a hard time producing the same output like your’s?what do you think is the problem?
John
You need to be a bit more specific. What specifically are you having trouble with?