Welcome to part 3 of our series of tutorials on building a website with MODx CMS. So far we’ve looked at:
Part 1: Introduction to MODx
Part 2: Installing MODx
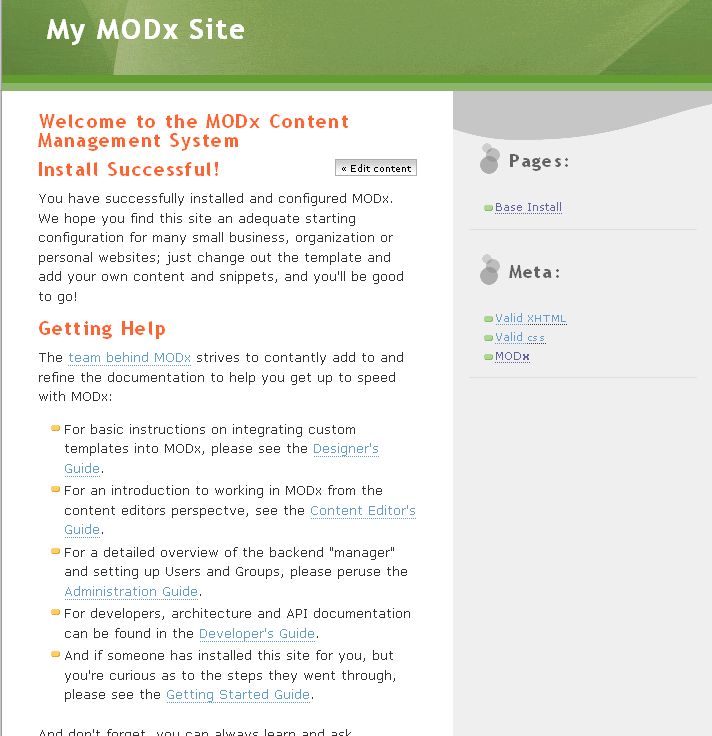
As we work through these tutorials, we’re building a MODx resource site called Learn MODx. So far our website looks like this: (you can click on the images to see a larger view)
If you recall, we didn’t install the sample website but instead opted for a minimal install, which I feel is cleaner and easier to work with. As I clarified in my addendum to the post on Installing MODx, Shane’s comment about the value of installing the sample website as a demo to see how MODx does things is an excellent idea. If you didn’t read the addendum to that post and the comments please do so.
In today’s post, we’re going to start looking at templating MODx. We’re going to begin implementing a new template to our site to give it a unique look and in the process we’ll learn about some of MODx’s template tags.
The first thing we need to do is find a template. If you know your way around creating coding HTML/CSS you can probably create your own templates to work with. MODx allows you to implement almost any template you can think of into your website. So that you can work with me through this tutorial if you want to, I will be using an open source template that you can download and use too, just remember to read the usage license so you don’t violate it.
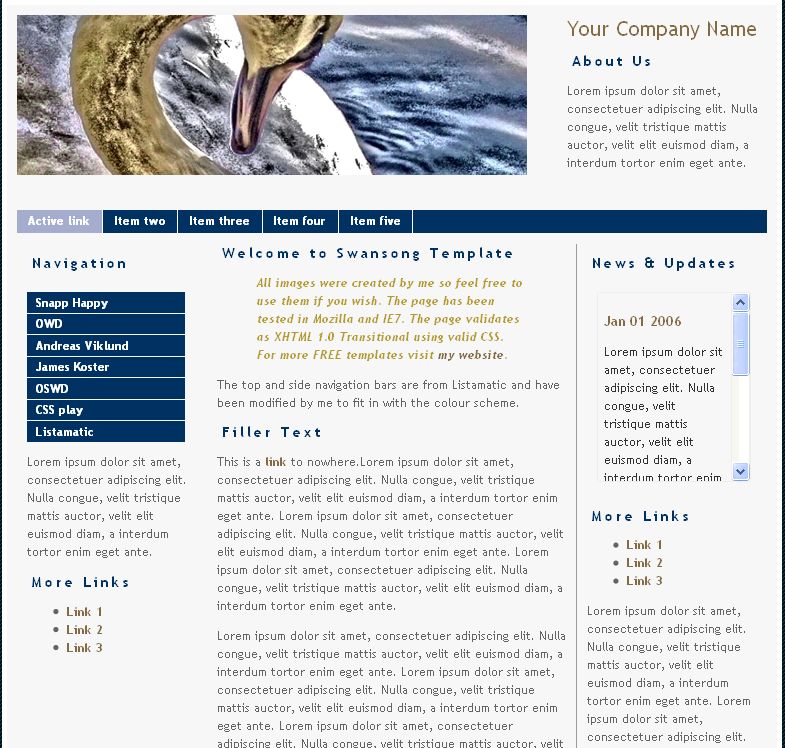
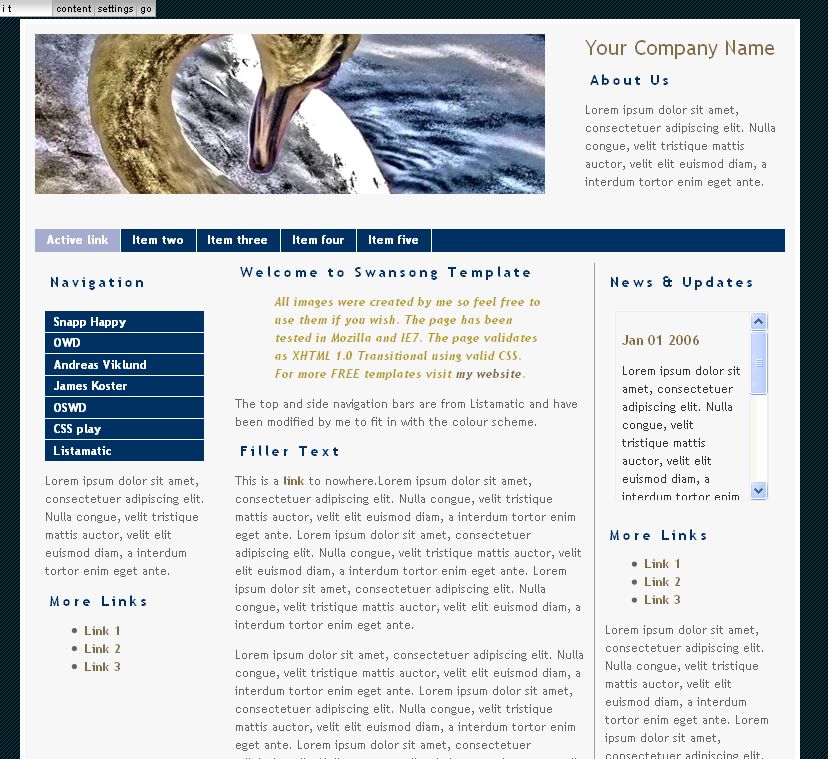
We’re going to use the Swansong template by Denise Mitchinson from Snapp Happy. It’s template #11 on her free template list, and you can preview it at http://www.mitchinson.net/designs/11_swansong/index.html. Below is a snapshot of the template:
I chose this template for this tutorial because it’s nice and simple, clean, and visually appealing to me. The usage license for this template allows me to use it as I please and even to modify it as long as I leave the creator’s link at the bottom. So keep this in mind as you follow along. There are numerous places on the web where you can find free templates to play with, and I’ve linked to a few of my favorite sources at the bottom of this post. Just remember to read the usage license before using the template.
If you’re working along with me, go ahead and download the Swansong template and unzip it on your desktop. The folder should contain an “index.html” file, a “style.css” file, a license txt file, and a folder named “img” with the template images in it.
I recommend that you make a copy of this template folder and keep the original one intact because we may need to reference it in the future.
Alright, let’s get busy and port this thing into our MODx site to give it a fresh unique look 🙂
The first thing I want to do a little site configuration in MODx. We will change the site name so that it starts to look more like our Learn MODx website and less like a default MODx site. Right now, the title bar looks like this:
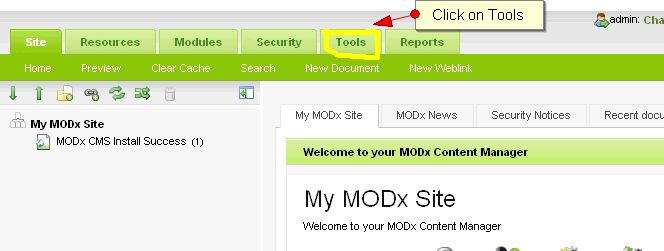
Let’s log into the administrative backend. You do this by appending /manager to your url. Once logged in, make your way to “Tools”.
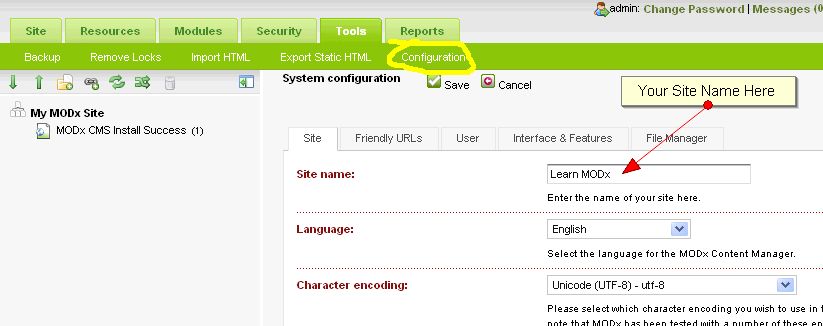
When the Tools tab is open, click on Configuration in the submenu. This is where you have all the options to configure your website, including setting your site information, clean urls, user management, and a ton of other things. We will explore all these in detail in later posts, right this moment I am only interested in changing the site name.
Save your configuration (all the Save links in the MODx manager seem to be at the top of the page :)). If we now look at the title bar, we now see the name of our website, Learn MODx, in the title bar.
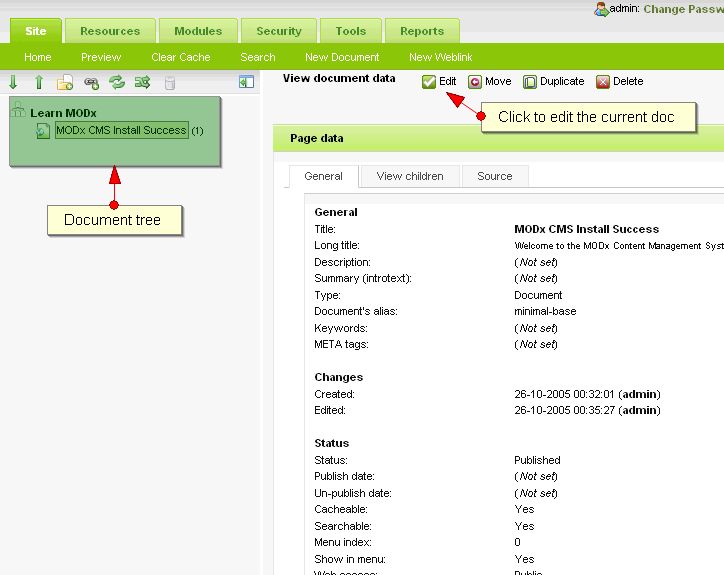
One more thing we need to do and then we’ll be ready to start porting. Let’s edit the content on the front page, remove the default MODx text and put our own. To do this, you can click on the document in the document tree and select edit on the pane to the right.
The MODx editor comes with the TinyMCE rich text editor installed which allows you to format text directly just like you word in a Word or a similar word processor. If you prefer you can turn this off.
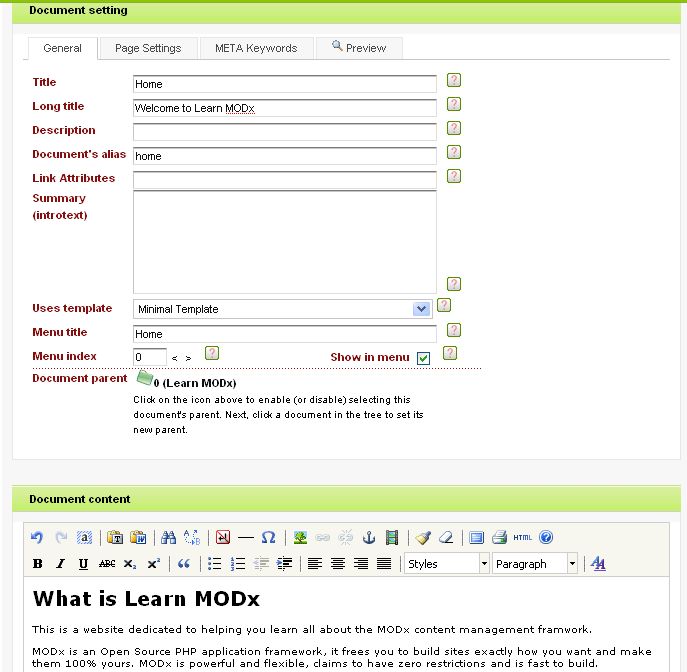
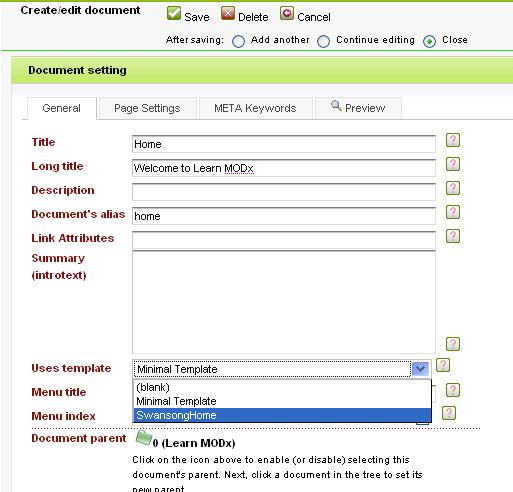
I’m going to edit just the General Settings of this document (title, long title, alias, and menu title as shown below, and then put my own text that I want to appear on the front page in place of the default document content. I will leave the template as it is because we haven’t ported our swansong template yet.
After you hit save, you will see that the name of the document has changed in the document tree and is now called Home. It has a number next to it in parenthesis, in this case (1). This is the document id and every document you create will have one. It’s an important identifier as you will see when we start working with snippets.
If we now navigate to the front page of our website (by clicking “Preview” or simply entering our url), you can see the change.
Now that we have some custom text and have configured the basic site information to show, it’s time to start porting our swansong template.
On your server, (WAMP, MAMP, remote…whatever you’re using), in your website folder where you uploaded the MODx files, we want to create a place to put the files for our template. I don’t believe there are any hard and fast rules as to where you place your template files (someone please correct me if I’m wrong). The MODx templates that come with the default install are found in the assets/templates folder, so it makes sense to use this as the folder for our templates too. I prefer to create a mytemplates folder where I keep all the templates I port into a website.
I will create a folder swansong, and in it create two new folders, images and styles. So I have:
assets/templates/mytemplates/swansong/images
assets/templates/mytemplates/swansong/styles
Copy the “style.css” file into the styles folder, and all the images in the “img” folder into the images folder.
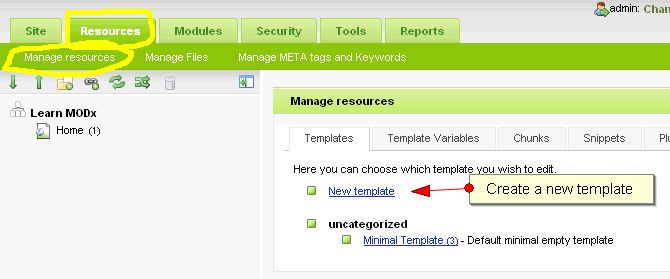
Now open “index.html” code in your favorite editor, mine happens to be notepad++. Navigate to your MODx administration backend, click Resources, and then under that click Manage Resources -> Templates.
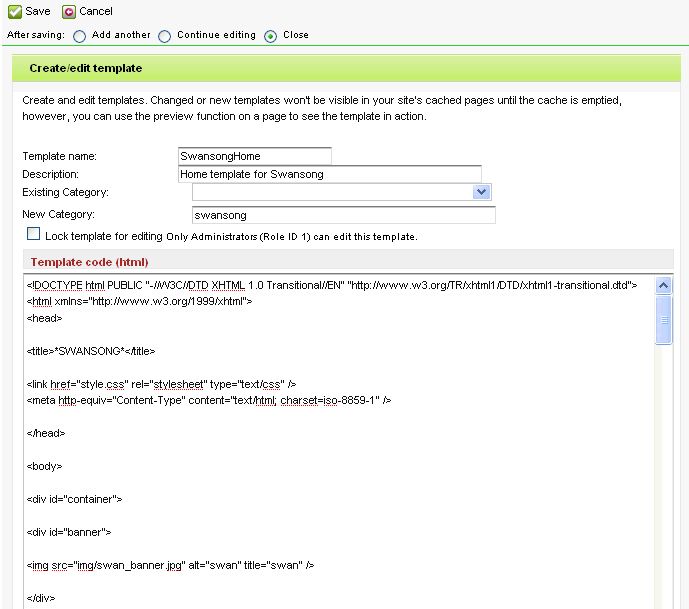
You can see on this screen that there’s already one template in place,the Minimal Template. This is the template our website is currently using. Let’s click on “New Template” to create a new template, and then enter the settings as shown below. We’re going to name our template SwansongHome, and place it in a new category “swansong”. This way we can keep our templates organized. We then paste the code from “index.html” into the body of the template.
We still have a lot of work to do on the template, but let’s apply it as it is, and see what happens. Click on Save to save the new template. Now navigate to your Home document and click on “edit”. In General Settings, under “Uses Template” click on the arrow and select our new SwansongHome template, which now shows up in the list.
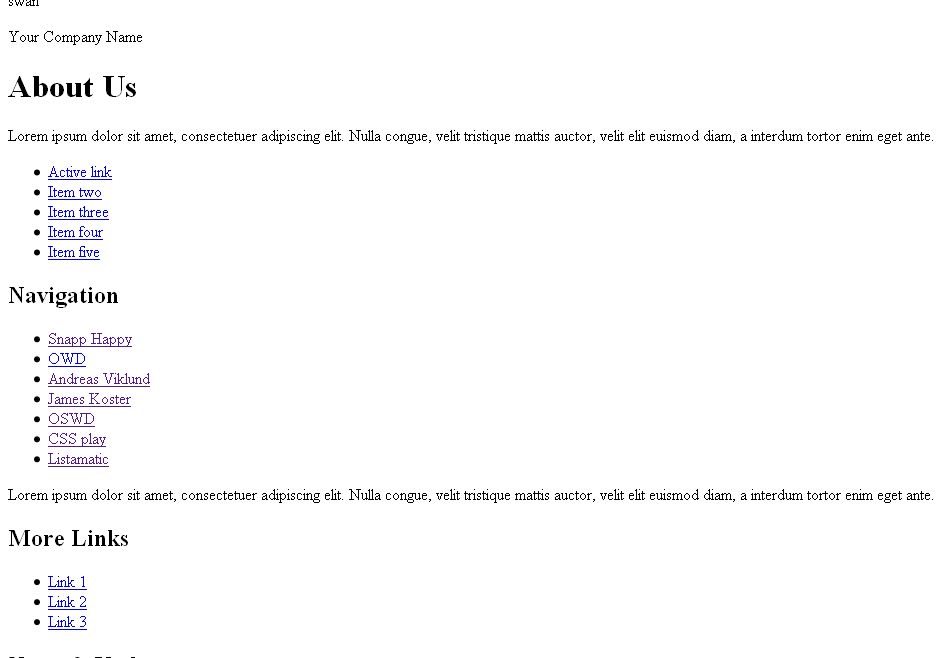
Once you select the new template, you’ll see a message warning you that you will lose unsaved changes, go ahead and click OK. Let’s then save the page and preview the website, and this is what we see:
Doesn’t look like much does it? Infact, it looks rather… plain! We lost all our nice text, we have no formatting, and our title bar no longer reflects our Learn MODx name, but instead reads “*Swansong*”. What to do, what to do?
Let’s go back into the Resources -> Manage Resources -> Templates screen again, and let’s open our swansong template. We know that in the process of uploading the template, we moved things about, changed the location of the css file and the images, and so we need to change the paths to those in the template. We also need to insert template tags so that our template can dynamically add the relevant page and site information to each page that we create.
We’re going to start off by inserting some Site Variables and Document Variables to our template.
Site Variables: Recall that in the site configuration we entered a name for our website? This is an example of a site variable. Site variables are taken from the site configuration and in some cases in the config.inc.php file that’s created when you install MODx. For example, sitename and charset (remember that from the installation?) are both site variables.
Site variables take the form [(sitevariable)].
Document Variables: While site variables are global to the site and output information that pertains to the whole website, such as the site name or the base url, the document variables relate to the particular document that you’re working with such as it’s title and its content. They take the form [*documentvariable*].
Let’s look at our template: At the top, right after the doctype declaration, we have
<title>*SWANSONG*</title>

<link href="style.css" rel="stylesheet" type="text/css" />
<meta http-equiv="Content-Type" content="text/html; charset=iso-8859-1" />
As you know from HTML the text inside the <title></title> tag is what appears in the title bar of the webpage. We could easily change the title to “Learn MODx”, but we want it to be dynamically generated from the site configuration, so we will use the MODx site variable. I also want the title of the page that’s open at any time to also appear on the title bar like so: Page Title – Site Name. To accomplish this, we replace SWANSONG in the title tag with [*pagetitle*] – [(site_name)].
Next, to allow our template to find the styles and image files, we need to declare our base url relative to which our paths will be declared. Therefore we need to add a base href statement and refer to our site url using the site variable [(site_url)] like so:
<base href="[(site_url)]" />
Next, let’s look at the link href line in the code above that references our css style sheet. We need to change that to reflect the new location of our style.css file. We know we have the style.css file in assets/templates/mytemplate/swansong/styles. Because index.html sits in the root folder of our site, we can simply change this line to
<link href="assets/templates/mytemplates/swansong/styles/style.css" rel="stylesheet" type="text/css" />
In the next line, we have the charset declaration. As Shane clarified in the comments to the last post, MODx does not tie you to any particular charset but, as we saw from the installation process, determines your charset and works with it. So we need to replace of the charset declaration in our template with the site variable [(modx_charset)].
Okay, so the section of code above should now look like this:
<title>[*pagetitle*] - [(site_name)]</title>

<base href="[(site_url)]" />
<link href="assets/templates/mytemplates/swansong/styles/style.css" rel="stylesheet" type="text/css" />
<meta http-equiv="Content-Type" content="text/html; charset=[(modx_charset)]" />
If you now save the document and then preview it, Voila!! Changes changes!
First and most obviously, our website is starting to look more like the swansong template. Second, you can see the title bar reflects both the name of the website and the page we’re on.
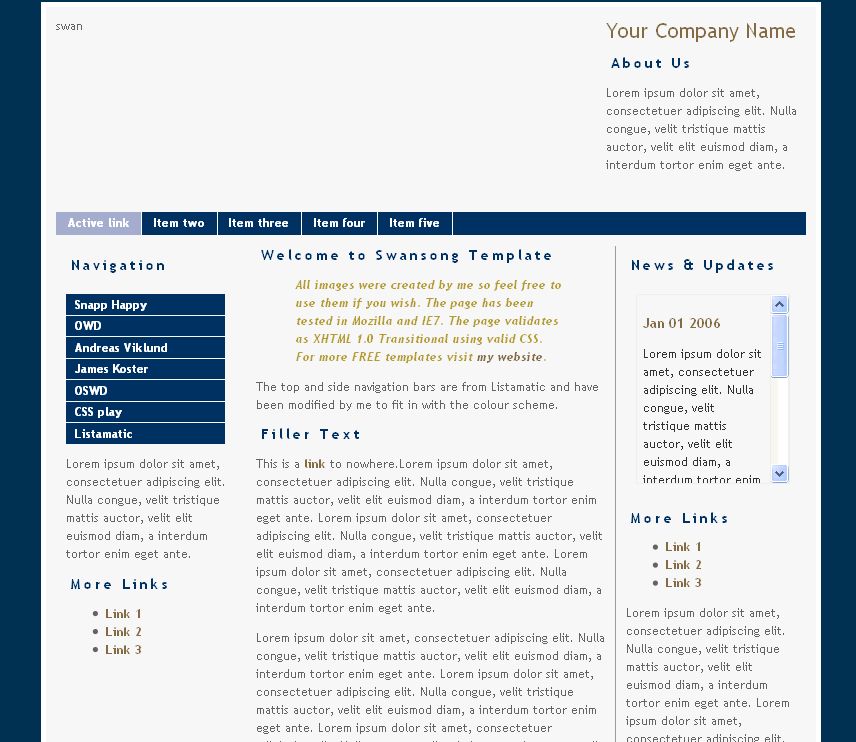
OK, we’re making some progress. But two things are still off, one is that our images aren’t showing, and the second is that we’re still showing the filler content from the template.
Let’s remedy the image issue first. To do this, we need to find every reference to images in the template and change the path accordingly. You can either do this by using search replace or by going through the template manually. If you have many images, it might make sense to copy your template code into something like notepad++ and then find replace all the base image references with your new path. In my case I would replace all “img/” with “assets/templates/mytemplates/swansong/images/”.
I actually only have one image here in the header so I’m going to go ahead and change that manually. I will replace
<div id="banner">

<img src="img/swan_banner.jpg" alt="swan" title="swan" />

</div>
in my template code with:
<div id="banner">

<img src="assets/templates/mytemplates/swansong/images/swan_banner.jpg" alt="swan" title="swan" />

</div>
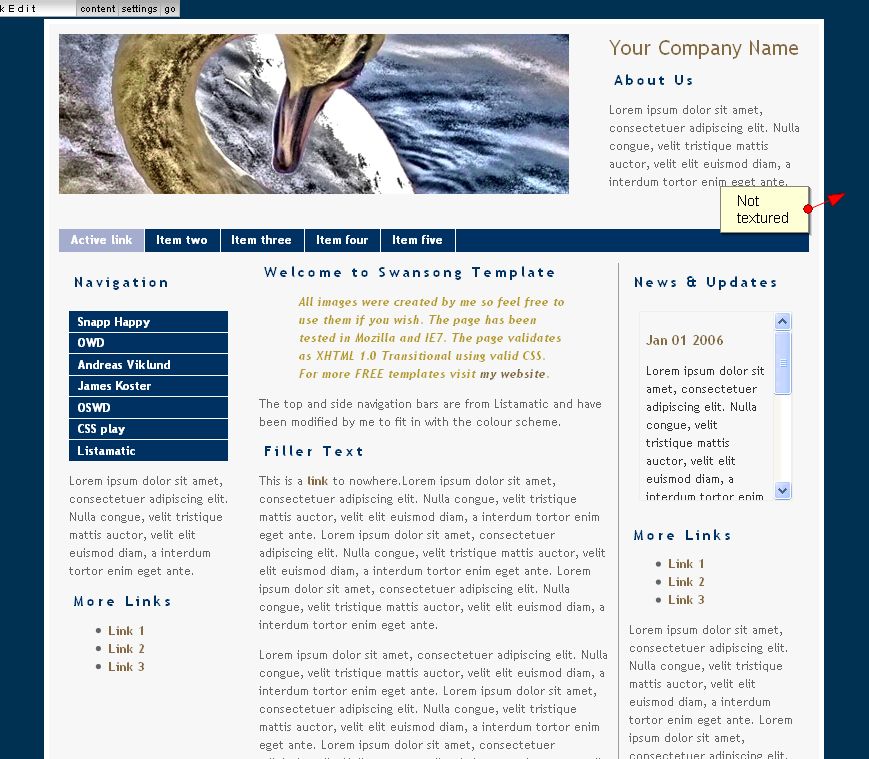
If we now save the template and preview our website, you can see the banner image of the swan now appears. However, our background around the main container (the bluish area) looks smooth, not textured like the template demopage (http://www.mitchinson.net/designs/11_swansong/index.html), which means the background image is missing.
Now in most (X)HTML/CSS based templates, images will also be referenced from the css file, so you need to make sure you look at your css file and change any paths there too so that the images show in your template.
We will edit our css file and then reupload it to the server. A lot of the editing that I’m doing at this stage can all be done offline as you’re creating your template and then uploaded, I’m doing it all online for purposes of demonstration so that we can see our changes as our website evolve step by step.
OK, looking at the css file, we need to find our image references and edit them to reflect the correct paths. In this case there’s only one right at the beginning:
body {
margin : 20px;
padding : 0;
font : 73% "Trebuchet MS", verdana, arial, sans-serif;
color : #666;
background : #003250 url(img/bgd.png) repeat;
}
The background image url needs to change to “../images/bgd.png”. So now that portion of the styles file should look like so:
body {
margin : 20px;
padding : 0;
font : 73% "Trebuchet MS", verdana, arial, sans-serif;
color : #666;
background : #003250 url(../images/bgd.png) repeat;
}
There are no other image references in our css file so we’re done. You need to go through your entire css file, and if your template uses multiple style sheets you need to go through all of them to make sure your images all have the correct path set.
If we now reupload our css file to the assets/templates/mytemplates/swansong/styles folder, and preview our website, you can see that our background now renders correctly and looks like the demo template page.
Beautiful! Images taken care of.
Now looking at our template, in the banner area we have an area to put some info about our company. I am going to change that next to reflect some information about our website.
<div id="bannerb">

<p class="sitename">Your Company Name</p>

<h1>About Us</h1>

<p>
Lorem ipsum dolor sit amet, consectetuer adipiscing elit. Nulla congue, velit tristique mattis auctor, velit

elit euismod diam, a interdum tortor enim eget ante. </p>

</div>
I will replace company name with my [(site_name)] tag and put a little blurb about Learn MODx in this area. My end result looks like this:
<div id="bannerb">

<p class="sitename">[(site_name)]</p>

<h1>About Us</h1>

<p>
Learning MODx, step by step.  Building MODx skills from novice to guru!</p>

</div>
The next step is to take care of the main page content. For now we will leave and menu, navigation, and sidebar stuff as it is, and tackle it in the next post when we talk about snippets and chunks. Scroll down in your template to the main content section which starts with the <div id=”content”> tag.
This content area is where our main content would appear for each page. We simply want to replace all the filler text in this area with a document variable for content. So we’re going to replace:
<div id="content">

<h1>Welcome to Swansong Template</h1>

<blockquote>All images were created by me so feel free to use them if you wish. The page has been tested in Mozilla and IE7. The page validates as XHTML 1.0 Transitional using valid CSS.<br />  For more FREE templates visit <a href="http://www.mitchinson.net" title="my website">my website</a>.</blockquote>

<p>The top and side navigation bars are from Listamatic and have been modified by me to fit in with the colour scheme. </p>

<h1>Filler Text</h1>

<p>This is a <a href="#">link</a> to nowhere.Lorem ipsum dolor sit amet, consectetuer adipiscing elit. Nulla congue, velit tristique mattis auctor, velit elit euismod diam, a interdum tortor enim eget ante.  Lorem ipsum dolor sit amet, consectetuer adipiscing elit. Nulla congue, velit tristique mattis auctor, velit elit euismod diam, a interdum tortor enim eget ante.  Lorem ipsum dolor sit amet, consectetuer adipiscing elit. Nulla congue, velit tristique mattis auctor, velit elit euismod diam, a interdum tortor enim eget ante. </p>

<p>Lorem ipsum dolor sit amet, consectetuer adipiscing elit. Nulla congue, velit tristique mattis auctor, velit elit euismod diam, a interdum tortor enim eget ante.  Lorem ipsum dolor sit amet, consectetuer adipiscing elit. Nulla congue, velit tristique mattis auctor, velit elit euismod diam, a interdum tortor enim eget ante.  Lorem ipsum dolor sit amet, consectetuer adipiscing elit. Nulla congue, velit tristique mattis auctor, velit elit euismod diam, a interdum tortor enim eget ante. </p>

</div>
with
<div id="content">

[*content*]

</div>
Save your template, and preview. Look at that thing of beauty!!
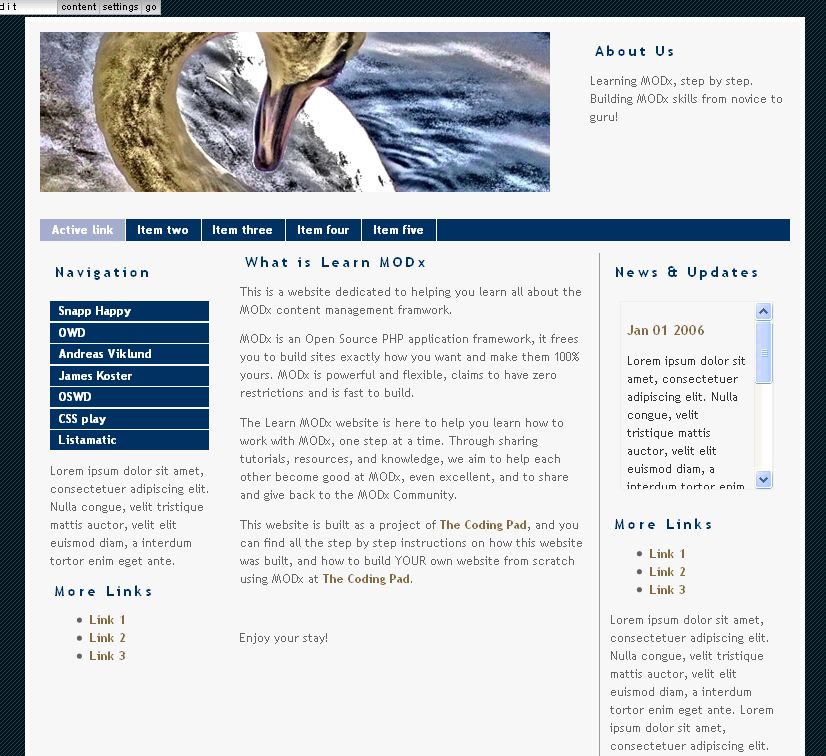
Our home page now has our custom text that we entered earlier on, and the main template content filler text is gone. Things are definitely looking up!
As you can see, our template is coming along great. We still need to work on our sidebars and navigation, but the site is taking shape. We’ve come a long way from our default simple install!
Summary
In this post, we started looking at templating MODx. We picked a HTML/CSS template to work with and looked at where to place the files in our MODx structure. We talked very briefly about some template tags and how to apply site variables and document variables to our template to display the site and page content and information using the template.
In the next post, we’re going to go further in our templating discussion and look at chunks and snippets. We will split our template into it’s various regions (header, footer, sidebar, etc), and we’ll also start implementing a site navigation system. So hang tight and stay subscribed so you don’t miss a thing!
Resources:
More Reading
I could not possibly cover all the details you need to know on tags, and templates, and all that. So here’s some more reading for you to reinforce and add to what you’ve learned today.
More About MODx Tags
List of Document Variables
Official MODx Documentation
Other places to find open source templates:
Snapp Happy
Open Source Web Design
Free CSS Templates
Andreas Viklund
Get Free Web Designs
Open Designs
For premium high quality templates for your production sites I recommend Themeforest.



As part of my learning curve, I set up a WAMP localhost on my PC at home, still have nightmares..I use this to make my mistakes on before duplicating the resources on the “real” site. It is a very simple site, if you like I could post the url. Could I run a latest version Revo alongside my current Evo localhost “test site”? Where do I learn more very basic Revo vs Evo stuff? I see these Tuts are Evo only, but both would be almost the same for the end user simply putting up pages and images… I would think. I’m 60… “new” is scary! Well.. challenging at least.
John
Yes you can install several sites on your WAMP localhost on your PC. So you could run a Revo install alongside your Evo install.
I have a series of Revo beginner tuts on this blog. Just go to the Beginner page (https://codingpad.maryspad.com/beginner-tutorials/). The Revo tuts are listed there.
To set up more than one site on your WAMP localhost, just create a folder for each site. Hope this makes sense
mary
Thanks Mary, I’ll give it a try.
This beginners tutorial is awful and outdated. You begin by saying to go to Tools and Configuration. There is a Tools menu but no config anywhere to be found. Installation was easy but it took me six pages of your introduction to get to the first thing. I have 100% blank page and cannot figure out a single thing.
Barry
Are you using MODX Evolution or Revolution? From the sounds of it you’re using Revolution. This set of tutorials is for MODX Evolution. If you are using MODX Revolution, you want to start with the tutorial here: https://codingpad.maryspad.com/2010/08/18/modx-revolution-for-beginners-part-1-introduction/ The full list of MODX Revolution tutorials can be found on this page -> https://codingpad.maryspad.com/beginner-tutorials/ Make sure you look at the Revolution series.
mary
Yes, Mary I am using:
MODX Revolution 2.2.4-pl (traditional)
I’ve spent hours today and have yet to see anything appear for my work. Very frustrating as you might guess. I came here for “Building a Website with MODx for Newbies” but I guess I am too much of a newbie to have known the difference between versions and your tutorial sites. I think I will delete and reinstall the installation as I have probably already mucked it up. Thank you.
Barry, sorry about the confusion. When I wrote that MODX for newbies tutorial I had no idea a completely new and different version of MODX would be released. If I had I would have titled them a bit more clearly.
Yes, good idea to reinstall and then start using the correct set of tutorials for MODX Revolution. Feel free to ask any questions in the comments, I normally respond within a day or two at most.
best
mary